Custom Fields
Accelero allows the creation of custom fields to customize the registration of some system entities. These fields enrich the solution by allowing adaptation to specific situations of each operation, without the need for code customization.
Navigation path: Advanced > Custom fields
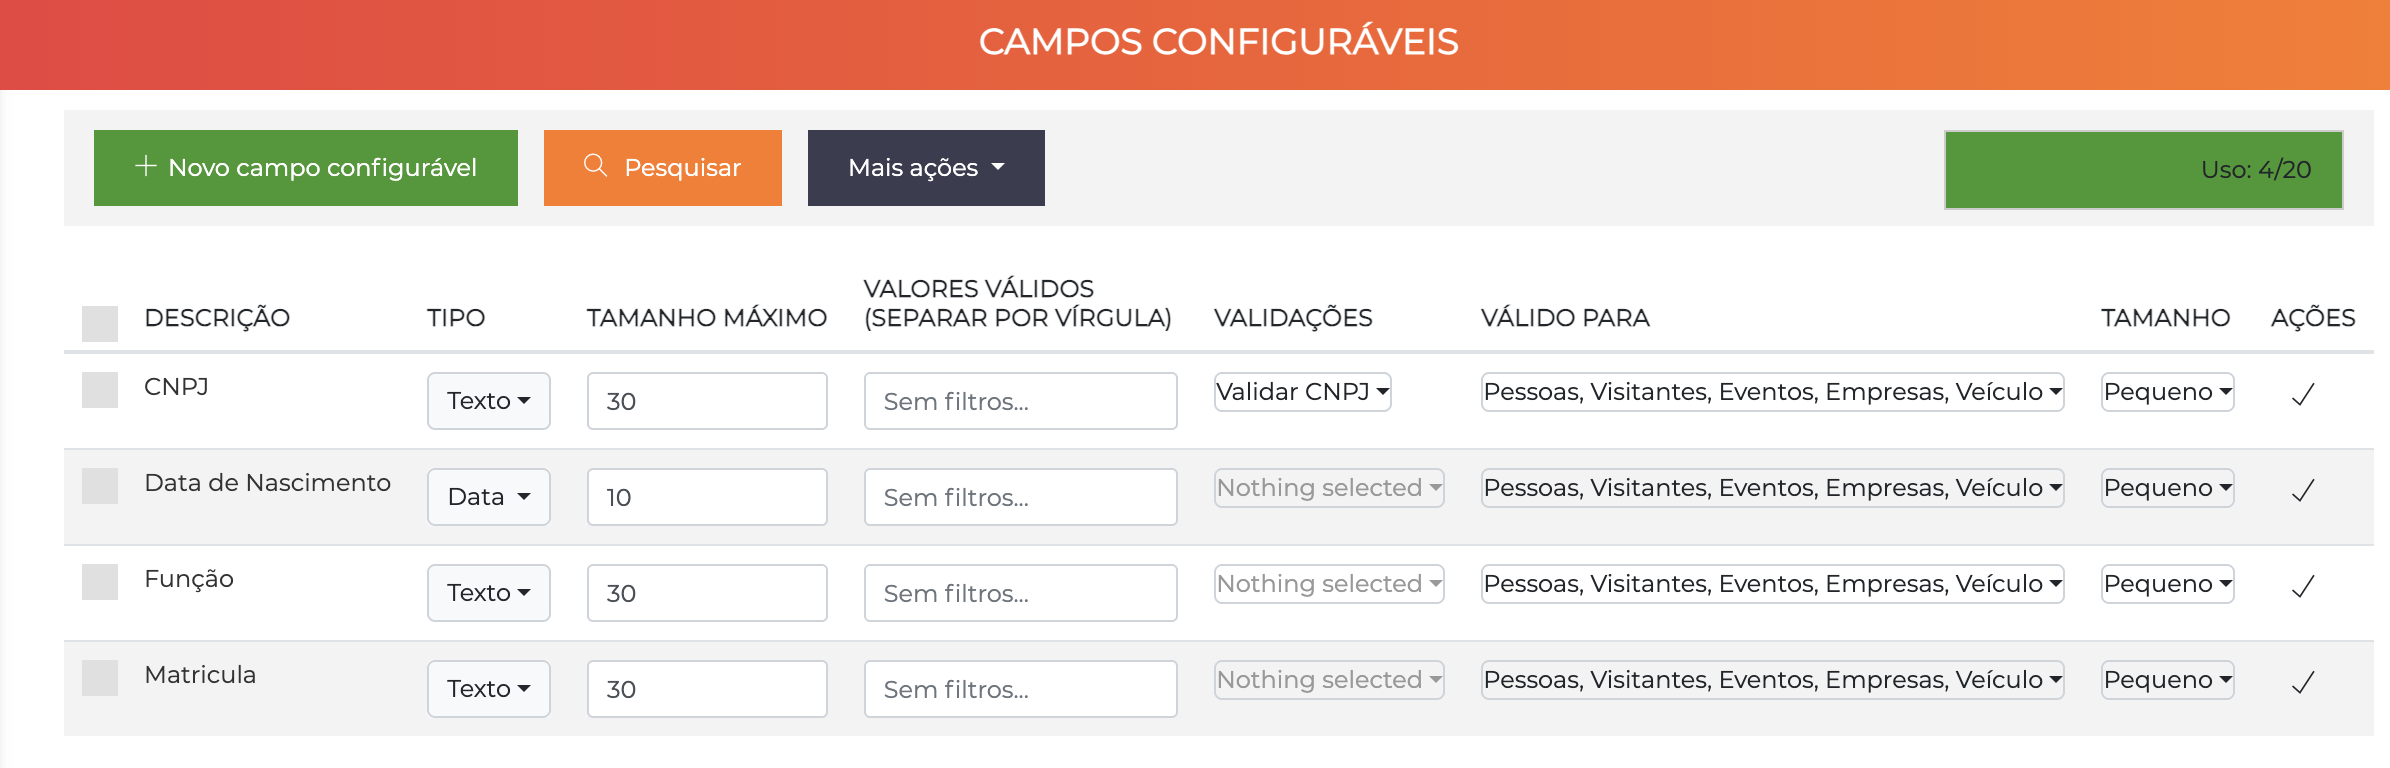
The list displays all custom fields with the columns Description, Type, Maximum size, Valid values, Validations, Valid for, Size and Actions. The badge in the upper right corner indicates the current usage relative to the license limit (e.g. Usage: 4/20).
Custom fields are edited directly in the list — each column of the row is editable, and the ✓ icon in the Actions column confirms the changes.
Overview
Custom fields allow you to add customized information to the system's standard registrations, adapting it to the specific needs of the operation.
Usage examples:
- Internal enrollment number (people)
- Department or role (people/companies)
- Validated CNPJ as an additional field
- Date of birth for internal control
- Special vehicle type (vehicles)
- Authorization number (events)
How to Create a Custom Field
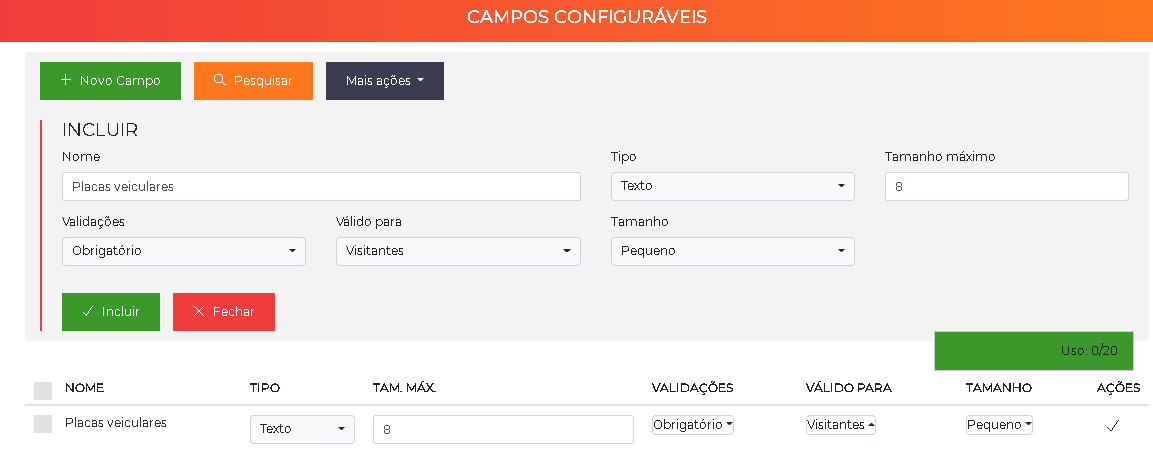
Custom fields allow you to add information that does not exist natively in Accelero — for example, requiring the vehicle plate in the visitor registration.
- Go to
Advanced > Custom fields. - Click + New field. The creation screen is displayed.
- Fill in the configuration fields:
- Name: name of the field that will appear on the screen.
- Type: defines whether the field accepts text, numbers, date or list.
- Maximum size: number of characters allowed.
- Validations: defines whether filling is required or optional, plus format validations (CPF, CNPJ).
- Valid for: the entities to which the rule applies (People, Visitors, Events, Companies, Vehicle).
- Size: width of the field on the screen.
- Click Add to finish.
How the Field Appears in the Registration
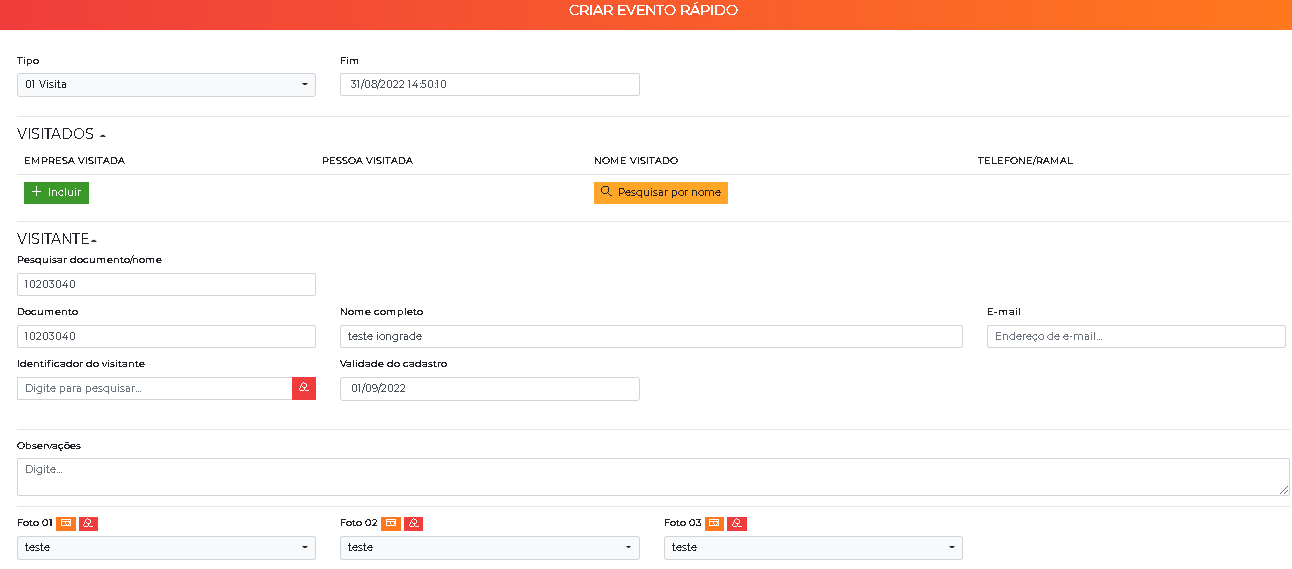
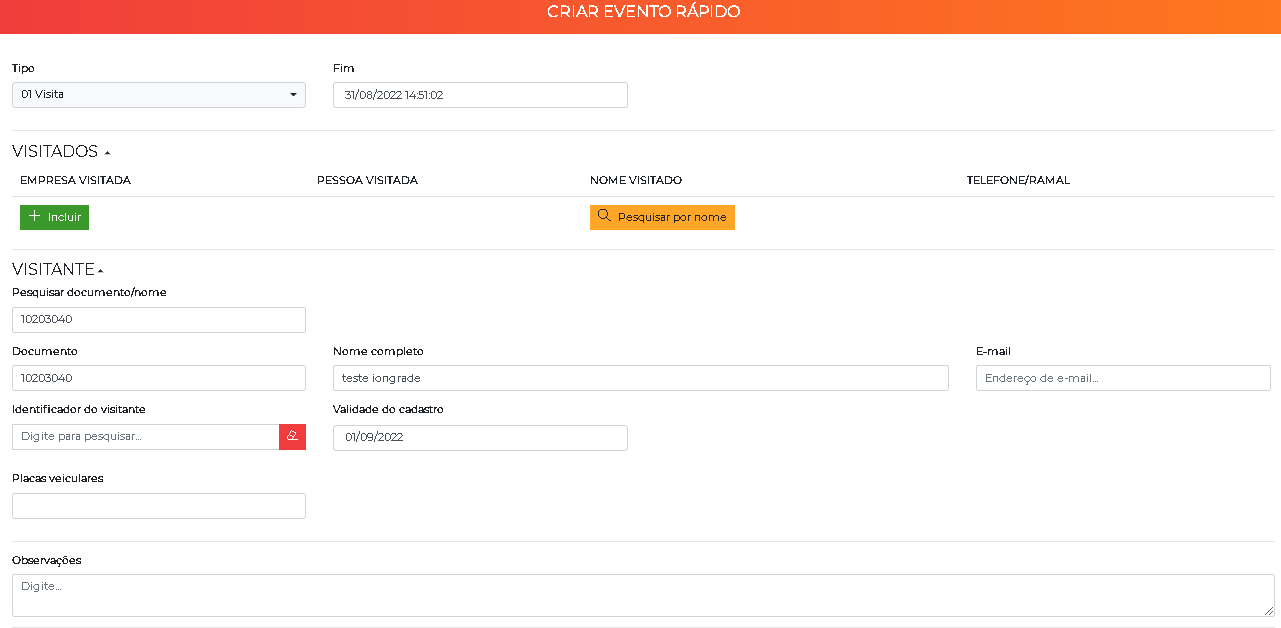
Once created, the field starts to be displayed in the registration of the entities selected in Valid for. In the example below, a vehicle plates field is added to the visitor registration.
Before the field is created, the registration does not show the item:
After creation, the field starts to appear automatically in the registration:
Field Configuration
Each custom field has the following settings:
| Column | Description |
|---|---|
| Description | Name that will appear on the screen to identify the field |
| Type | Data type: Text, Numeric, Date or List |
| Maximum size | Maximum number of characters allowed |
| Valid values | For the List type: available options separated by comma |
| Validations | Validations applied when saving (e.g. Validate CNPJ, required) |
| Valid for | Entities in which the field should appear: People, Visitors, Events, Companies, Vehicle |
| Size | Width of the field on the screen: Small, Medium or Large |
Field Types
Text
Accepts free text input with a configurable maximum size.
Usage examples: department name, notes, external reference code, role
Numeric
Accepts only numeric values.
Usage examples: enrollment number, phone extension, cost code
Date
Accepts input in date format.
Usage examples: date of birth, document expiration date, admission date
List
Presents a list of predefined options for selection. The values are registered in the Valid values column, separated by comma.
Example: Administrative,Operational,Financial,IT
Usage examples: department (fixed list), document type, reason for visit, risk classification
Available Validations
Validations ensure the quality of the entered data. The Validations field presents available options according to the field type, such as:
| Validation | Description |
|---|---|
| Validate CNPJ | Checks whether the entered value is a valid CNPJ |
| Validate CPF | Checks whether the entered value is a valid CPF |
| Required | Field must be filled in to save the registration |
Display Sizes
| Size | Recommended Use |
|---|---|
| Small | Short codes, numbers, acronyms |
| Medium | Medium texts, short descriptions |
| Large | Long texts, extensive notes |
Where the Fields Appear
Custom fields appear in a specific section on the registration screens of the selected entities, always organized in alphabetical order by description.
Entities That Support Custom Fields
- People: Additional fields in the registration of employees and residents
- Visitors: Complementary data in the visitor registration
- Events: Additional information linked to the event
- Companies: Specific data of registered companies
- Vehicles: Complementary information of vehicles
Custom fields are always displayed in alphabetical order by description, regardless of the order of creation. To control the display order, use numeric prefixes:
1. Department2. Enrollment3. Notes
Practical Examples
Example 1: Person Enrollment
Description:   Enrollment
Type:          Text
Max. size:     30
Validations:   (none)
Valid for:     People
Size:          Small
Result: The "Enrollment" field appears in the person registration for internal identification.
Example 2: Validated CNPJ
Description:   CNPJ
Type:          Text
Max. size:     30
Validations:   Validate CNPJ
Valid for:     People, Visitors, Events, Companies, Vehicle
Size:          Small
Result: CNPJ field with automatic format validation when saving.
Example 3: Authorization Number for Events
Description:   Authorization Number
Type:          Numeric
Max. size:     10
Validations:   Required
Valid for:     Events
Size:          Small
Result: When registering events, it will be mandatory to provide an authorization number.
Example 4: Department as a List
Description:   Department
Type:          List
Valid values:  Administrative,Operational,Financial,IT,HR
Validations:   (none)
Valid for:     People
Size:          Medium
Result: "Department" field with selection restricted to the predefined options.
Important Precautions
Be careful when creating required fields in systems that already have existing registrations.
Problem: Old registrations will not have the new field filled in. Any attempt to edit these registrations will fail until the field is filled in.
Recommended solution:
- Create the field as optional initially
- Fill in the field in the existing registrations (manually or via API)
- Only then configure the field as required
Integration with Other Features
Event Types
Custom fields can have default values defined in Event Types. When creating an event of that type, the fields will already come pre-filled automatically, speeding up repetitive processes.
See Events - Event Types for more details.
API and Integrations
Custom fields are accessible via API for reading and writing values. The same validations configured in the system are also applied in operations via API.
Best Practices
- Descriptive names: Use clear names that easily identify the purpose of the field
- Plan before creating: Define which fields are really necessary before creating them — there is a license limit
- Avoid required fields in active systems: Always create them as optional first
- Use the appropriate type: Prefer List when the options are fixed, as it ensures data consistency
- Realistic maximum size: Configure a size that accommodates all expected values, but without excess
- Periodic review: Remove fields that are no longer used to free up license usage