Controllers
Controllers are the physical access control devices. All controllers in use must be reported to ACCELERO so that they can connect to the server and perform the physical control of passages.
They are the devices installed near the access points (doors, turnstiles, gates, tourniquets) and validate the credentials presented (cards, biometrics, QR Code, etc.).
Navigation path: Settings > Controllers
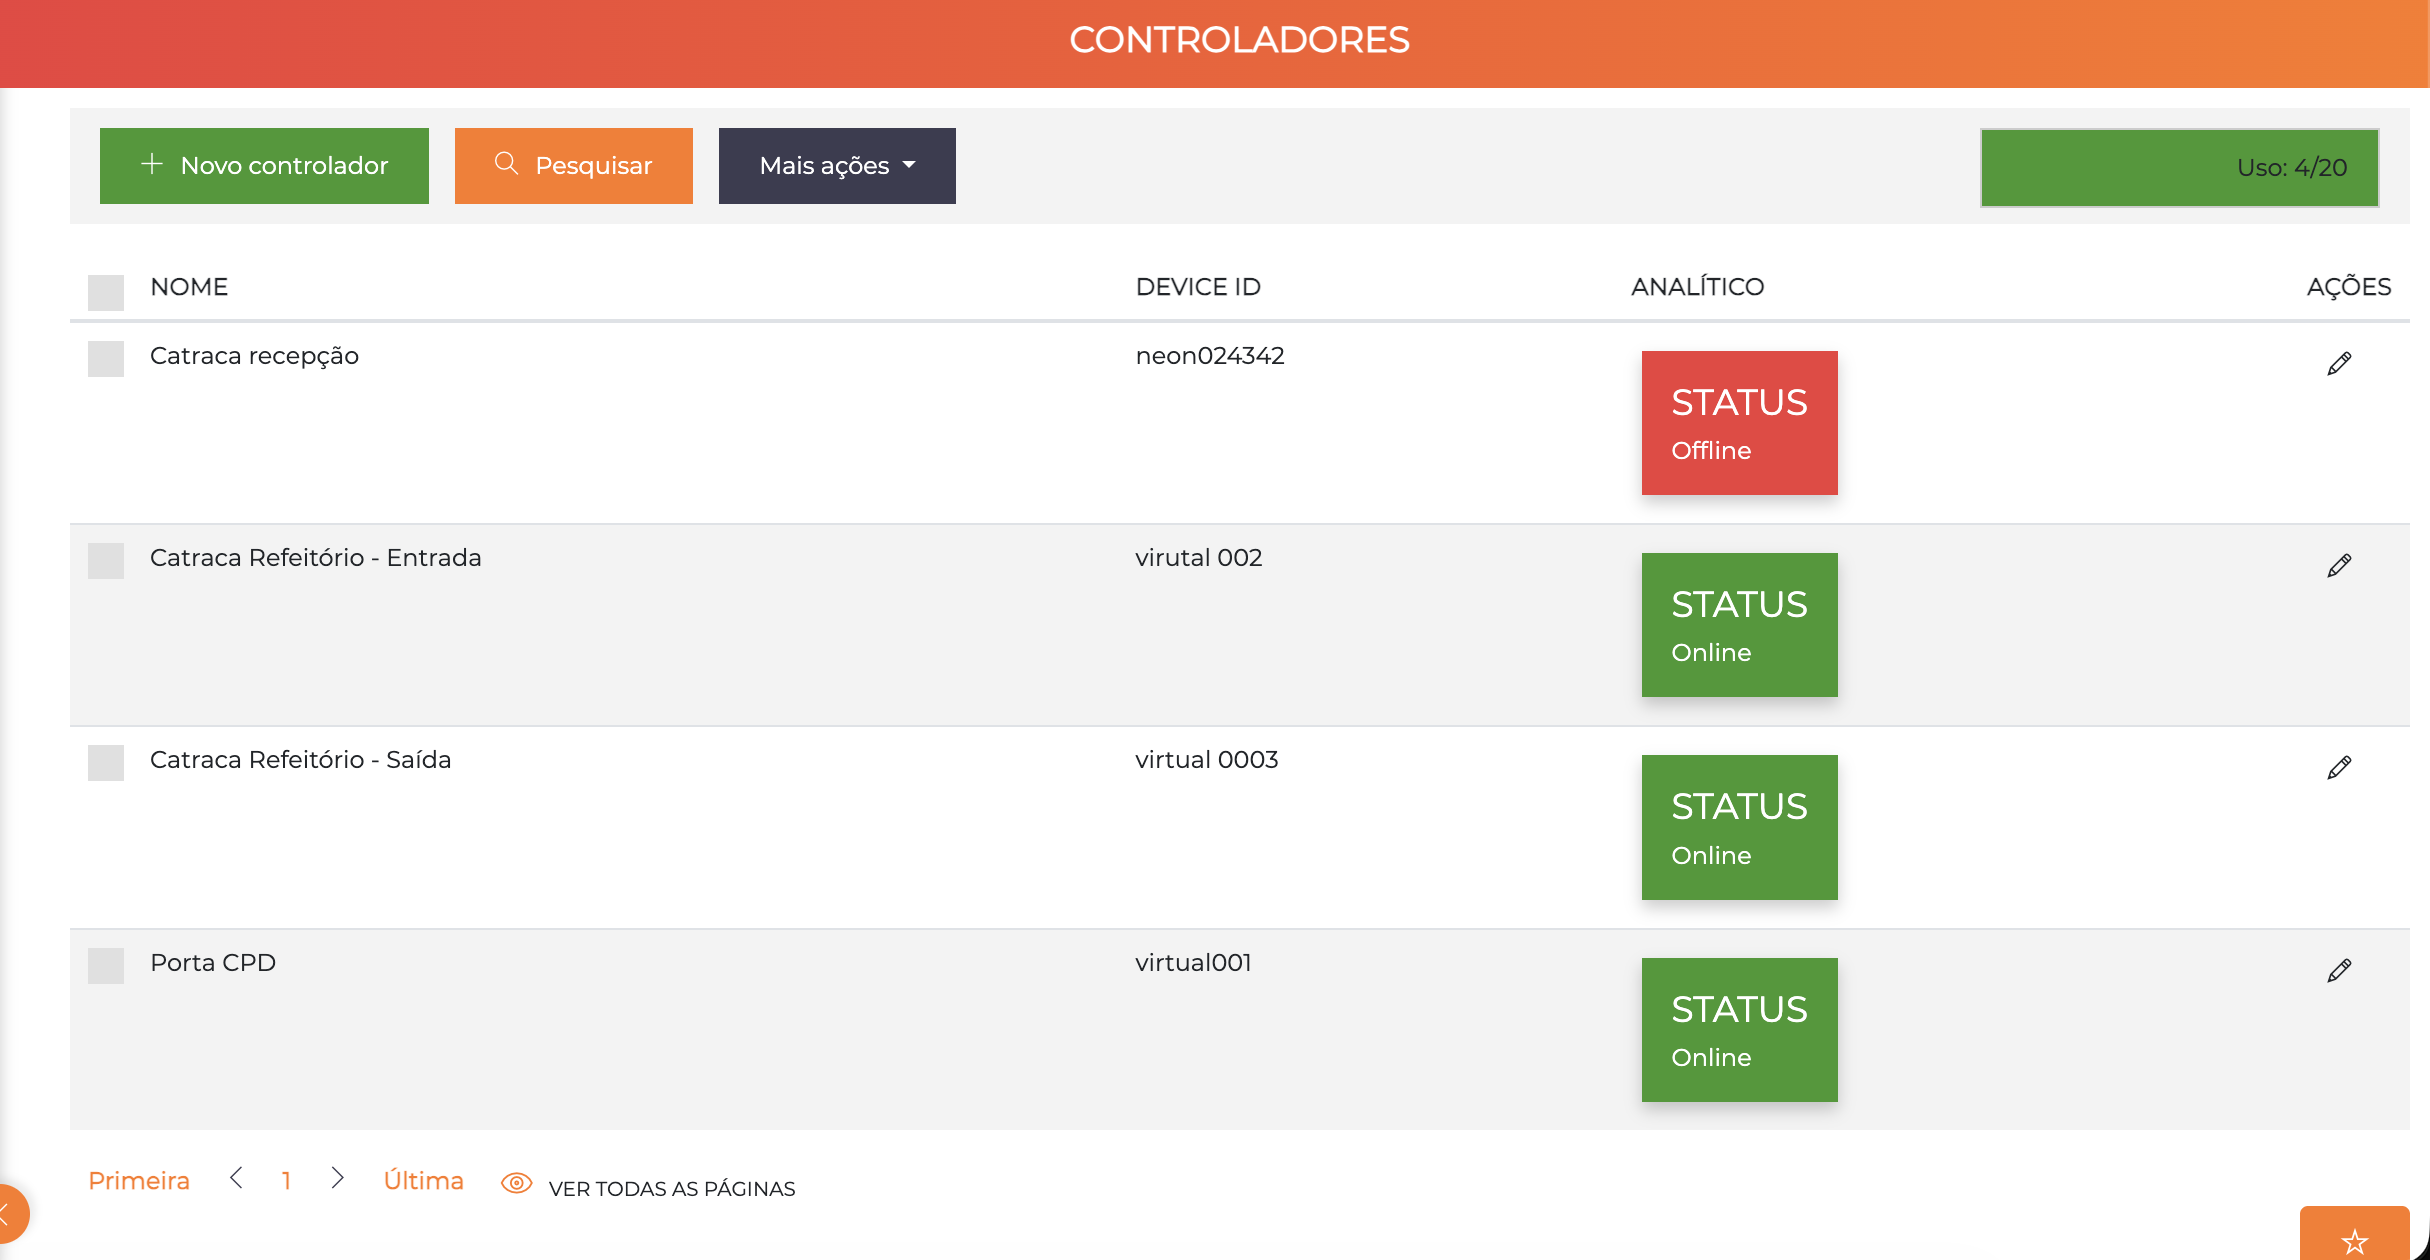
The list displays all registered controllers with the columns Name, Device ID, Analytical (Online/Offline status badge) and Actions. The badge in the upper right corner indicates the current usage relative to the license limit.
Controller Creation
When you click "+ New controller", the creation screen is displayed:
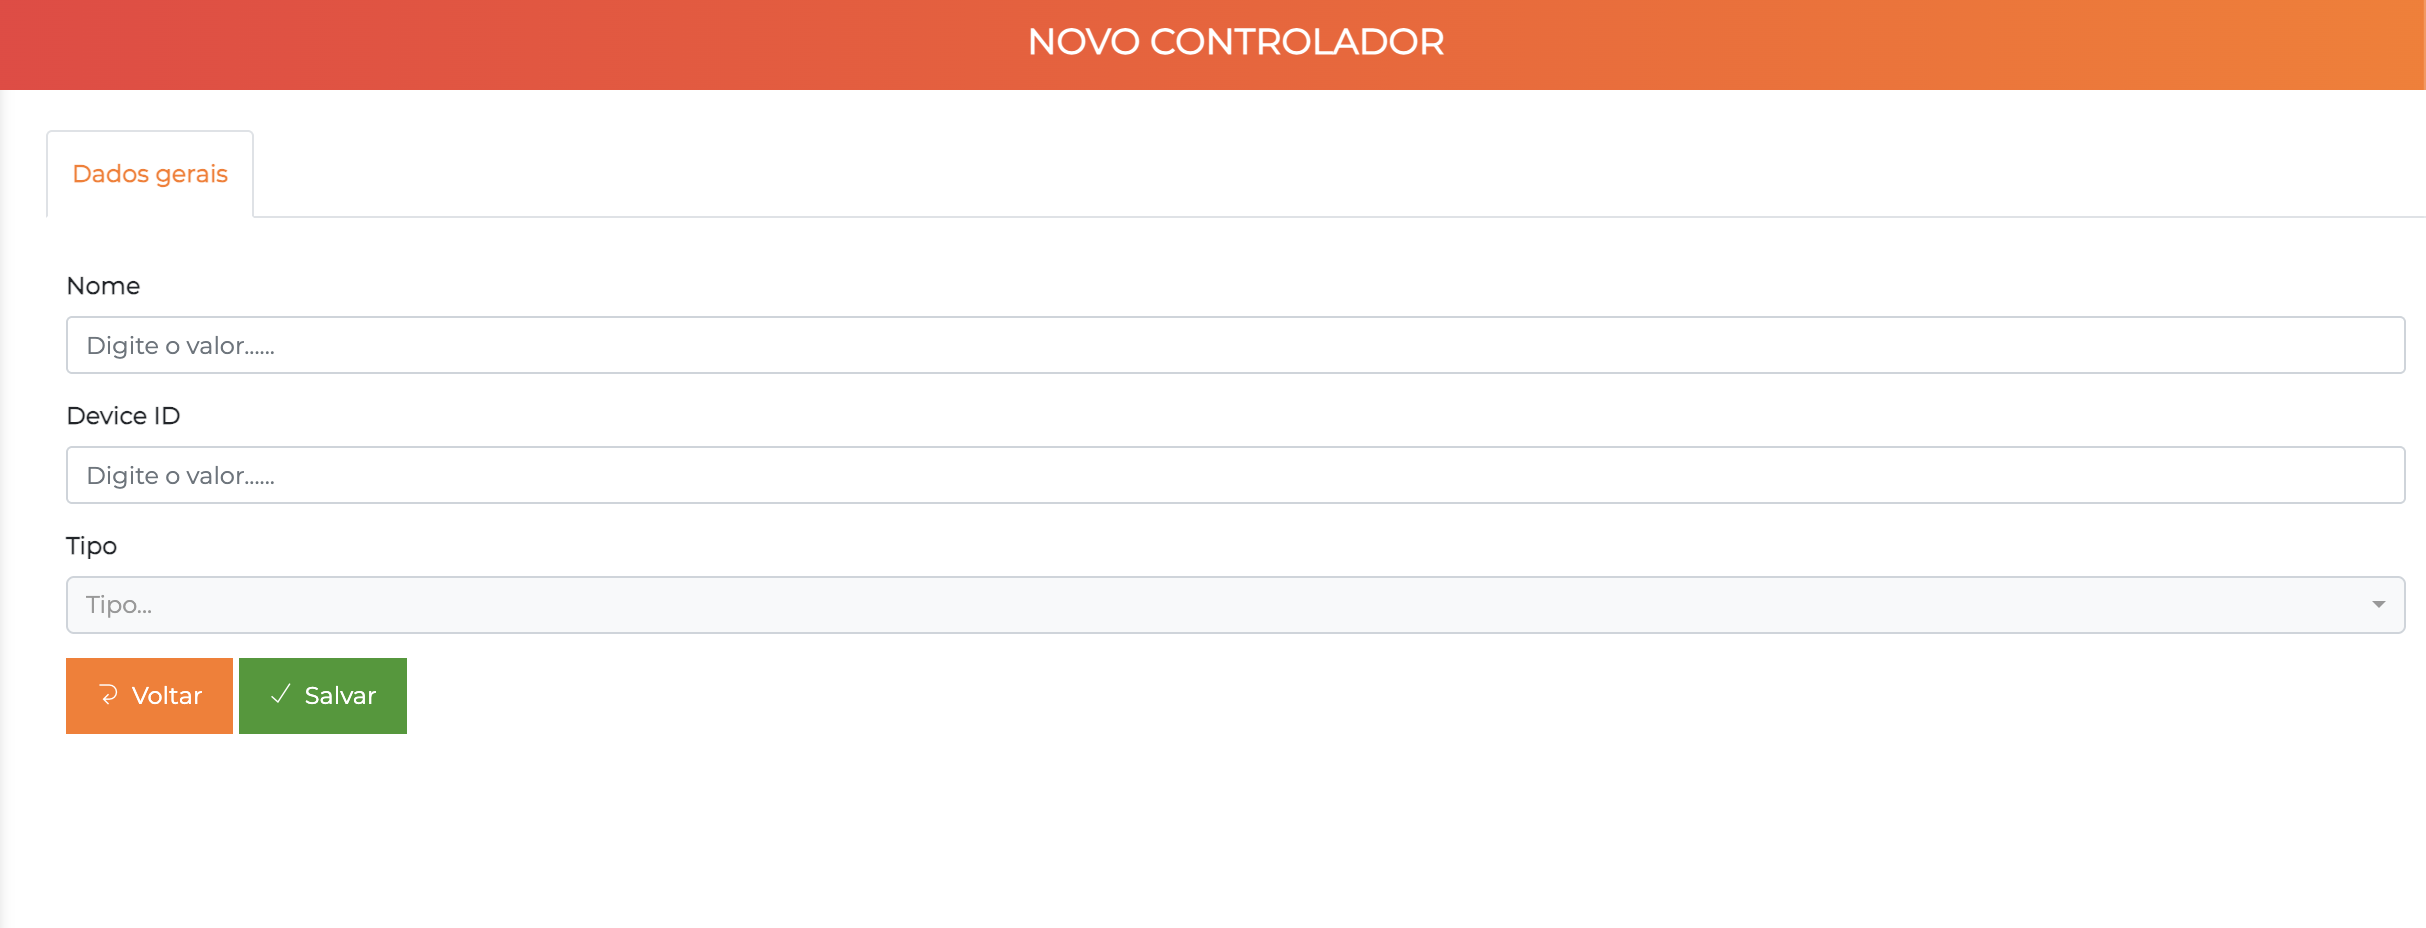
| Field | Description |
|---|---|
| Name | Name of the controller that will be shown in all logs and reports |
| Device ID | Unique identification of the controller. Must be obtained from the access controller itself |
| Type | Controller model (Neon, Cobalt, etc.) |
After creating the controller, click the pencil icon in the list to access the full edit screen with all tabs and settings.
Controller Types
ACCELERO supports several controller models. Among them:
- Neon — Standard Iongrade controller
- Cobalt — Controller with support for mixed mode (I/O + access), allowing the same device to be used for access control and monitoring of inputs/outputs (I/O)
Edit Screen
The controller edit screen is organized into 3 tabs: General data, Channels and Advanced.
Tab: General Data
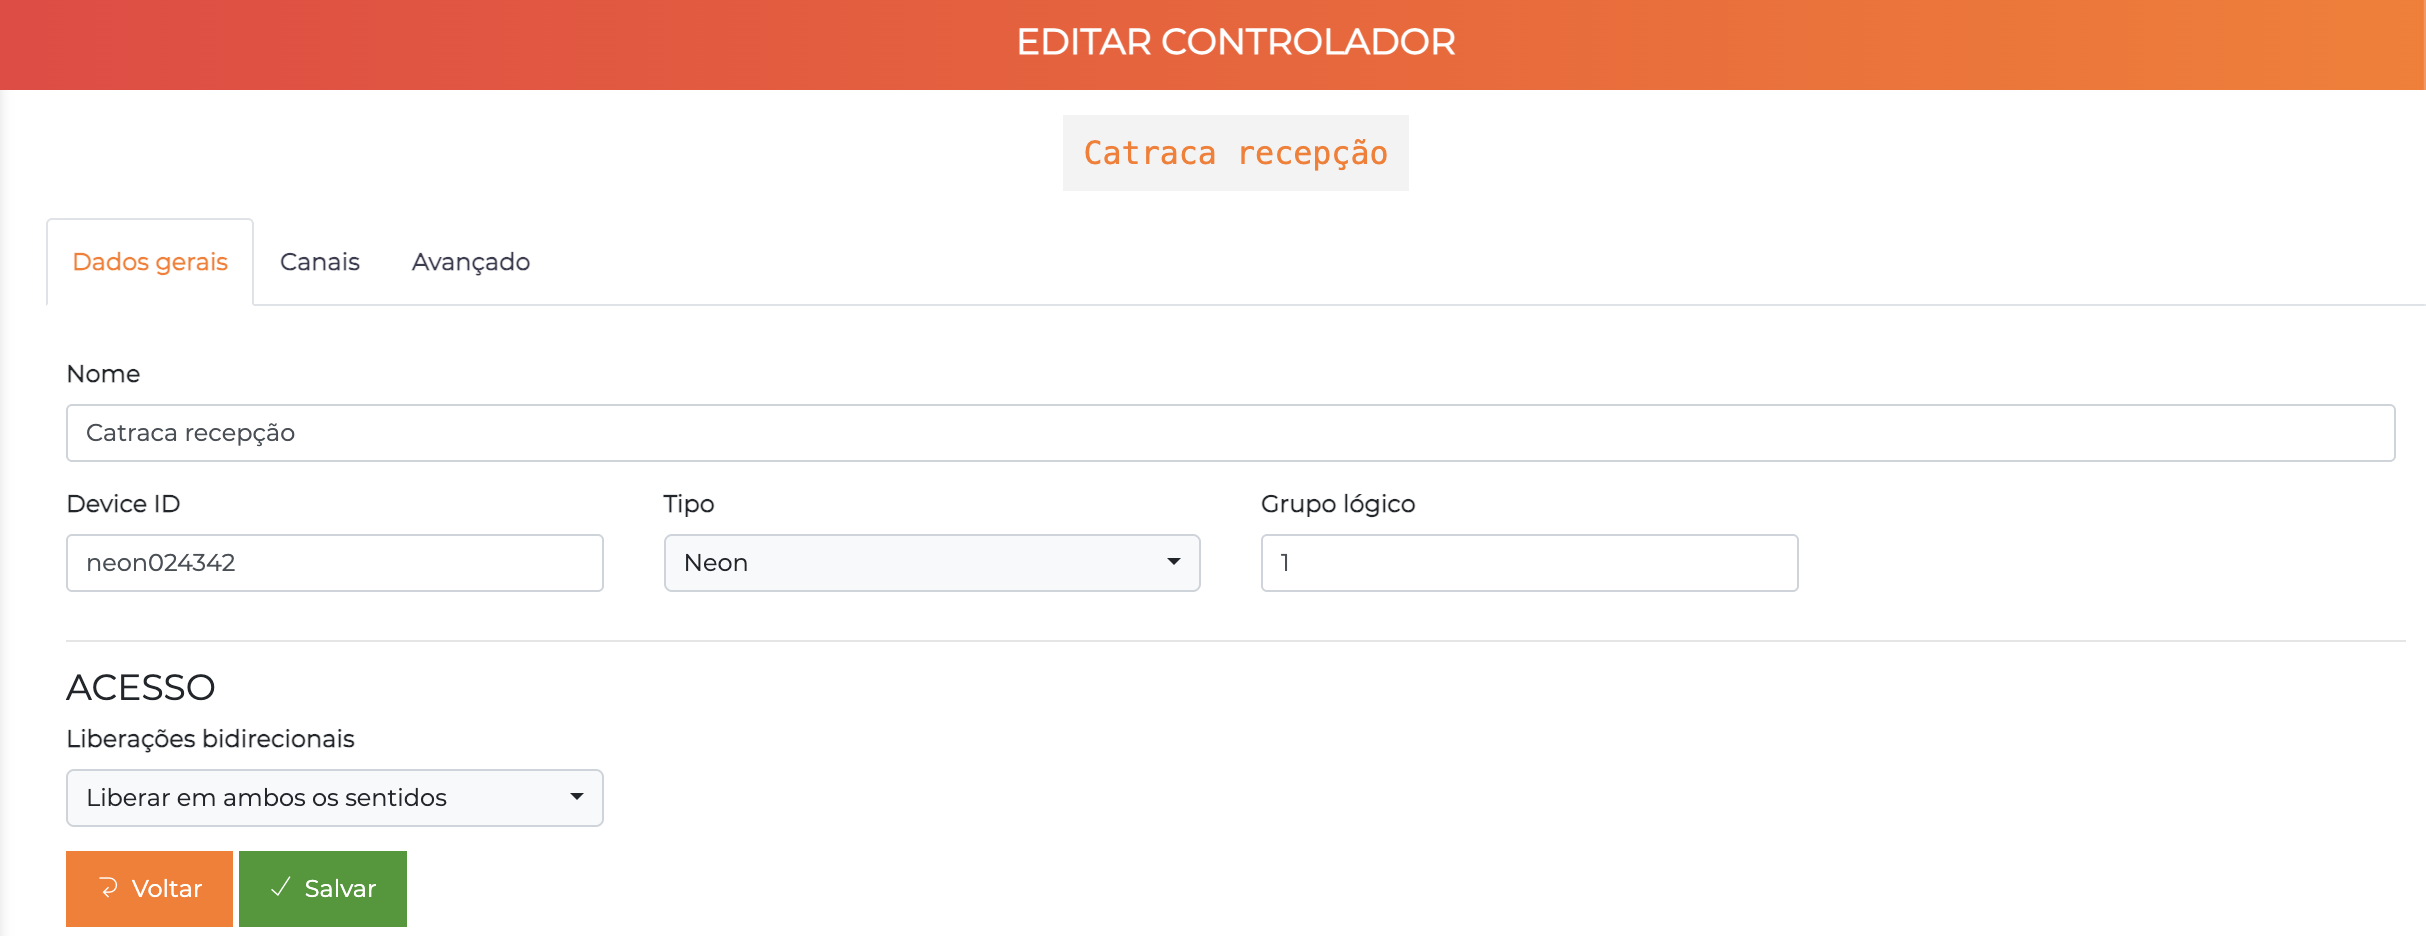
| Field | Description |
|---|---|
| Name | Name of the controller |
| Device ID | Unique identification of the controller |
| Type | Controller model (dropdown) |
| Logical group | Logical grouping of the controller |
Section: Access
| Field | Description |
|---|---|
| Bidirectional releases | Defines the bidirectional release behavior of the controller (e.g. "Release in both directions") |
Bidirectional Blocking Mode
The bidirectional blocking mode is used in bidirectional turnstiles with a single reader and without anti-passback enabled. When it detects the identifier, the turnstile releases in both directions, allowing the user to perform the entry or exit passage.
- The controller's physical wiring must be done according to the bidirectional scenario before adjusting the system.
- The area in which the bidirectional release will be applied cannot have anti-passback enabled.
Enabling it in Accelero involves two adjustments:
-
Enable the feature globally — go to
Advanced > System > System - Advanced, open the Security tab and check the Bidirectional accesses option. With this option checked, the turnstile will always release in both directions.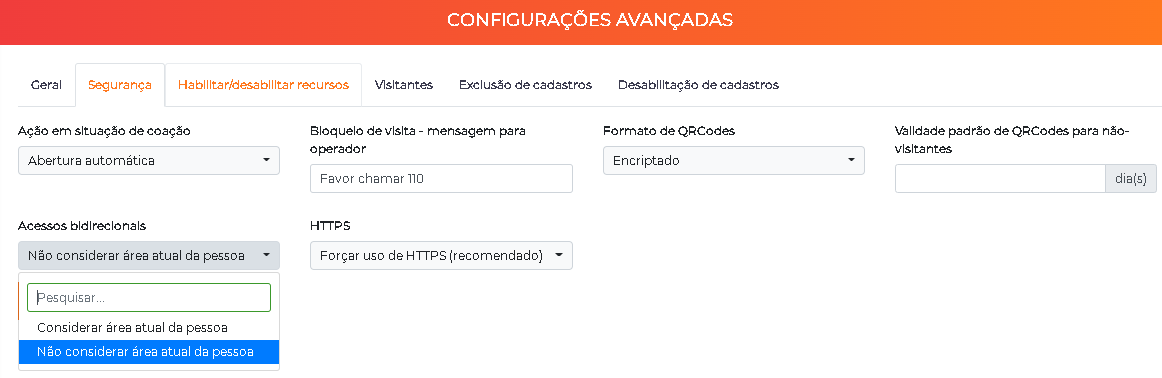
-
Configure the controller — go to
Settings > Controllers, click the pencil of the desired controller and, in the General data tab, verify that the Bidirectional releases field is set to Release in both directions.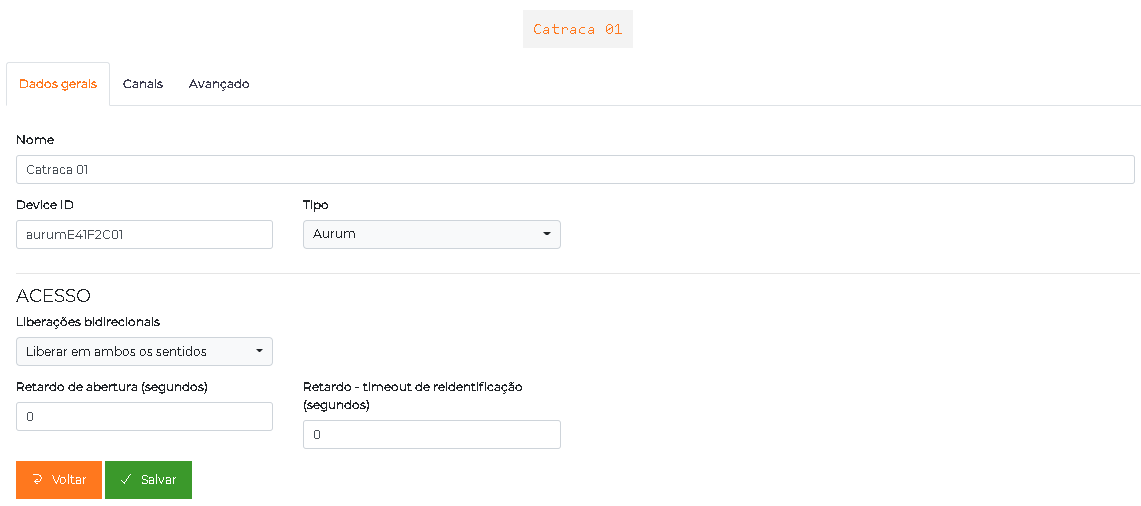
Tab: Channels
Each controller has channels. A channel represents a direction of passage — for example:
- Channel 1: Entry (Indoor → Reception)
- Channel 2: Exit (Reception → Indoor)
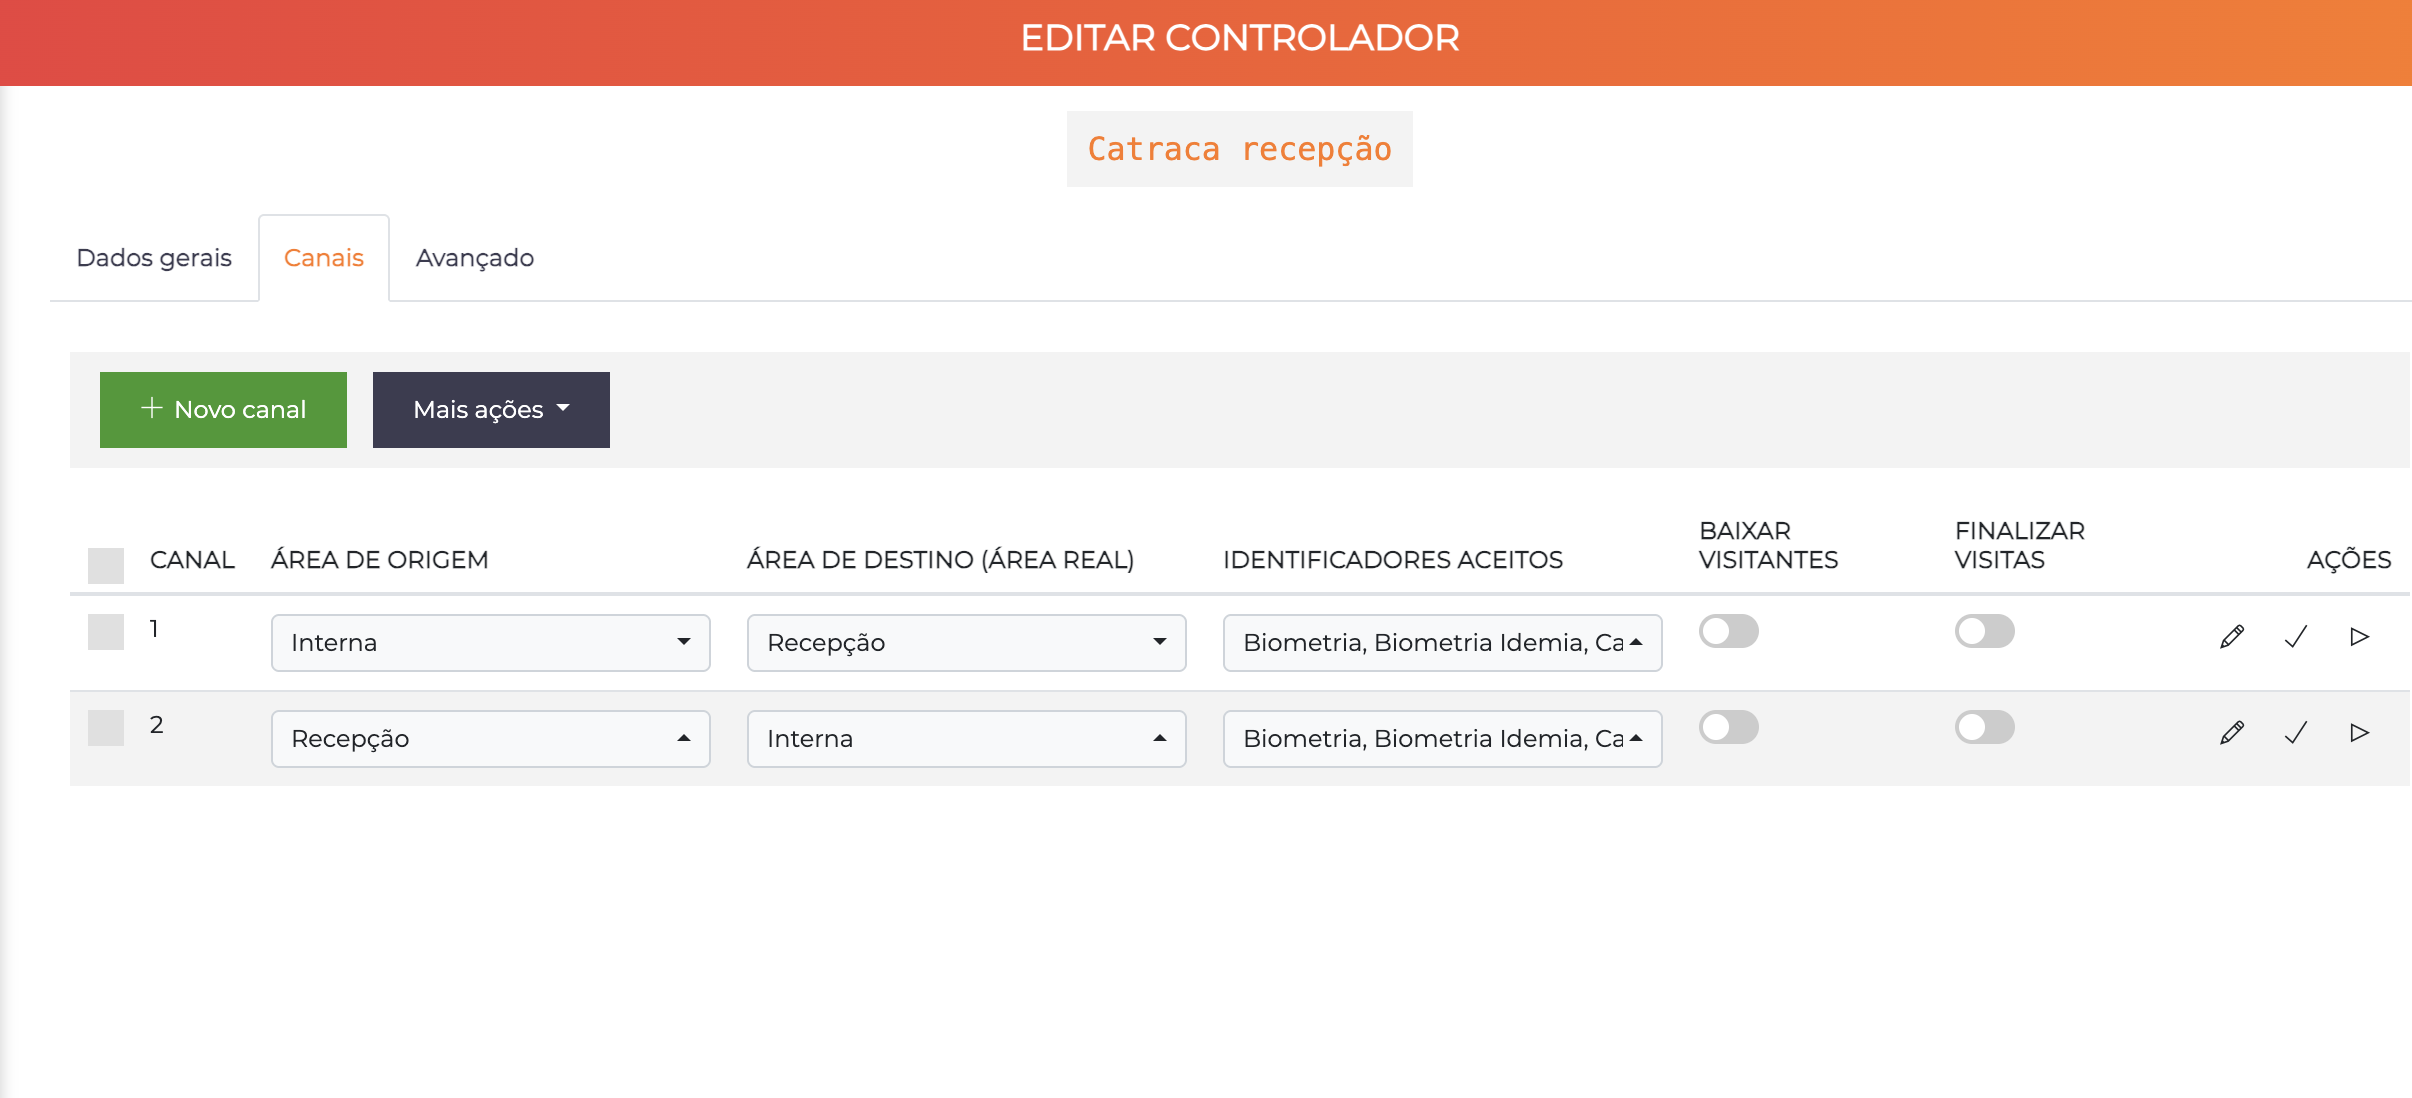
The channel list allows direct configuration of the most common parameters:
| Column | Description |
|---|---|
| Channel | Channel number |
| Source area | Area the person is coming from |
| Destination area (real area) | Area the person is going to. The system will check occupancy and anti-passback in this area |
| Accepted identifiers | Which types of identifier will be accepted on this channel |
| Deregister visitors | If enabled, visitor-type identifiers will be disassociated after passage |
| End visits | If enabled, visits will be ended after passage |
| Actions | Edit (pencil), confirm (check) and allow passage/REX (play) |
The "+ New channel" button lets you add channels to the controller.
The play button in the channel list sends a remote opening command to the controller on that specific channel. Useful when the operator needs to manually release the passage.
Full Channel Configuration
When you click the pencil of a channel, the full edit screen is displayed with all available options, organized into two tabs: General data and Inverted QRCode.
Tab: Channel General Data

Basic Settings
| Field | Description |
|---|---|
| Description | Description of the channel |
| Enable printer | Enables the use of an on-board printer on this channel for printing QR Codes |
| Source area | Defines the source area of the channel |
| Destination area (real area) | Defines the destination area of the channel. After passage confirmation, the person's current area will be updated to this area |
Virtual Destination Area
| Field | Description |
|---|---|
| Virtual destination area (access prerogatives) | If configured, this area will be used for access policy checking (except anti-passback and occupancy). If blank, the real destination area will be used for all checks |
The virtual area allows multiple floors to share the same access policy. For example: the person accesses "Floor 5" but the policy is validated against "Administrative Area".
Area Update Control
| Field | Description |
|---|---|
| Update area after passage | If active, the person's area will be updated normally. Default and recommended behavior. If turned off, the area will remain unchanged (logs are generated normally) |
| Update occupancy area after passage | If active, the occupancy area will be updated normally. Default behavior |
| Do not update area after vehicle passage | When enabled, vehicle passage will not update the vehicle's current area |
Occupancy Control
| Field | Description |
|---|---|
| Control occupancy via | Defines whether occupancy control will be by the Real physical area (recommended) or by the Occupancy area (sub-area scenarios) |
Visitor Control
| Field | Description |
|---|---|
| Deregister visitors | Visitor-type identifiers will be disassociated after passage. Typical use: card collection urns |
| End visits | Visits will be ended after passage. Typical use: QR Code reader at the exit |
Security Control
| Field | Description |
|---|---|
| Require password | Requires entering a personal password for access validation |
| Check-in channel | When enabled, the system will check in visitors with the "Registered" status and issue notifications according to configuration |
Escort Control
| Field | Description |
|---|---|
| Control escort | Enables escort control on this channel |
| Categories authorized to be escort on the channel | Categories accepted as escort |
| Perform passage of escorted + escort | Determines whether the escort will also have their passage confirmed. Common at doors where both pass through the blocking point |
The escort system requires an authorized person (the escort) to accompany a person with restrictions. For example: visitors can access certain areas only if escorted by an employee.
Elevator Integration
This feature is available only if the elevator integration module is enabled in the license.
| Field | Description |
|---|---|
| Enable elevator integration | Enables the early call of elevators for accesses on this channel |
| Access delay for early call (ms) | Delay time in releasing the blocking point so that the user interacts with the terminal |
| Gateway | Communication gateway for the early call |
| Source floor | Physical floor where the blocking point is located |
| Terminal Device ID | Identification of the message display terminal |
Dual Custody
This feature is available only if the dual custody module is enabled in the license.
| Field | Description |
|---|---|
| Dual custody | Defines that accesses on this channel will require two authorized people to present credentials in sequence. Typical use: safes, high-security rooms |
Tab: Inverted QRCode

Allows the DirectPass user to scan a physical QR Code to make an access request, inverting the operational flow. Useful in situations where you do not want to use physical readers.
| Field | Description |
|---|---|
| Start validity | Start date/time when the QR Code can be used |
| End validity | End date/time when the QR Code can be used |
| Source control | If enabled, it will check the user's source area when validating the request |
Inverted QR Codes can be created and deleted at any time, and changes take effect immediately.
Tab: Advanced
The Advanced tab displays technical information reported by the controller.
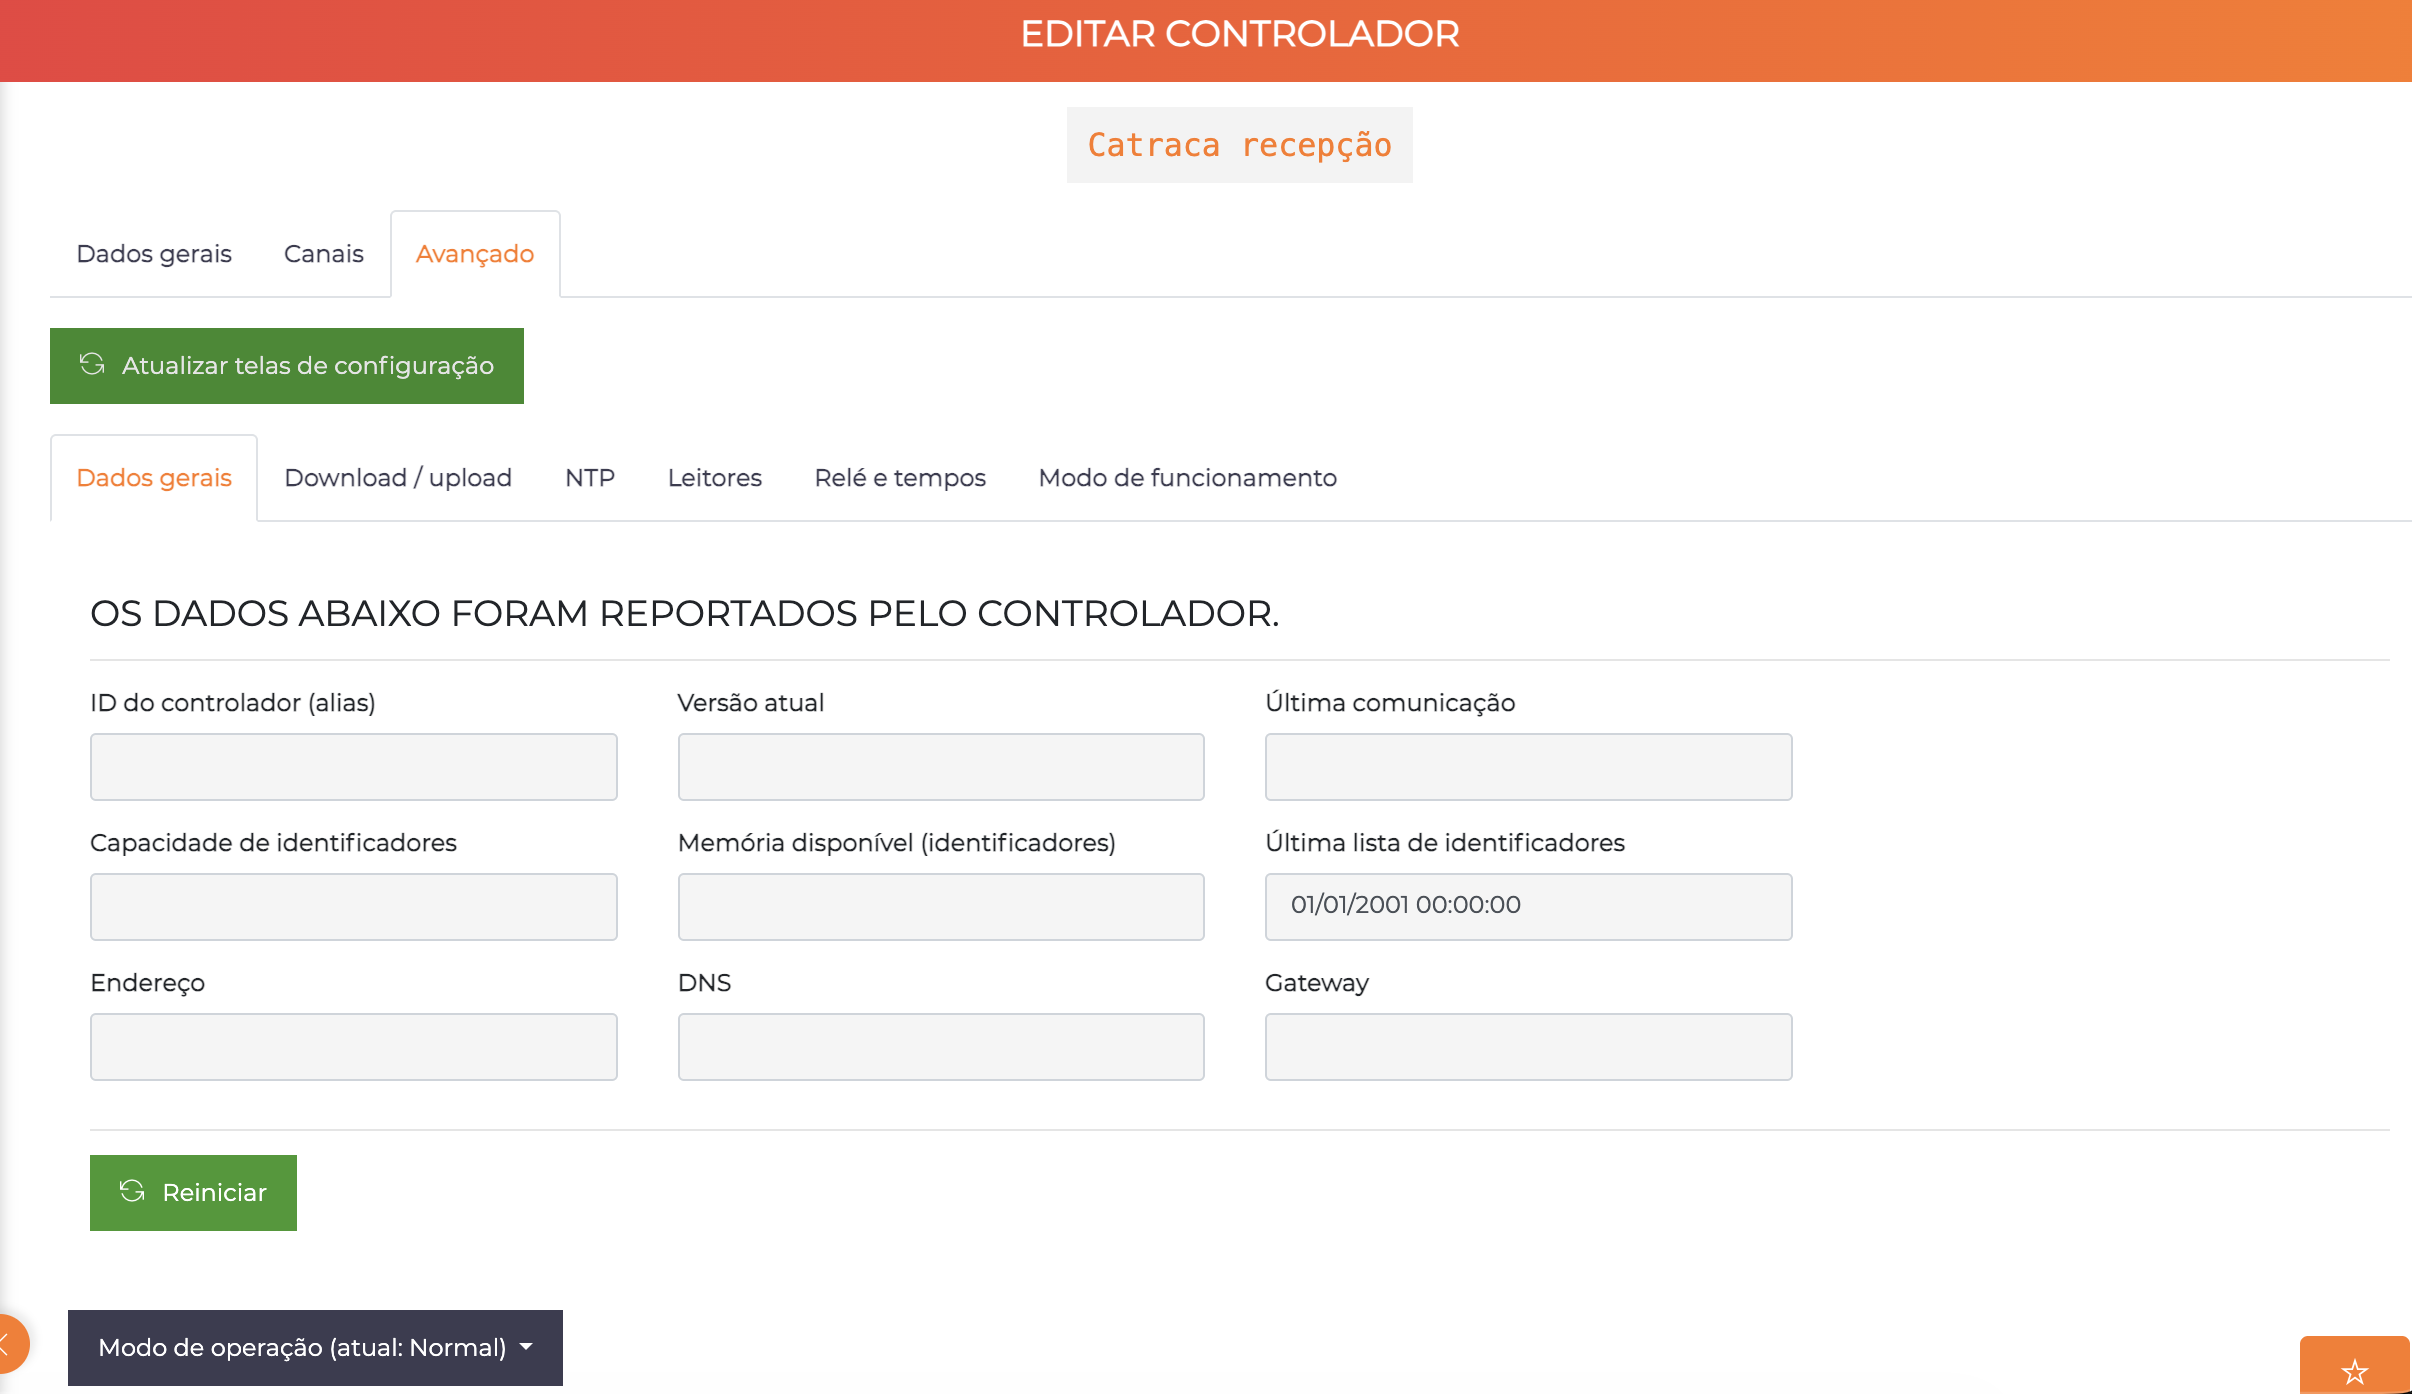
The "Update configuration screens" button forces the update of the data reported by the controller.
The tab has 6 sub-tabs: General data, Download/upload, NTP, Readers, Relay and timing, Operation mode.
Sub-tab: General Data
Displays the data reported by the controller:
| Field | Description |
|---|---|
| Controller ID (alias) | Internal identification of the controller |
| Current version | Firmware version in operation |
| Last communication | Date/time of the last communication with the server |
| Identifier capacity | Maximum number of identifiers supported |
| Available memory (identifiers) | Memory available for identifiers |
| Last identifier list | Date/time of the last identifier list submission |
| Address | IP address of the controller |
| DNS | Configured DNS server |
| Gateway | Configured network gateway |
The "Restart" button lets you restart the controller remotely.
The "Operation mode" button (in the footer) lets you change the controller's operation mode (e.g. Normal, Contingency).
For more information about the technical data specific to each model, consult the controller manufacturer's manual.
Sub-tab: Readers
The Readers sub-tab lets you configure the anti-repetition time per channel. This feature prevents the system from processing the same identifier twice in a row within the defined interval, avoiding duplicate reads at the same blocking point.
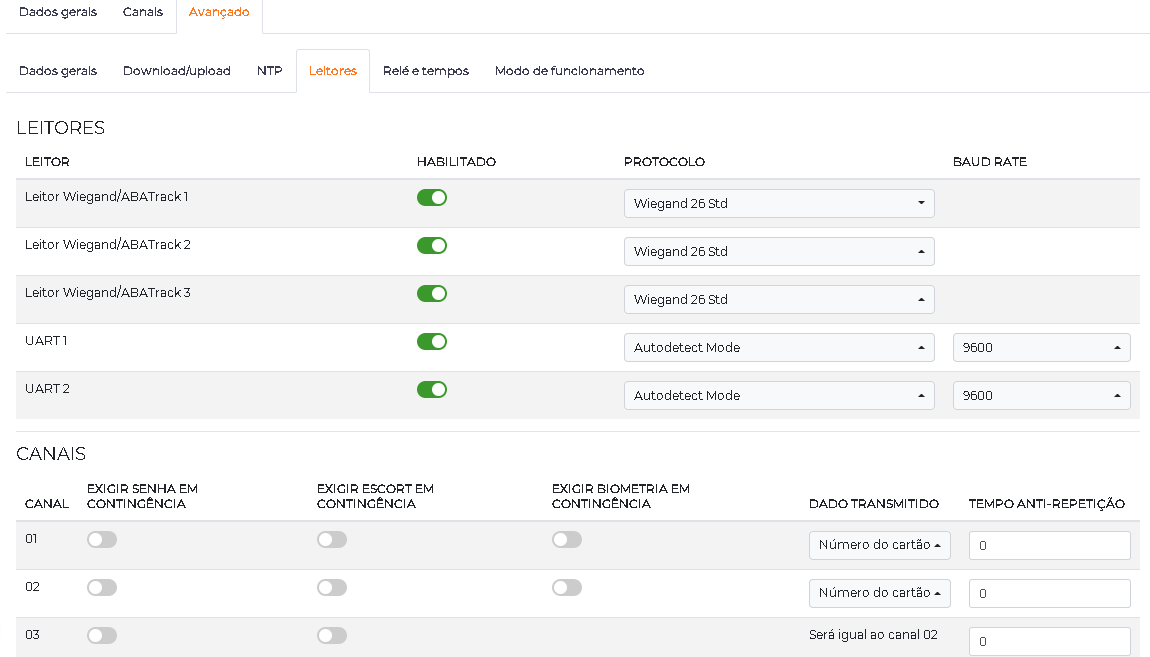
To configure:
- Go to
Settings > Controllers, click the pencil of the desired controller and open the Advanced > Readers tab. - Click Edit to unlock the editing of the fields.
- Enter the anti-repetition time for the desired channels. The value can be applied considering the identifier data or the user data.
- Click Save.
The anti-repetition time is entered in seconds. For 1 minute, for example, enter 60.
I/O on Controllers
You can use and monitor the inputs/outputs (I/O) of common controllers, not just specific I/O controllers. The Cobalt controller has native support for mixed mode (I/O + access).
See I/O and Automation for more details.
Configuration Examples
Entry Turnstile - Reception
Name: Turnstile 01 - Reception Entry
Device ID: NEON-00123456
Type: Neon

Channel 1 - Entry:
  Source area: Outdoor Area
  Destination area: Elevator Hall
  Accepted types: Permanent Card, Visitor Card, QR Code, Facial
  Check-in channel: ✅
  Update area: ✅
Characteristics: Main entry channel with support for multiple identification types and automatic visitor check-in.
Exit Turnstile - Reception
Name: Turnstile 02 - Reception Exit
Device ID: NEON-00123457
Type: Neon

Channel 1 - Exit:
  Source area: Elevator Hall
  Destination area: Outdoor Area
  Accepted types: Permanent Card, Visitor Card, QR Code
  End visits: ✅
  Deregister visitors: ✅
  Update area: ✅
Characteristics: Exit channel that automatically ends visits and collects visitor cards.
Restricted Area Door
Name: Vault Room Door
Device ID: NEON-00123458
Type: Neon

Channel 1 - Vault Room Entry:
  Source area: Administrative Corridor
  Destination area: Vault Room
  Accepted types: Permanent Card
  Require password: ✅
  Dual custody: ✅
  Update area: ✅
Characteristics: High security with mandatory password and dual custody. Only permanent cards accepted.
Turnstile with Elevator Integration
Name: Turnstile 03 - Tower A Access
Device ID: NEON-00123459
Type: Neon

Channel 1 - Tower Entry:
  Source area: Reception
  Destination area: Tower A - Ground Floor
  Accepted types: Permanent Card, QR Code, Facial
  Enable early call: ✅
  Access delay: 1500ms
  Gateway: Elevators Gateway A
  Source floor: 0
  Update area: ✅
Characteristics: Automatic elevator call after access validation, with delay for message display.
Reader with Inverted QR Code
Name: Parking Door
Device ID: NEON-00123460
Type: Neon

Channel 1 - Parking Entry:
  Source area: Outdoor Area
  Destination area: Parking
  Accepted types: Permanent Card
  Inverted QR Code 1:
    Validity: 01/01/2026 to 31/12/2026
    Source control: ❌
  Update area: ✅
Characteristics: In addition to physical readers, allows access via the app by scanning a fixed QR Code on site.
Best Practices
-
Descriptive naming: Use names that identify location and function (e.g. "Turnstile 01 - Main Entry Tower A" instead of "Ctrl01")
-
Channel configuration: Configure each channel with the correct source/destination areas and make sure the physical flow matches the logical configuration
-
Identifier types: Limit the types accepted on each channel as needed. Restricted areas should accept only specific types
-
Monitoring: Regularly check the status of the controllers (Online/Offline) in the list
-
Security: Use dual custody in critical areas and mandatory password for sensitive areas
Next Steps
- Areas - Configure controlled areas
- Identifiers - Manage access credentials
- Categories - Define access rules by category
- I/O and Automation - Configure inputs/outputs and automations