People
Accelero allows the registration of people for access control purposes. The system does not make any distinction between visitors, employees or any other classification, because it understands that people change roles constantly, or can be several things at the same time — an employee of unit 21 who has a medical appointment on the weekend at unit 63, for example.
For organization and secure access control, people have categories. Categories are an important part of determining a person's access level. A person can have several categories at the same time, and each association is valid for a certain period. Under normal situations, the person will be associated with a category "forever" (an employee, for example), but in the case of a visitor, the association may be valid only during the period of the visit.
Likewise, a person can be associated with companies within the system. Although not mandatory, this association will have operational, access and various reporting implications.
Navigation path: People > All
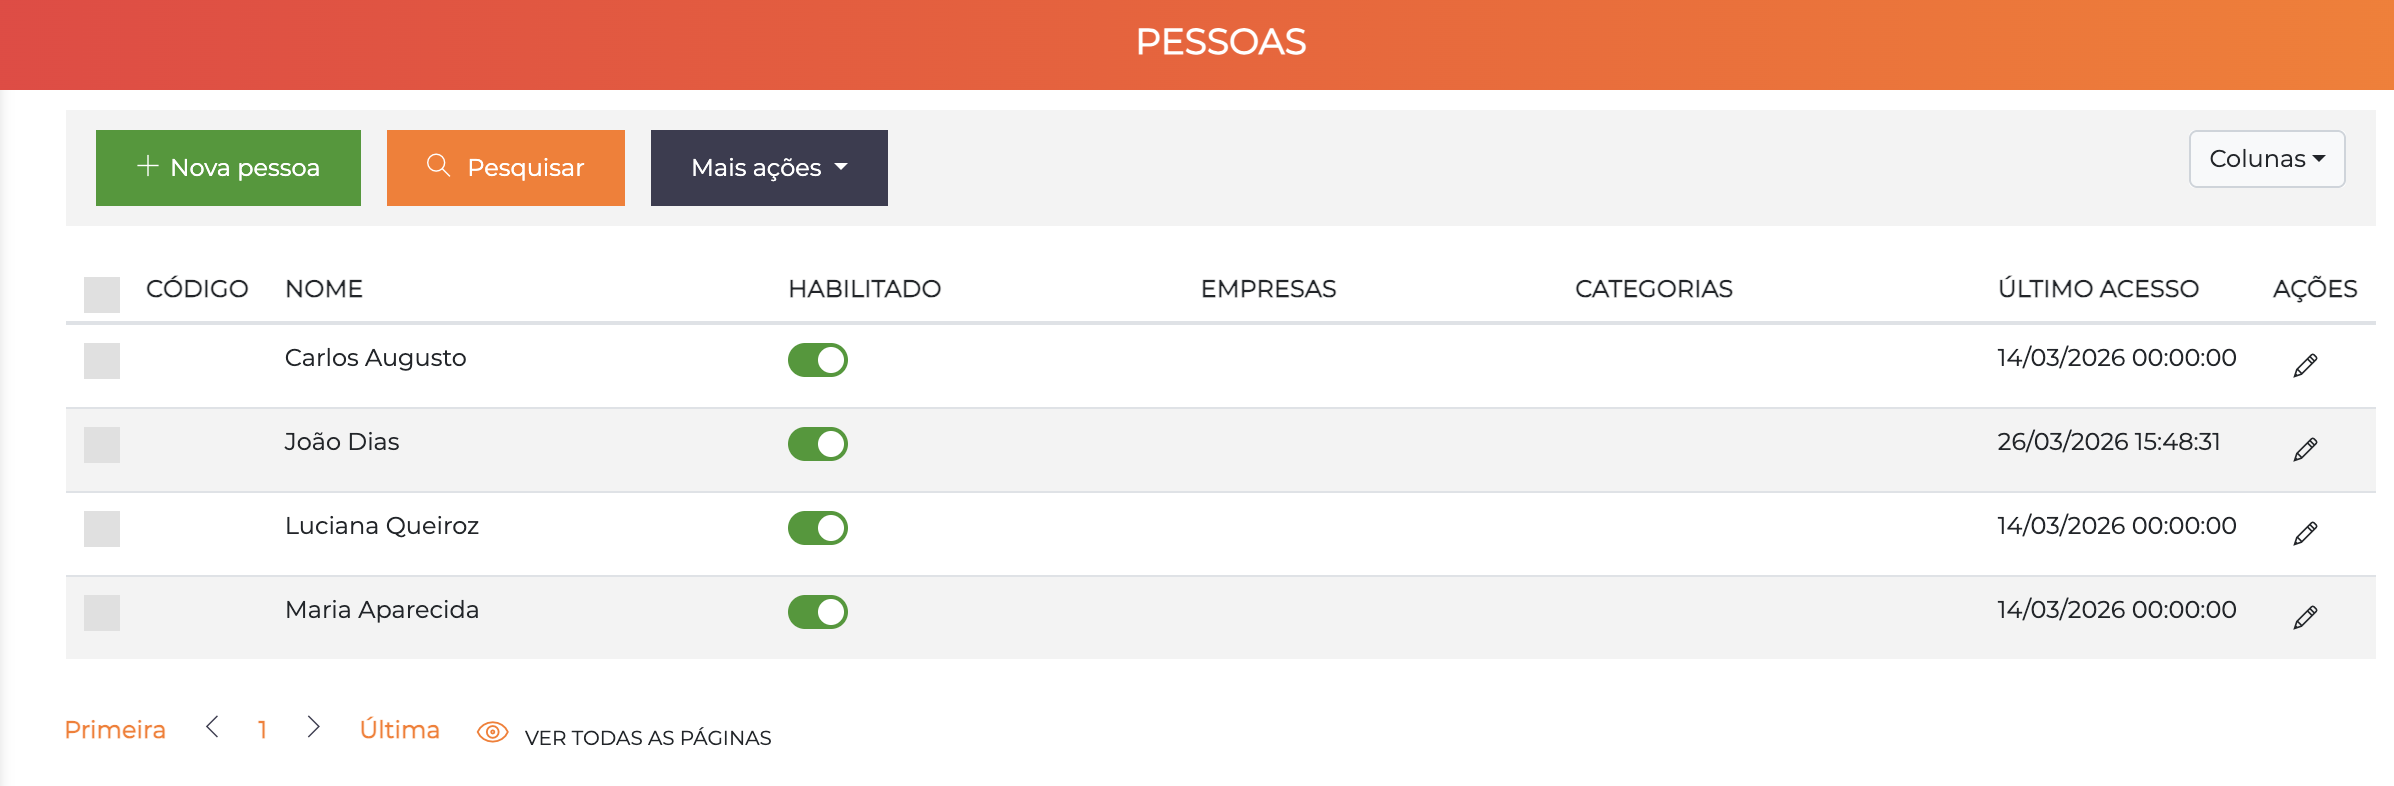
The list displays the registered people with the columns Code, Name, Enabled, Companies, Categories, Last access and Actions (pencil to edit). The Columns ▼ button in the upper right corner lets you customize which columns are displayed, including custom fields and additional data such as last access date.
List Filters
The list has advanced filters that allow you to:
- Filter by a specific category
- Filter by a specific company
- Filter people without categories or without companies
- Filter by enabled, not enabled or both people
People and operators are completely different entities and are never confused. Operators are the users of the web system (those who operate Accelero). People are the registrations for physical access control — residents, employees, visitors, etc.
Edit Screen
The person edit screen is organized into 8 tabs: General data, Companies, Categories, Individual permissions, Vehicles, Access history, Visits made and DirectPass.
Tab: General Data
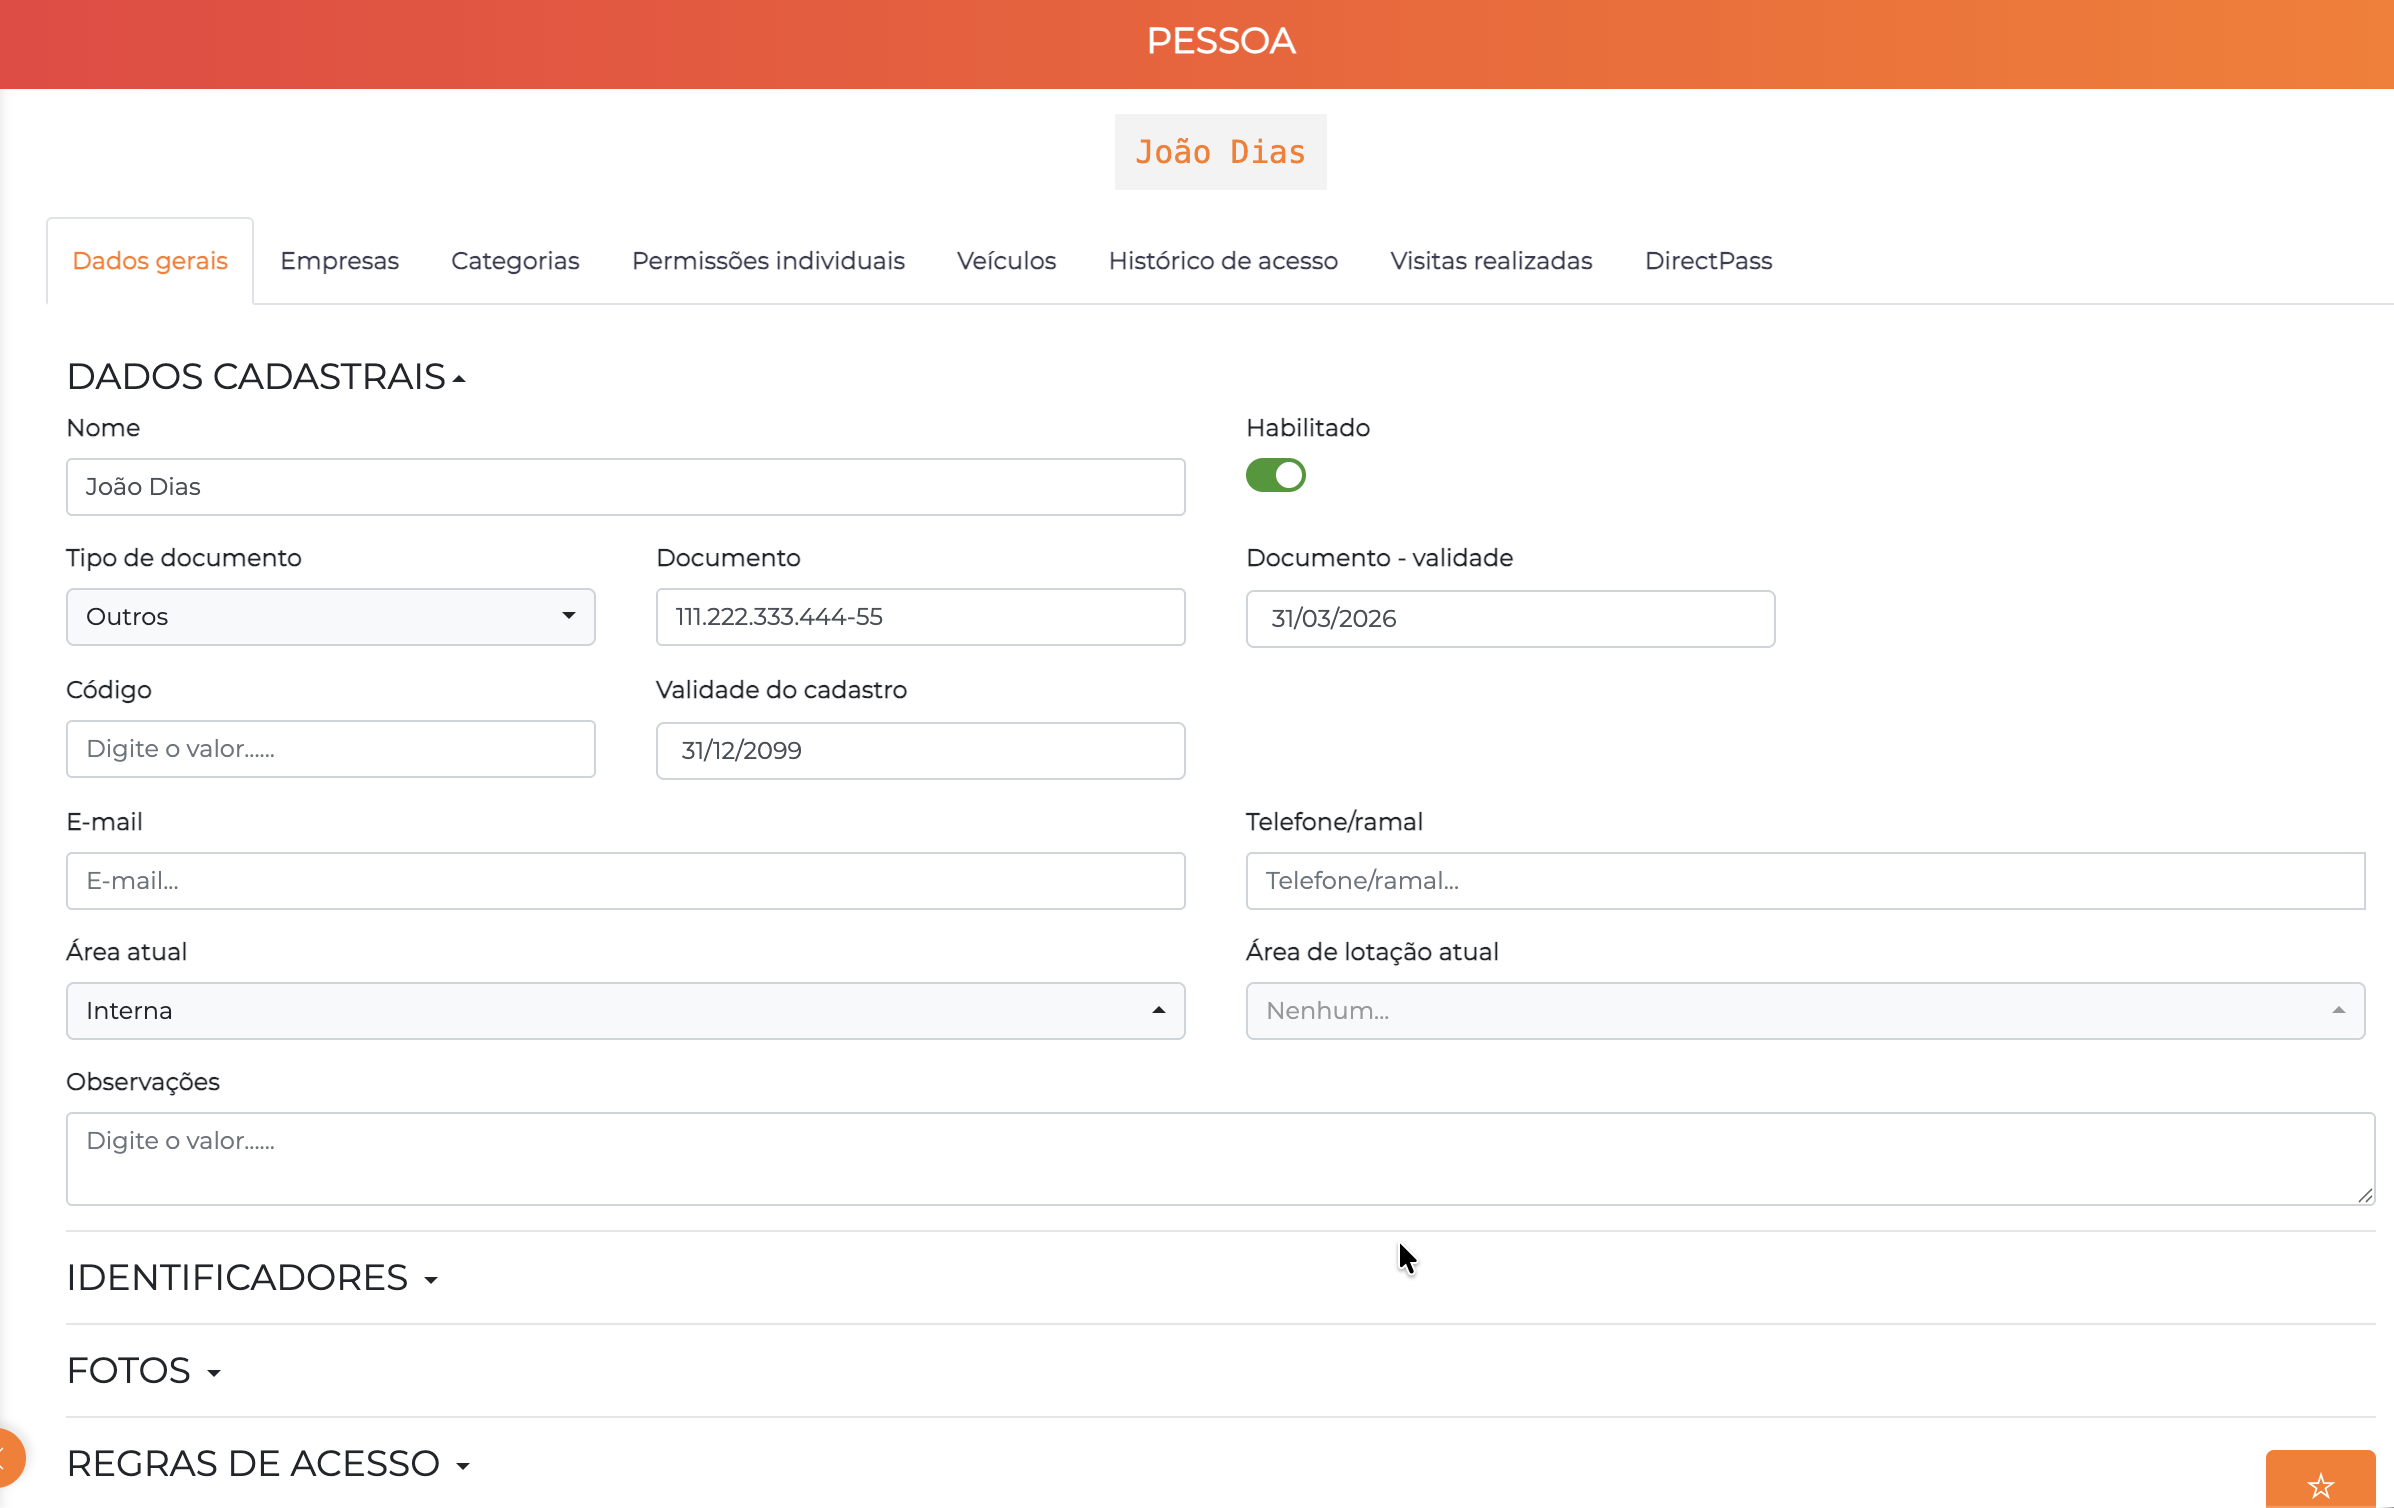
The General Data tab is organized into 4 collapsible sections: Registration Data, Identifiers, Photos and Access Rules.
Section: Registration Data
| Field | Description |
|---|---|
| Full name | (required) The person's full name |
| Enabled | If disabled, the person will have access automatically denied at all control points |
| Document type | Type of the identification document (CPF, RG, Others, etc.). The system prioritizes CPF in the display order |
| Document | (unique) Document number. Not required, but if provided it must be unique in the system |
| Document - validity | Document expiration date |
| Code | (unique) The person's code/enrollment. Not required, but if provided it must be unique in the system |
| Registration validity | People with an expired registration validity date will have access automatically denied |
| The person's email address | |
| Phone/extension | Contact phone/extension. This data can be shown on screen during visitor registration as a reference for contacting the visited person |
| Current area | Area where the person is currently located |
| Current occupancy area | The person's area for occupancy control purposes. In general it matches the Current area, but in specific scenarios it can differ to separate physical areas from logical areas |
| Default floor | The person's default floor for early elevator call purposes |
| Notes | Free field for internal notes |
| Journey control – last exit | Date/time of the person's last exit for journey control purposes |
Section: Identifiers
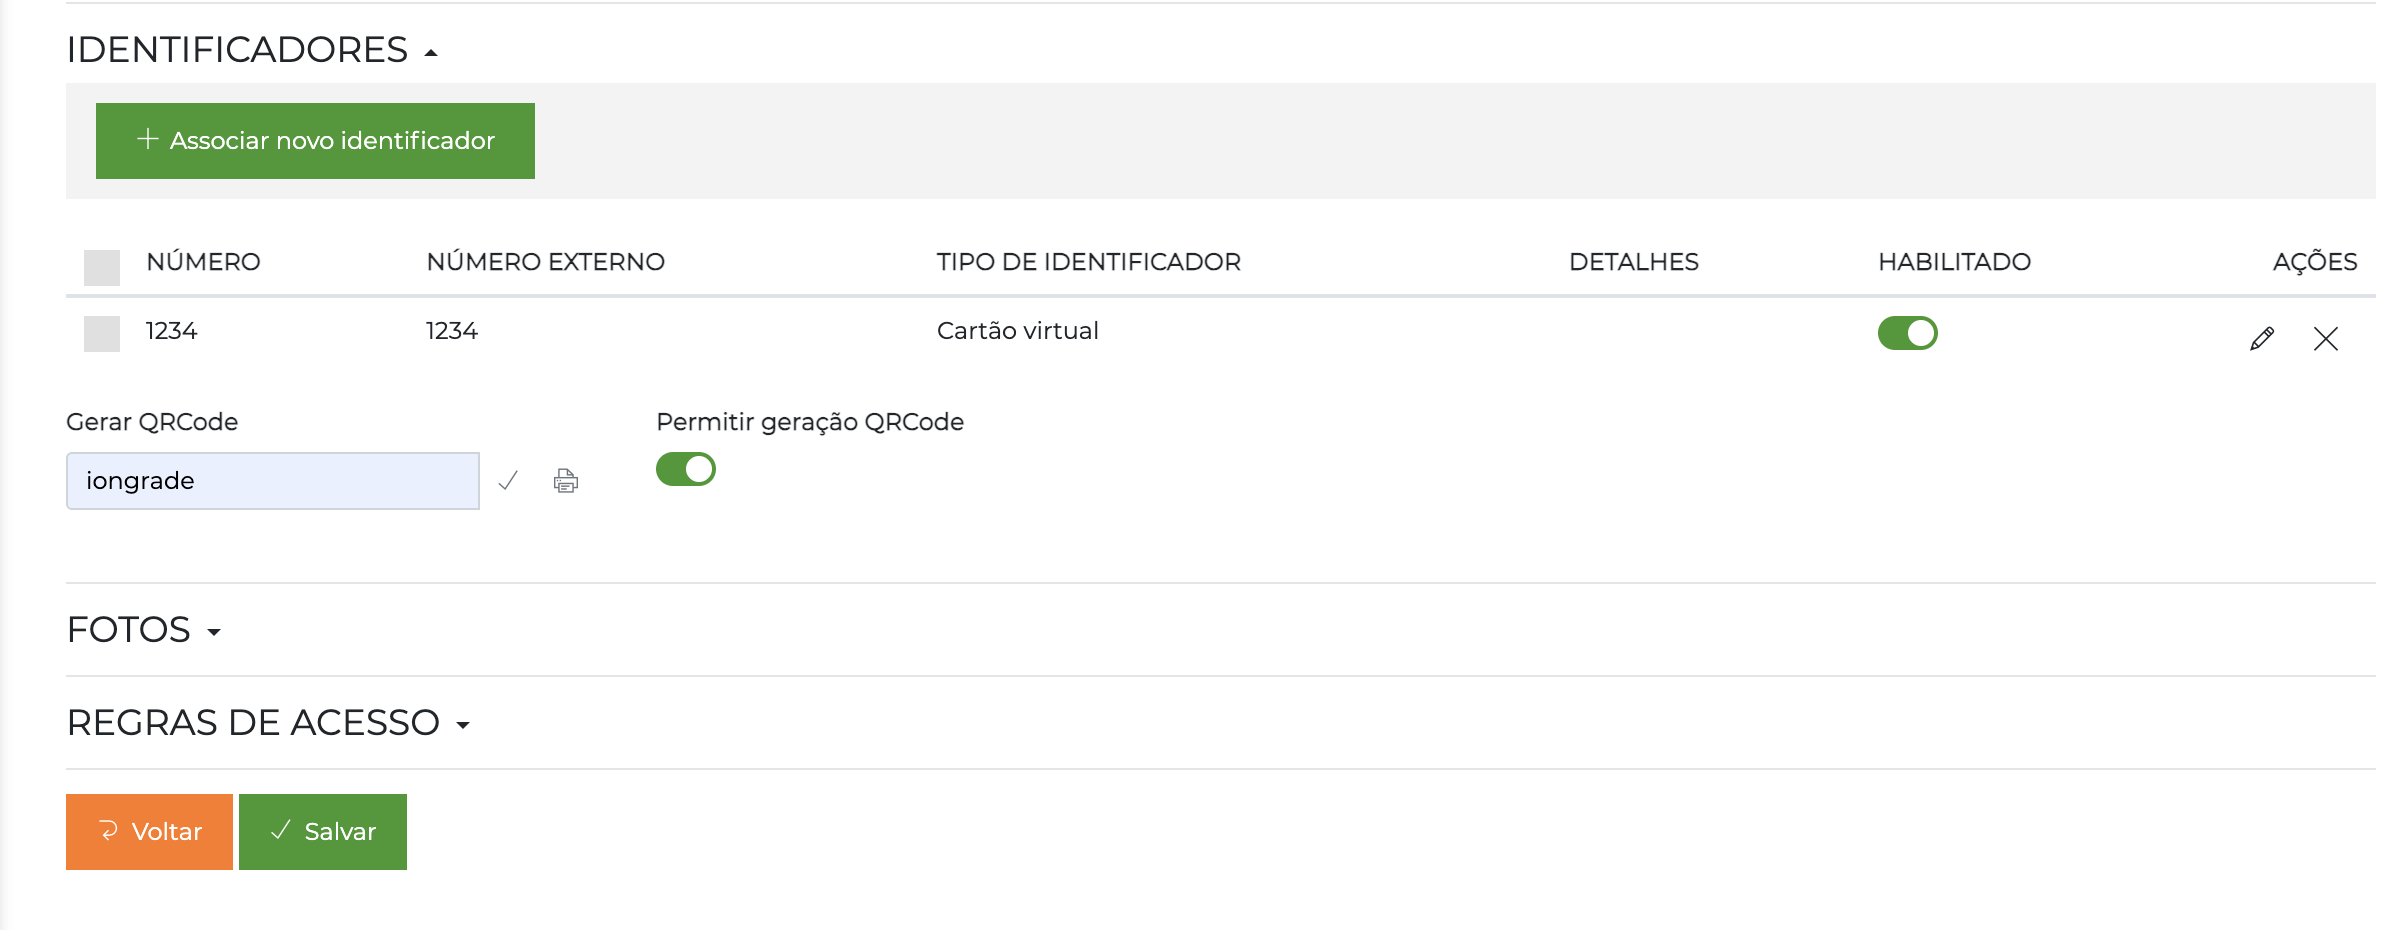
The Identifiers section displays all identifiers associated with the person. Click "+ Associate new identifier" to link an existing identifier.
| Column | Description |
|---|---|
| Number | Number of the identifier in the system |
| External number | Physical number printed on the card or tag |
| Identifier type | Type: virtual card, physical card, biometrics, etc. |
| Details | Additional information of the identifier |
| Enabled | Individual status of the identifier (can be enabled/disabled individually) |
| Actions | Pencil to edit the identifier; X to remove the association |
The Identifiers section is only available after the person's initial save.
Use this section to link the access cards created in Identifiers to the people who will use them.
QRCode:
Still in this section, you can generate QRCodes for the person:
- Type the QRCode value in the field and confirm with ✓ to generate
- Use the print icon to print the QRCode directly
- The QRCode can be sent by email or printed so that the person identifies themselves at the controllers
- The Allow QRCode generation flag, when disabled, prevents the generation of QRCodes for this person on any screen of the system
- For the QRCode to be accepted at a controller, you must enable this type of identifier in the controller channels configuration
Section: Morpho Wave
This feature requires the MorphoWave module enabled in the license.
The Morpho Wave section allows the capture and management of MorphoWave biometric templates. You can:
- Check whether the person already has a registered biometric template
- Perform the entire capture process online
- Select which device will be used for the capture and which hand will be captured
- The system instructs the operator at each step of the process automatically
Section: Photos
The Photos section allows the capture of up to three photos per person.
Supported devices:
- Standard market webcam
- Some IP camera models (see the specific section of this manual)
- File upload
The last camera selected by the operator for each photo is saved as the preferred one, speeding up the next registrations.
The system has an automatic photo capture feature: when it detects good image quality (ideal lighting and framing), the photo is captured automatically, speeding up the registration process.
The first photo has special meaning for the system:
- It is used for integration with facial recognition devices
- It is the photo that can be used for integration with applications and visit scheduling
It is recommended that it always be the frontal photo of the person's face, with the best possible quality: neutral and light background, uniform lighting, person looking directly at the camera, without sunglasses or accessories that cover the face.
In the lower right corner of the first photo, a synchronization status icon with facial recognition devices is displayed:
| Icon | Meaning |
|---|---|
| Red | There is at least one synchronization pending item or error |
| Blue | Synchronization OK, without pending items or errors |
Click the icon to view the details of the existing pending items or errors.
Section: Access Rules
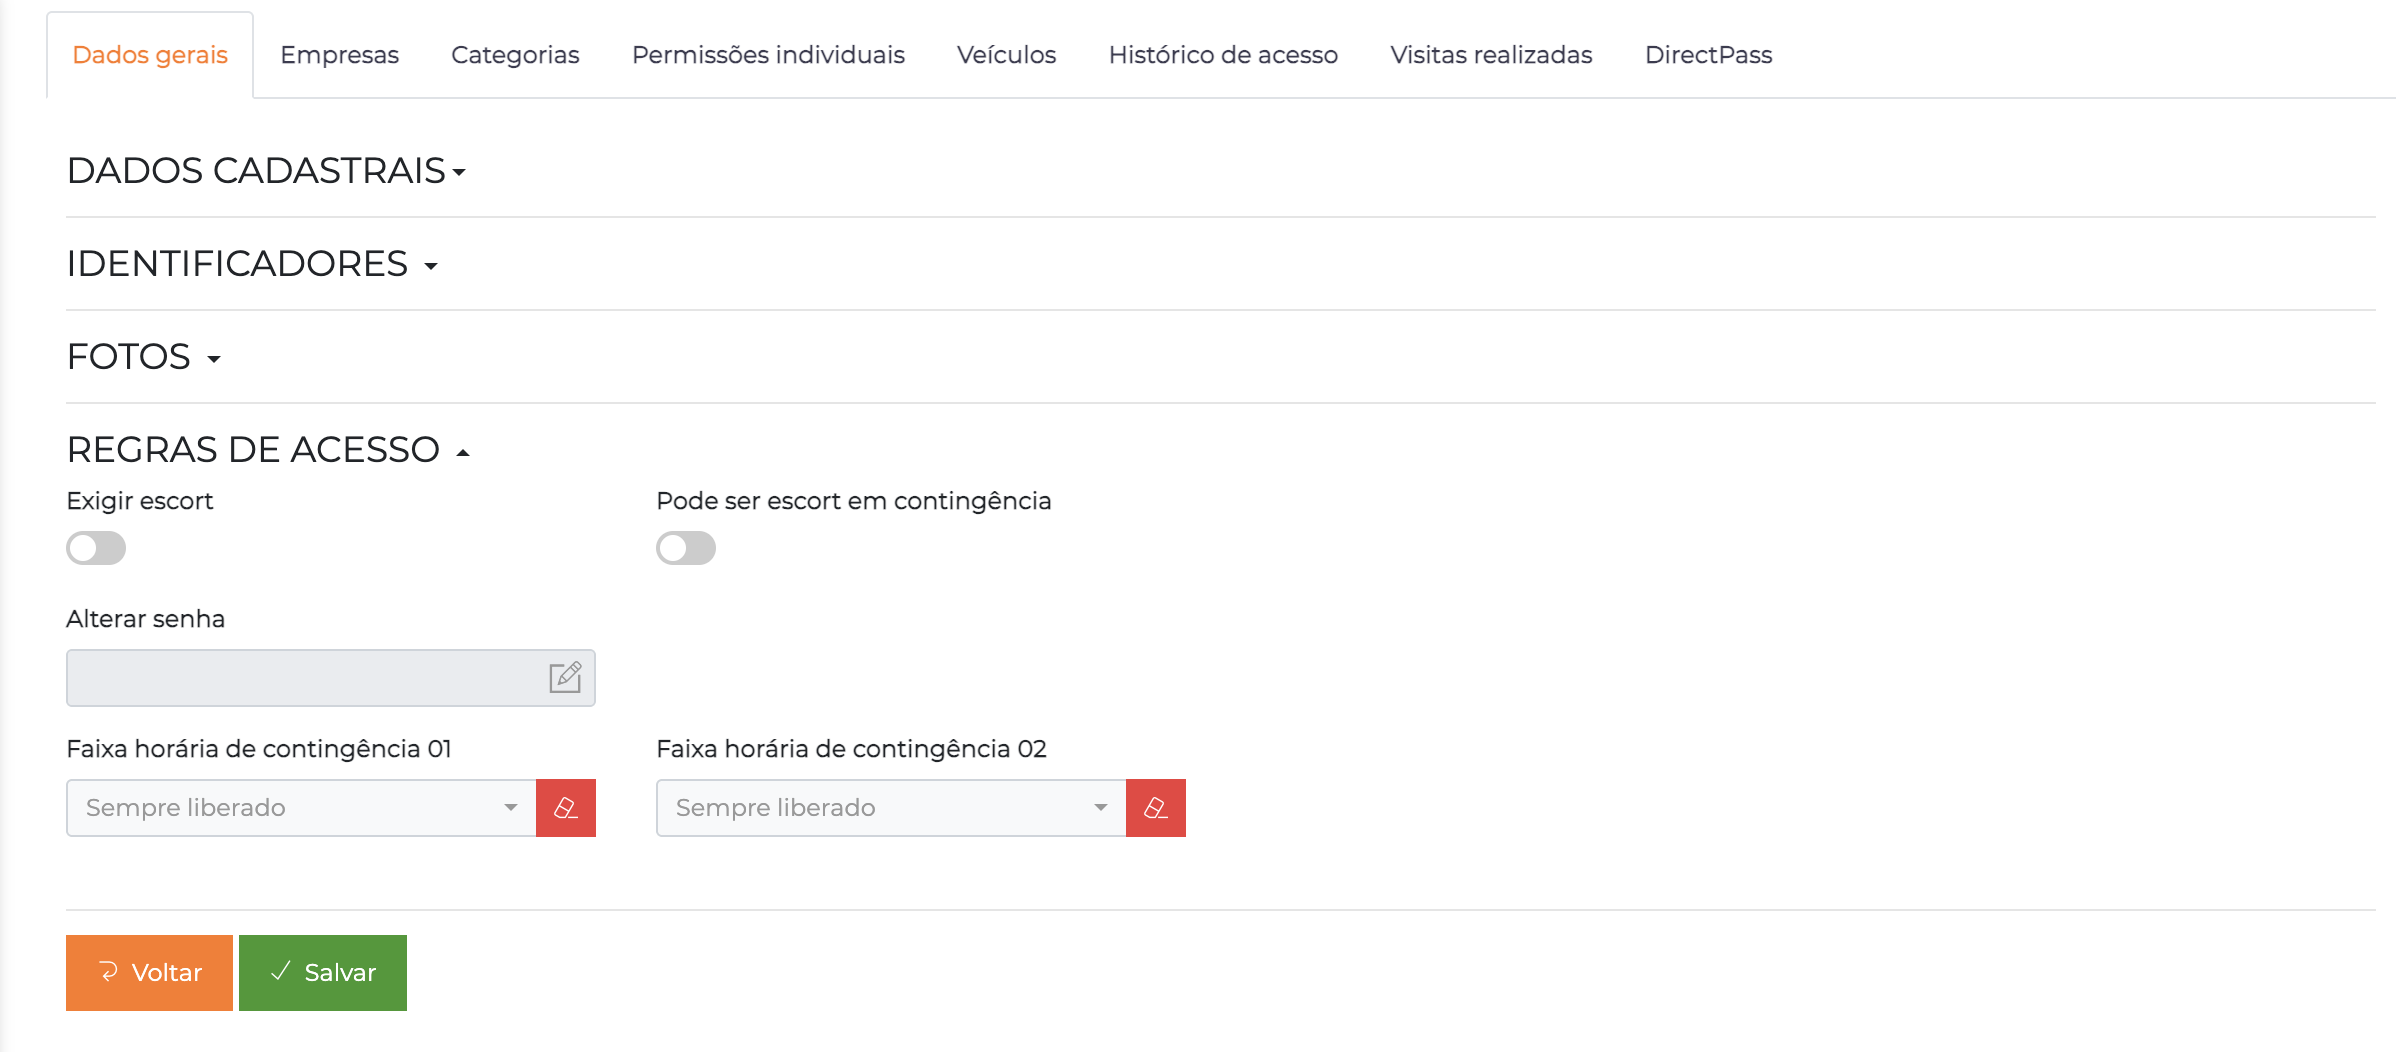
The Access rules section allows the configuration of specific data related to this person's access control:
| Field | Description |
|---|---|
| Require escort | If enabled, it will condition the person's access on the presence of an escort at the blocking points where escort control is enabled |
| Can be escort in contingency | If enabled, allows this person to act as an escort for other people in contingency mode |
| Change password | Sets or changes the person's numeric access password at the blocking points that require a password (up to 4 numeric characters) |
| Contingency time range 01 | First time range applied when the controllers go offline. Applies only to the areas where the person already had some online access permission |
| Contingency time range 02 | Second contingency time range. The two ranges are summed |
If any of the contingency time ranges remains with the Always released value, the system will not perform any time control for this person during contingency — access will be released at any time at the points where they already had online access permission.
Additional fields (visible according to licensing):
| Field | Description |
|---|---|
| Current credits | Current amount of access credits of the person |
| Require biometrics | If enabled, it will require biometric validation at the controllers that accept biometric identifiers |
Blacklist
You can add a person to the Blacklist directly from the registration screen. People on the Blacklist have access automatically blocked at all control points.
Only operators with the proper permission can add or remove people from the Blacklist.
Tab: Companies
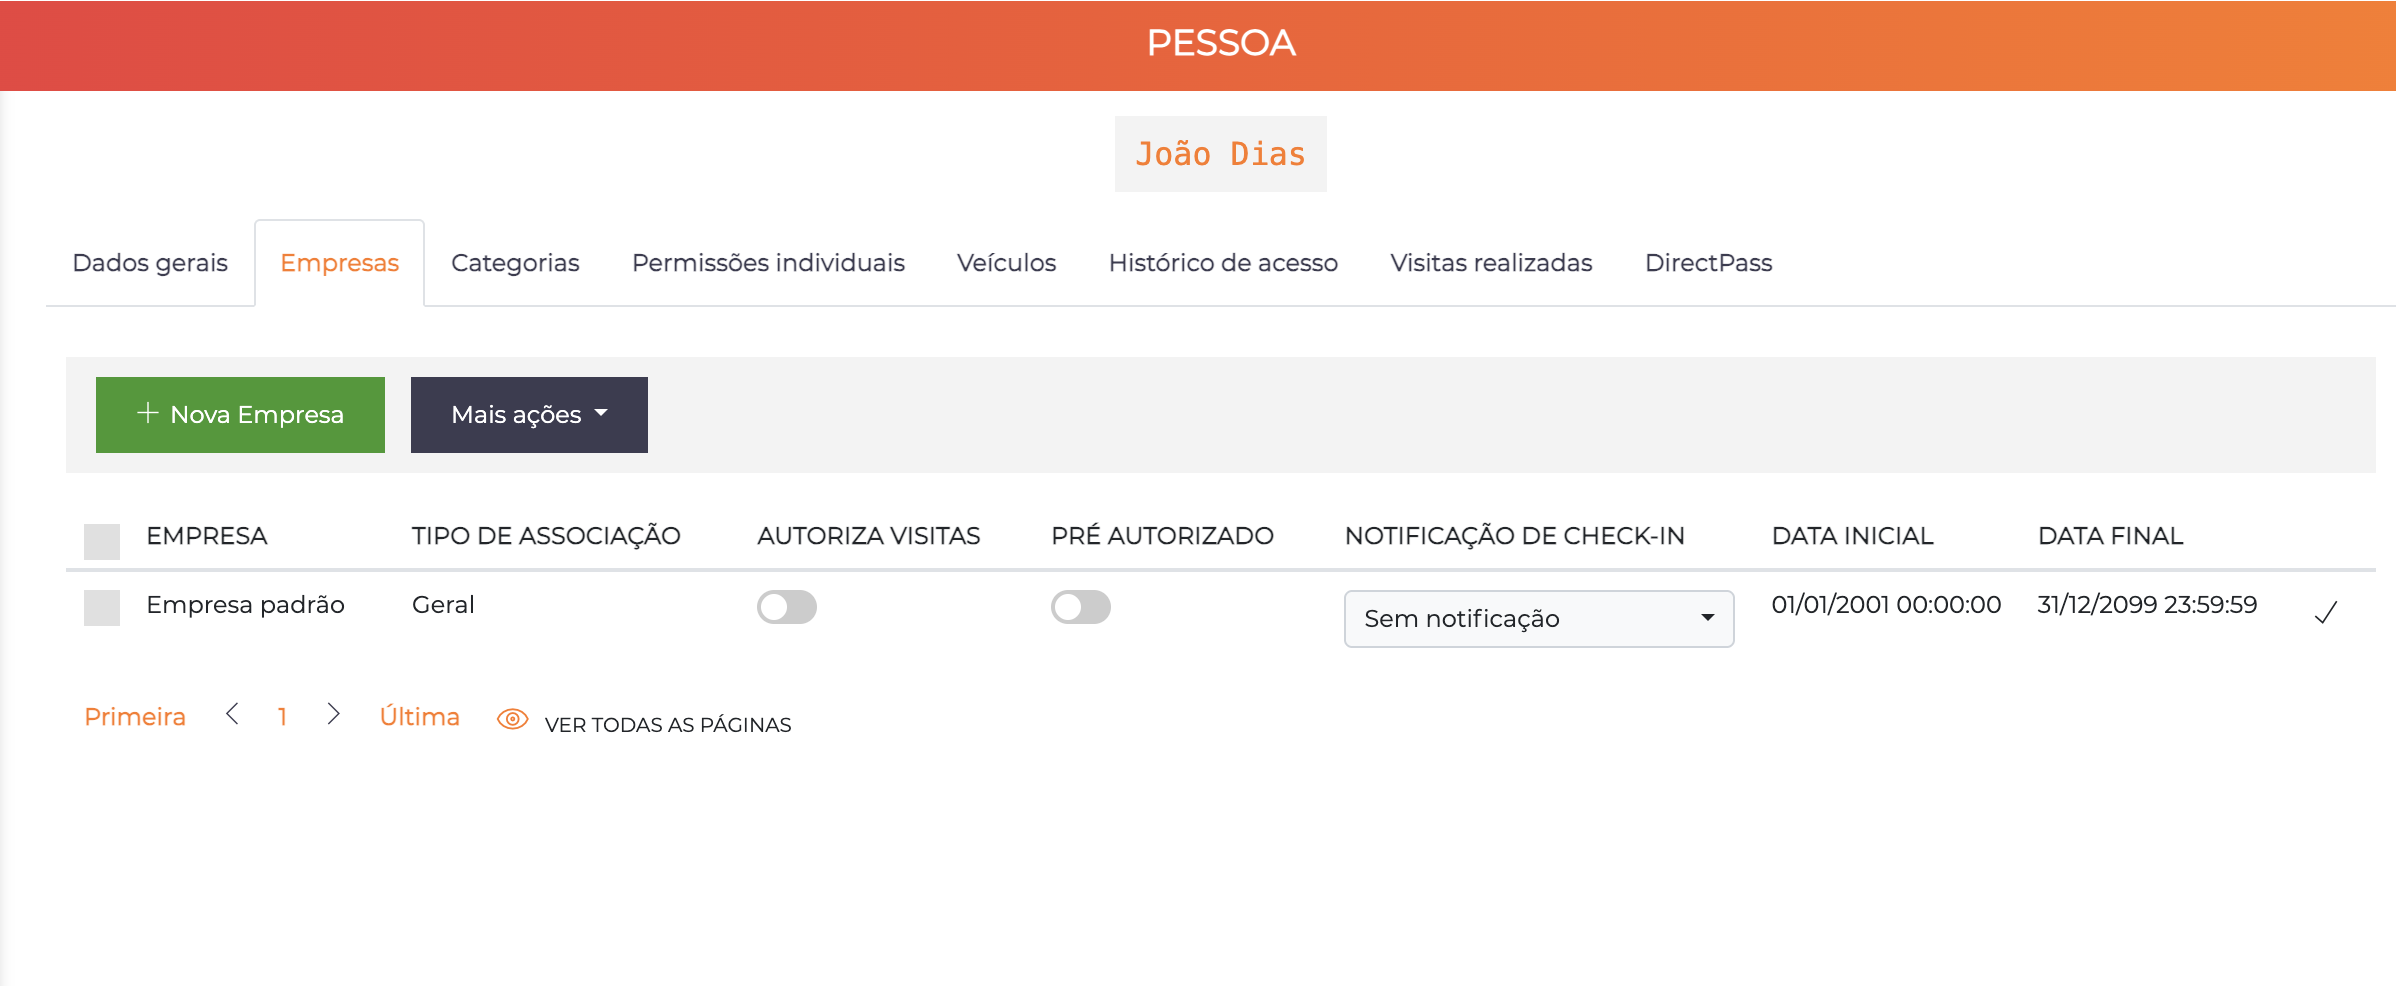
Allows you to associate and disassociate the person with companies in the system. Each row represents a link and is edited inline (confirm with ✓).
| Column | Description |
|---|---|
| Company | Company to which the person is linked |
| Association type | Type of the link (Employee, General, Service Contractor, etc.). See Association Types |
| Authorizes visits | Operational feature — indicates that this person can authorize visits in the company. Does not influence access policies |
| Pre-authorized | Operational feature — indicates generic pre-authorization. Does not influence access policies |
| Check-in notification | Defines how this person is notified when one of their visitors checks in (e.g. No notification, Email, SMS) |
| Start date | Start date of the link with the company |
| End date | End date of the link with the company |
How the link works:
- Without associated companies: The person cannot be "visited" and their access does not depend on a company
- With associated companies: The person can be visited; their access validation is conditioned on the presence of at least one enabled associated company
Check-in Notification:
For each person, you can individually determine the notification method for visitor check-ins. This configuration is relevant when the company is configured to send notifications to the visited people themselves (a typical case of residential condominiums).
Tab: Categories
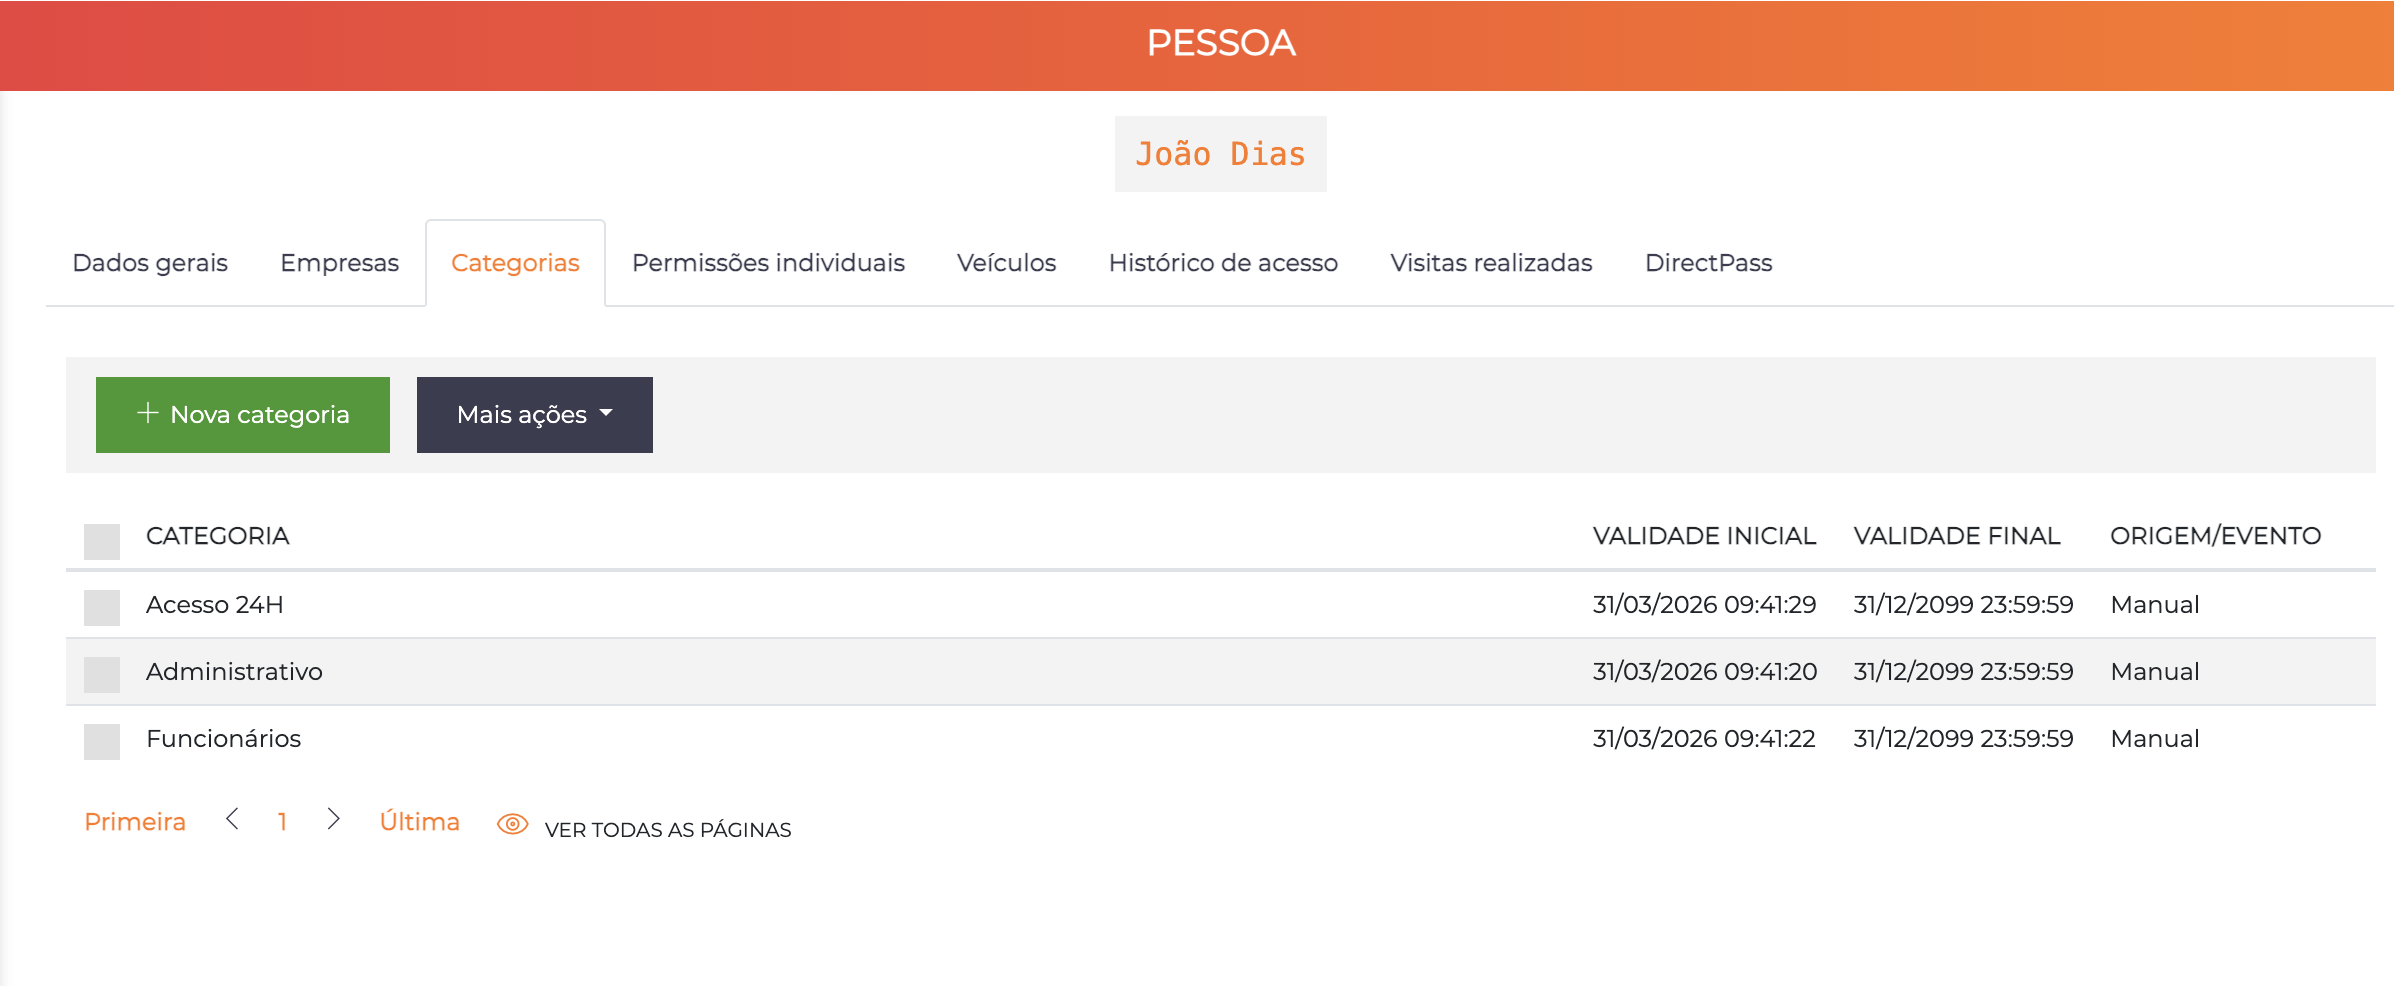
This is the main and most important configuration to define which areas and which time ranges the person will have access to.
Click "+ New category" to associate a category. The list displays:
| Column | Description |
|---|---|
| Category | Name of the associated category |
| Start validity | Date and time when the category starts to be valid for this person |
| End validity | Date and time when the category stops being valid |
| Source/Event | Indicates whether the association was made manually by an operator or automatically by an event (categories auto-associated in event types) |
Multiple Categories
The person can be associated with several categories simultaneously. To determine the active categories, Accelero always looks for the categories valid for the specific moment of the access:
- Categories with a future start date are disregarded
- Categories with an end date in the past are disregarded
Category Validity
When the validity dates are not filled in, the category remains associated with the person with lifetime validity (valid indefinitely).
Example: An employee receives the "EMPLOYEES" category without validity dates, guaranteeing permanent access as long as the link is maintained.
For visitors or temporary situations, always define a start and end.
Example: A service contractor receives the "CONTRACTORS" category valid only from 01/02/2026 to 28/02/2026.
Summed Permissions
The person's access prerogatives are the sum of all categories valid at the moment.
Person: João
  Category EMPLOYEES (valid: always)
    → Access to ROOM 03 from 08:00 to 18:00

  Category CLEANING (valid: 01/01/2026 to 31/12/2026)
    → Access to SERVICE AREA 24h

Result at 10:00 on 15/06/2026:
João can access: ROOM 03 + SERVICE AREA
See Categories for more details on how permissions work and the concept of additive permissions.
Tab: Individual Permissions
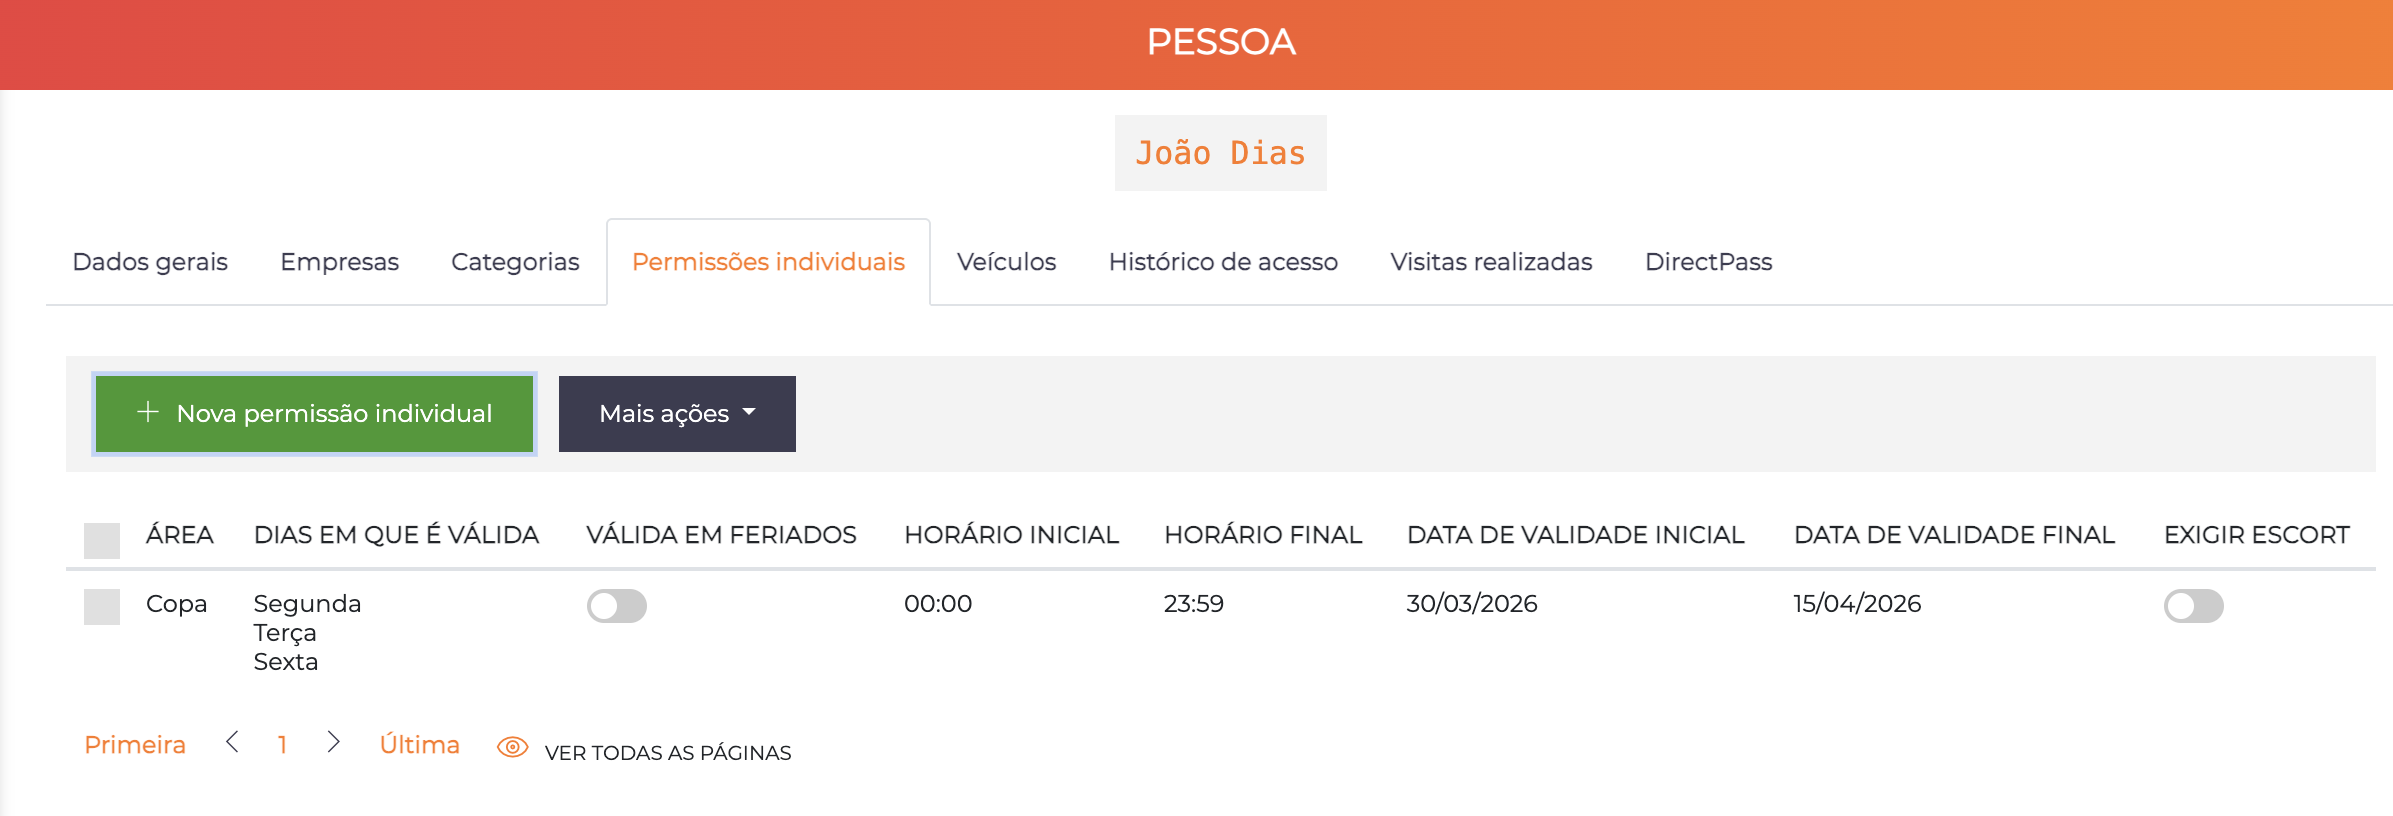
Accelero allows people to have individual access permissions, in addition to the permissions inherited from their categories. Click "+ New individual permission" to add.
| Column | Description |
|---|---|
| Area | Area to which the permission grants access |
| Days on which it is valid | Days of the week on which the permission applies |
| Valid on holidays | Whether the permission also applies on holidays |
| Start time | Start time of the permission |
| End time | End time of the permission |
| Start validity date | Date from which the permission is active |
| End validity date | Date until which the permission is active |
| Require escort | If enabled, access through this specific permission requires the presence of an escort |
Usage example: An employee with the EMPLOYEES category — who normally accesses Room 03 only on weekdays — needs to work next Saturday. Instead of changing the category (which would affect all employees), an individual permission is created for them to access Room 03 on that specific Saturday.
Individual permissions are added to the category permissions to determine the person's complete set of accesses.
Batch import: You can import individual permissions via CSV file in Batch Operations, facilitating mass registration.
Automatic cleanup: The system offers the option of automatic deletion of expired individual permissions, keeping the database clean and organized.
Tab: Vehicles
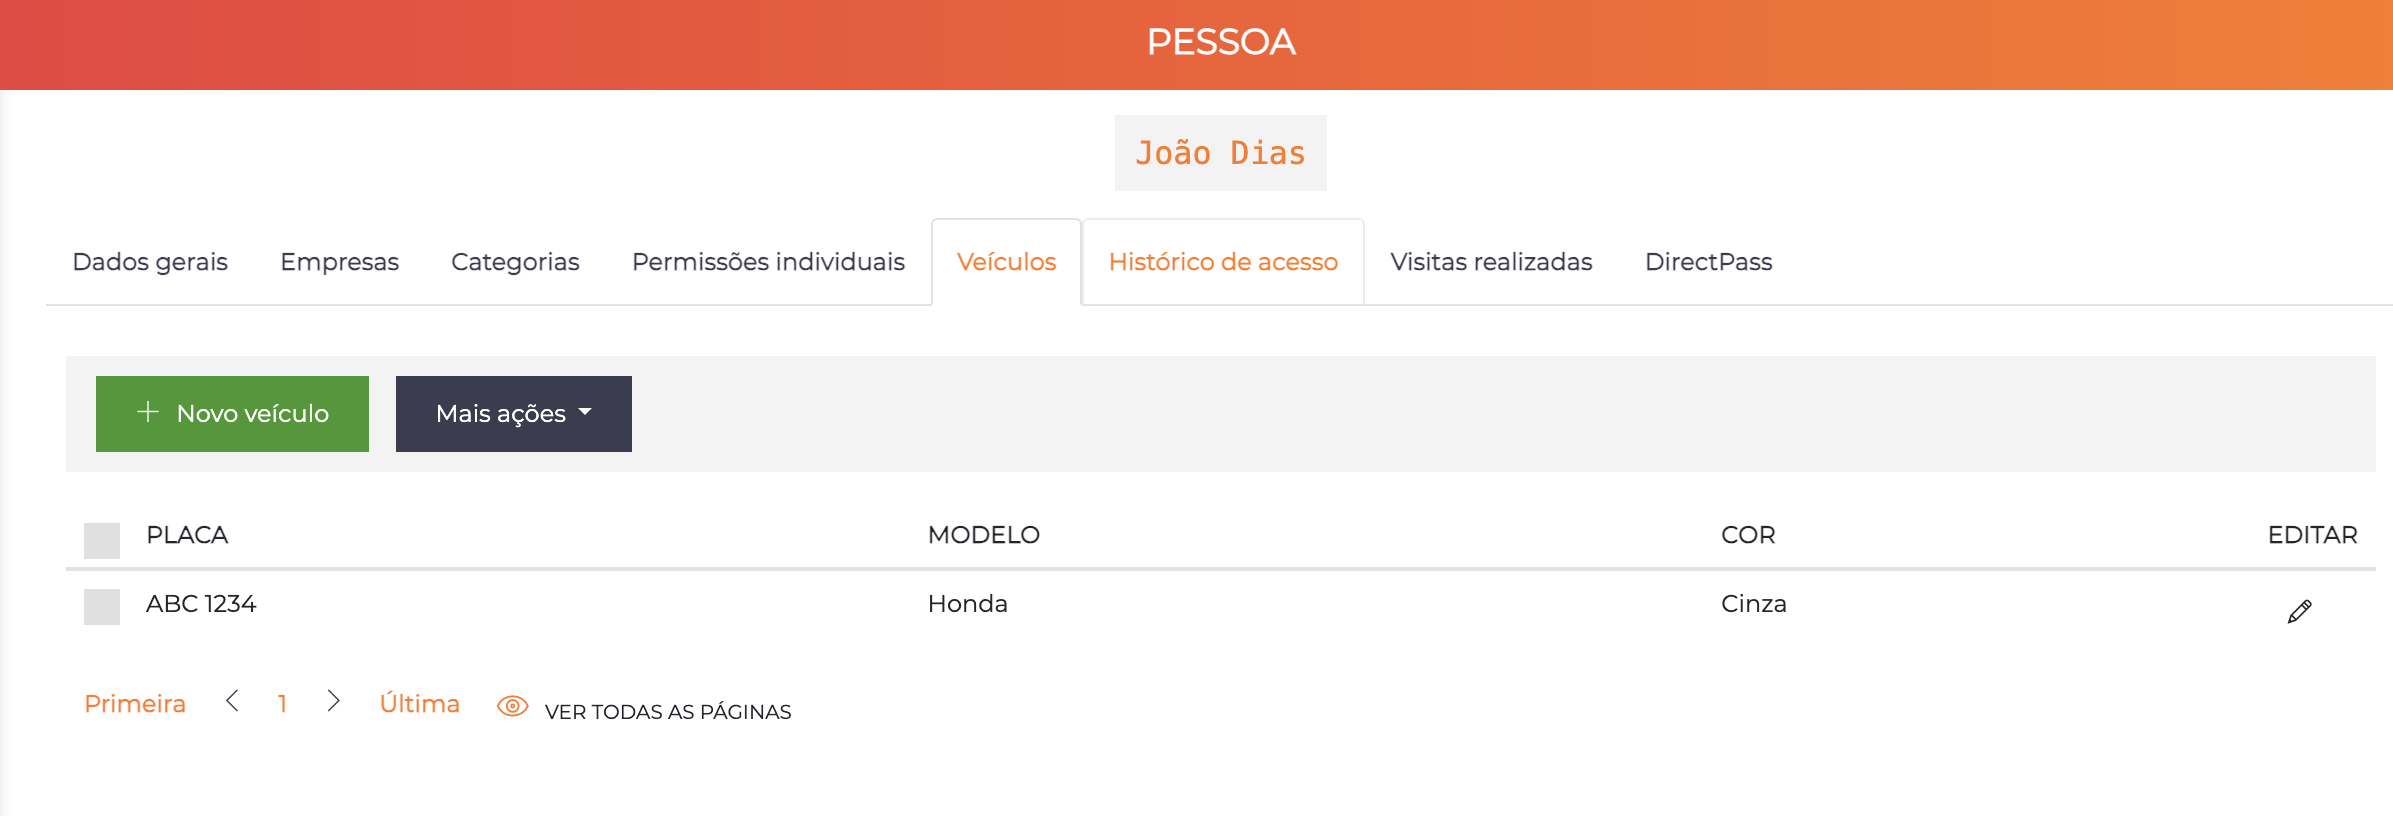
Allows you to associate and disassociate vehicles with the person. The list displays Plate, Model, Color and the pencil icon to edit the vehicle's registration.
Click "+ New vehicle" to create a vehicle and already associate it with the person, providing the basic data (plate, model, color) and, optionally, an initial identifier (usually a vehicle tag).
Multiple associations:
- Several people can be associated with the same vehicle simultaneously
- One person can be associated with several vehicles simultaneously
See Vehicles for more details on vehicle management.
Tab: Access History
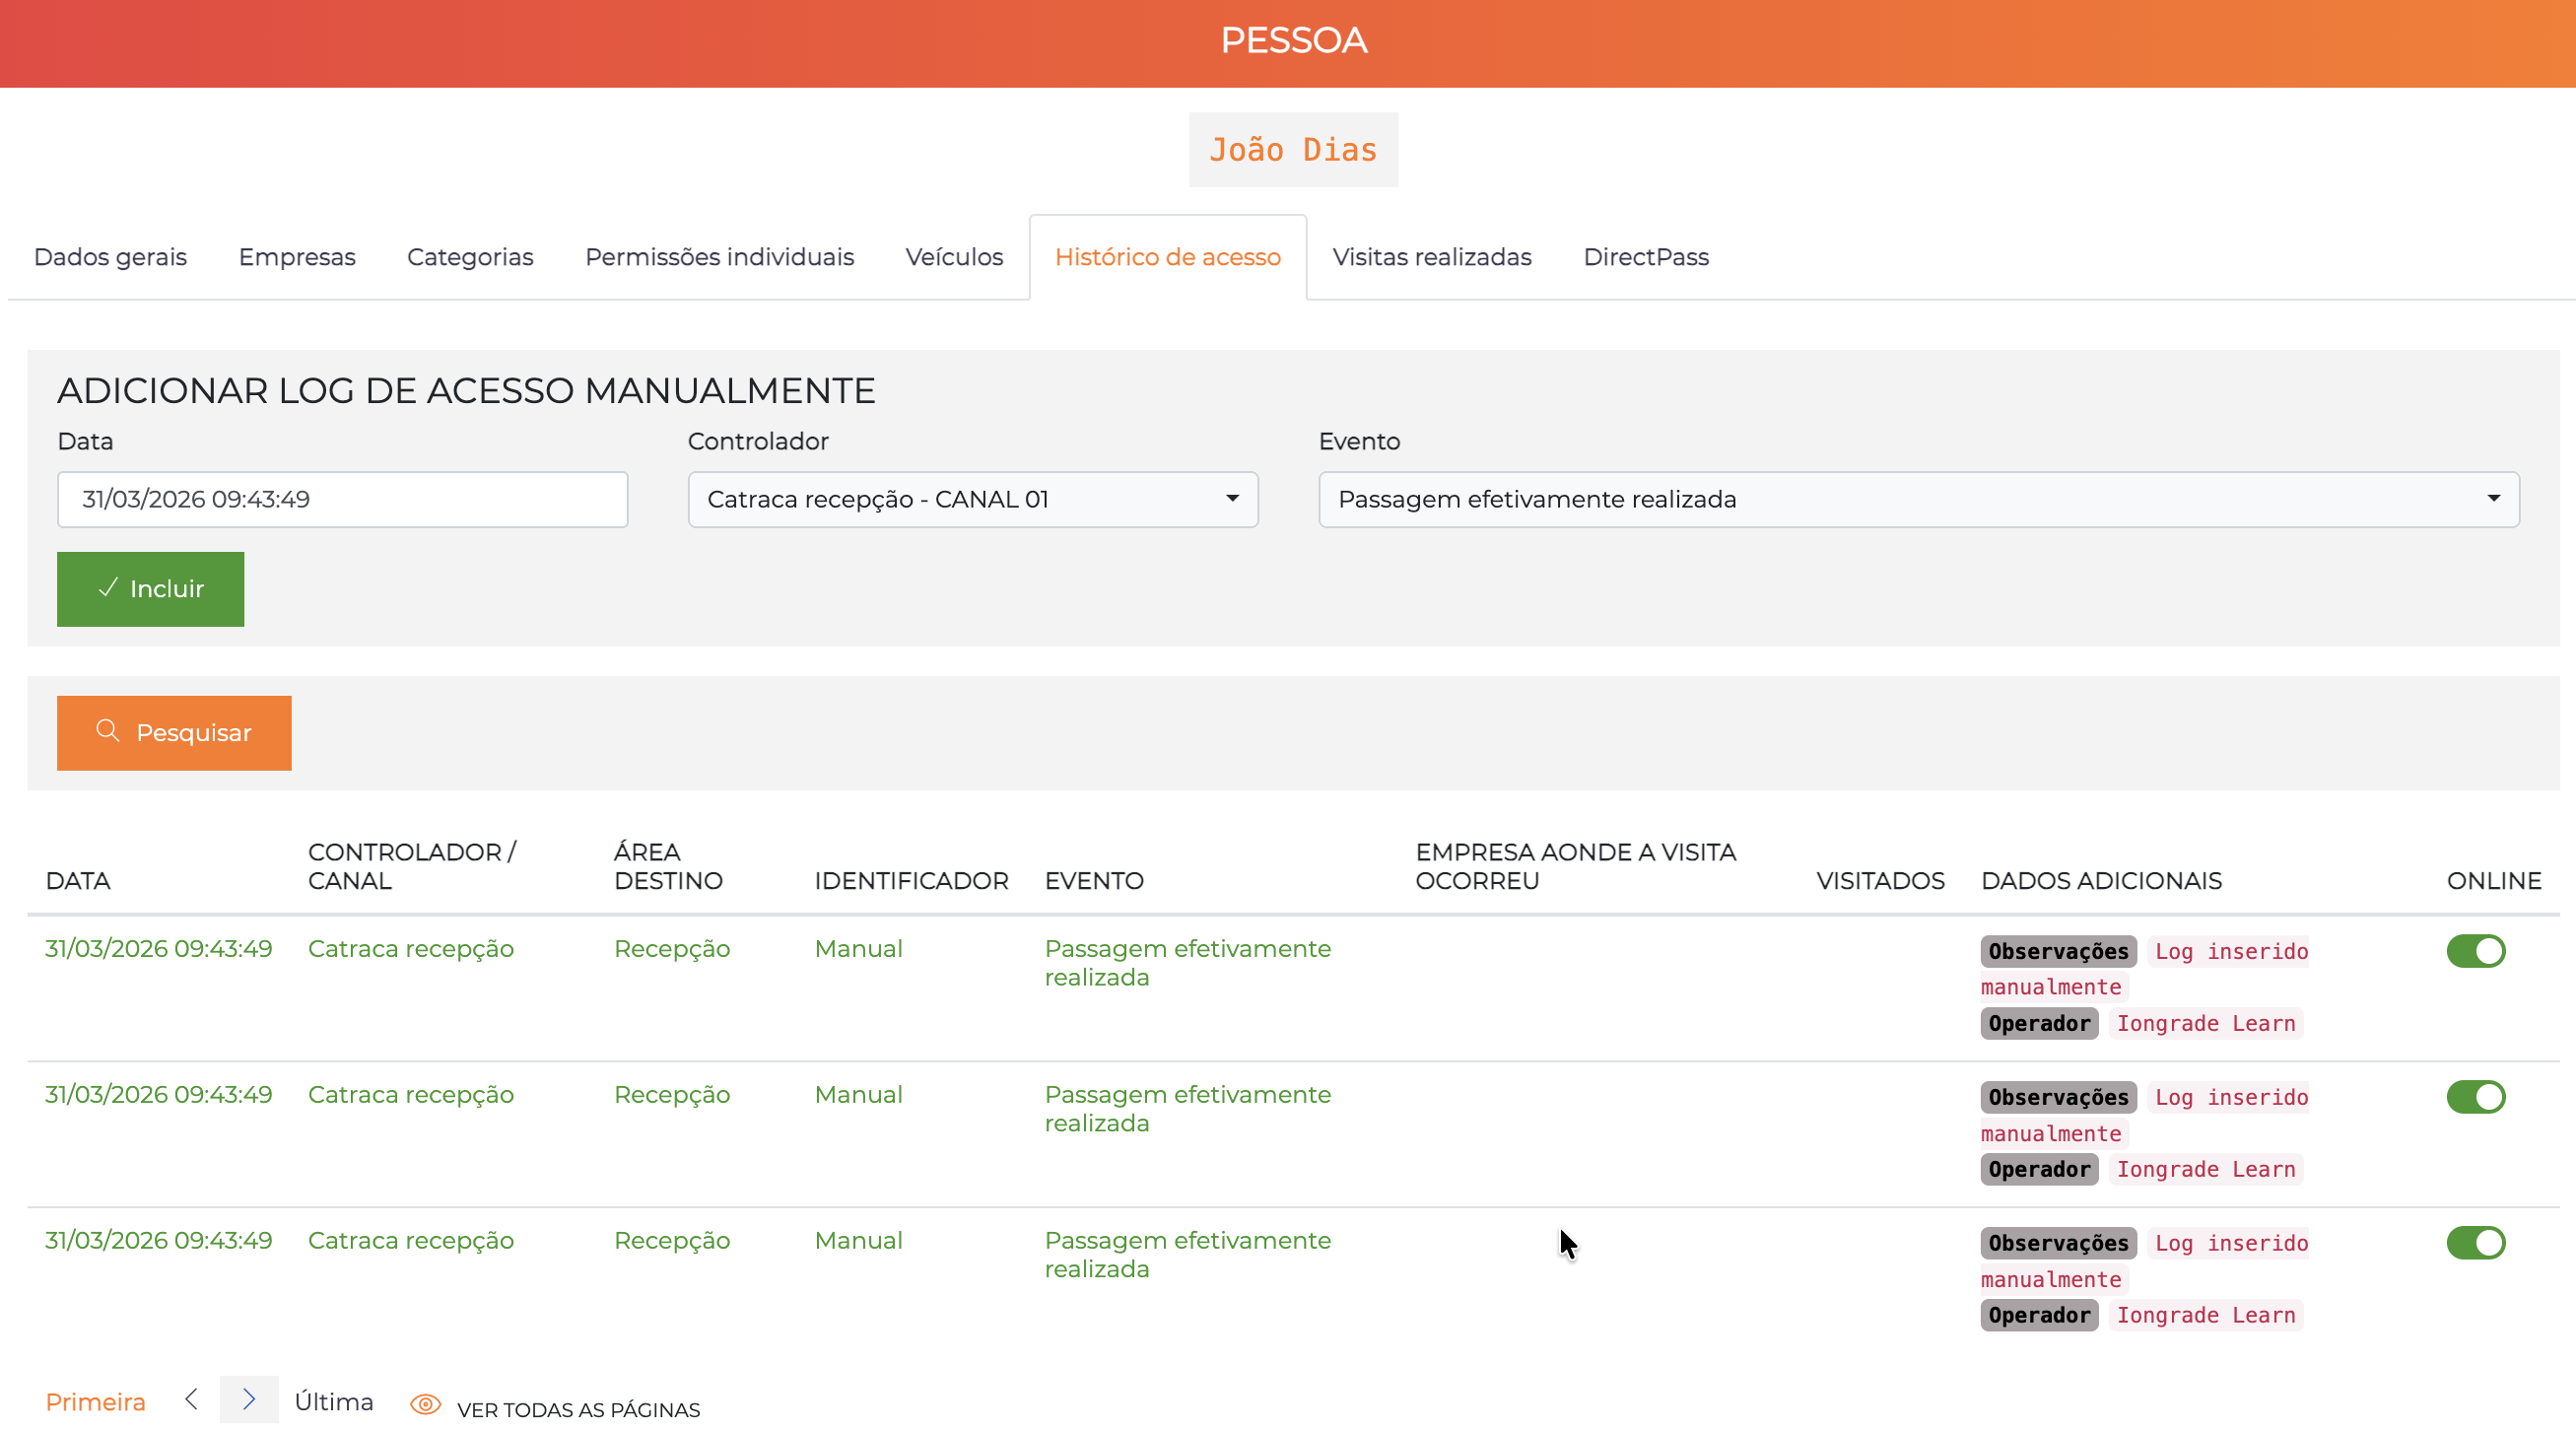
Displays the access events registered for this person. Use the Search button to filter by date and other criteria.
The history presents the columns:
| Column | Description |
|---|---|
| Date | Date and time of the event |
| Controller/Channel | Controller and channel where the access occurred |
| Destination area | Destination area of the access |
| Identifier | Identifier used (card, QRCode, etc.) or "Manual" |
| Event | Type of the event (e.g. Passage effectively performed) |
| Company where the visit occurred | Company associated with the event, when applicable |
| Visited | Visited person, when applicable |
| Additional data | Tags with extra information about the event |
| Online | Indicates whether the controller was online at the time of the event |
Manual Insertion of Access Log
The "Add access log manually" section lets you record events that occurred outside the system — such as manual openings of a blocking point or offline access records that need to be documented. Provide:
- Date: Date and time of the event
- Controller: Controller and channel where the access occurred
- Event: Type of the event to be recorded
Manually inserted logs are identified in the Additional data column with the tags Notes: Log inserted manually and Operator: [operator name].
Tab: Visits Made
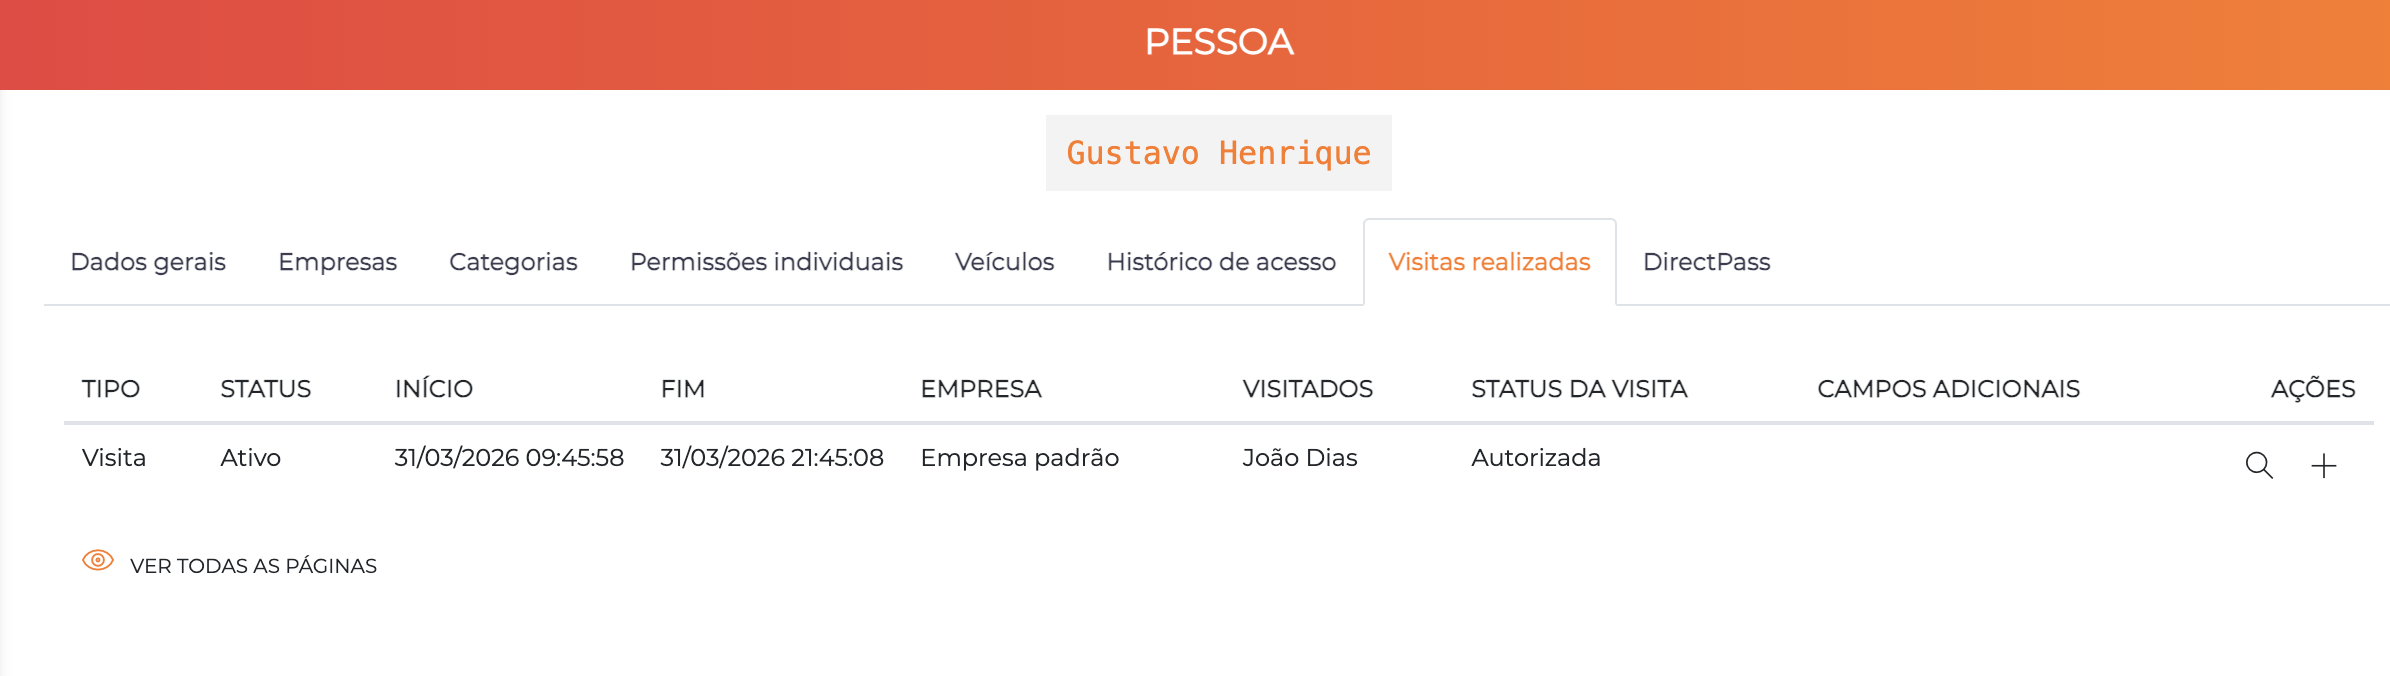
Displays the history of visits made by this person as a visitor. The columns are:
| Column | Description |
|---|---|
| Type | Type of the event/visit |
| Status | Current status of the visit |
| Start | Start date and time |
| End | End date and time |
| Company | Visited company |
| Visited | Visited person(s) |
| Visit status | Specific status (e.g. Authorized, Pending, Ended) |
| Additional fields | Custom fields filled in during the visit |
| Actions | Magnifying glass to view full details; + to repeat the visit (creates a new identical visit, speeding up recurring processes) |
Tab: DirectPass
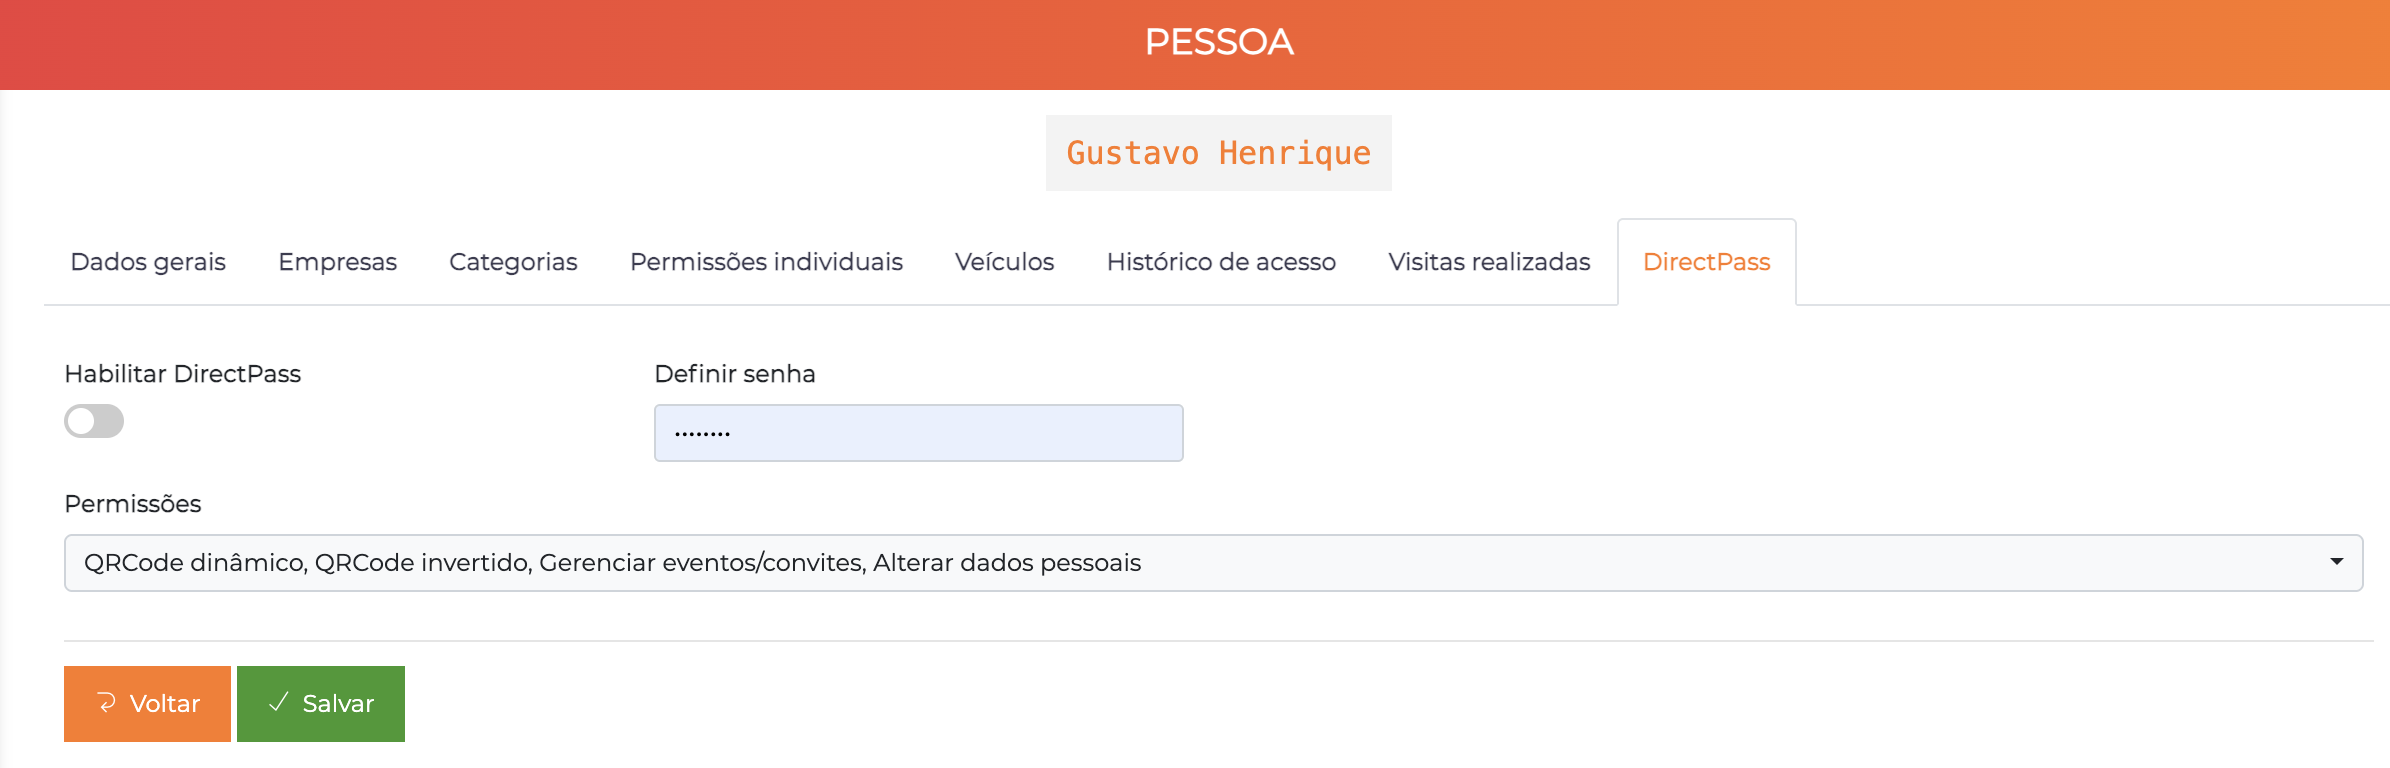
This feature requires the DirectPass module enabled in the license.
Enables this person's access to the DirectPass module and defines their permissions within the module.
| Field | Description |
|---|---|
| Enable DirectPass | Activates or deactivates this person's access to DirectPass |
| Set password | Access password for DirectPass |
| Permissions | Defines which DirectPass features this person can use (e.g. dynamic QRCode, inverted QRCode, Manage events/invitations, Change personal data) |
For more details on the functions available in the DirectPass module, see the specific section of this manual.
Features with Specific Licensing
Passes
This feature requires the Passes module enabled in the license.
The Passes tab lets you manage the person's passes — special permissions with temporal validity, such as medical exams, certifications, training and special authorizations.
Usage example:
- The POOL can only be accessed if the person has a valid MEDICAL EXAM
- The MACHINE ROOM can only be accessed if the person has a valid NR-10 CERTIFICATION
To add a new pass, provide: Type, Start validity, End validity and Note (optional).
Creating passes requires a specific permission in the operator's profile.
Escorts
This feature requires the Escorts module enabled in the license.
The Escorts tab lets you determine which specific people can accompany this person at the blocking points where escort control is enabled.
Usage examples:
- Determine that only a student's parents can accompany them at the school exit
- Require the sector's supervisor to accompany a third party's access to a restricted area
The check works with "OR" logic: the person presented as an escort is accepted if they belong to the escort categories configured at the blocking point or if they are on the list of authorized escorts for that specific person.
Recurring Events
This feature requires the Recurring Events module enabled in the license.
The Recurring Events tab manages situations in which a person is a "fixed visitor" — they are not exactly an occasional visitor, but also not a resident or employee with unrestricted access.
Classic situation: A gardener who must have access on Tuesdays and Thursdays in the afternoon. The person in charge wants to leave access pre-authorized in those and only those hours, without having to register a new visit each time.
Why use Recurring Events and not categories? In the normal registration mode, this filter would be unfeasible:
- ❌ It would be necessary to manually register a new visit at each occurrence
- ❌ Or create very specific categories and time ranges, which is impractical in most systems
Recurring events solve this type of situation in a simple and centralized way!
To add a recurring event, provide:
| Field | Description |
|---|---|
| Company | Company where the visit will occur |
| Visited | Person responsible for the authorization |
| Start / End | Period of validity of the recurrence |
| Start time / End time | Time window allowed for the access |
| Days on which it is valid | Authorized days of the week |
| Type | Event type |
| Custom fields | Default values for custom fields replicated in all generated events |
How it works in practice: It is as if Accelero automatically registered a new visit for that person on the informed days and hours, speeding up the entry of known and trusted people.
Recurring events are not listed on the visit scheduling screen — they are a separate configuration.
Multiple events: The same person can have several simultaneous recurring events. The gardener in the example can go to João's house on Monday morning, to Maria's house on Tuesday afternoon, and to Pedro's house on Thursdays and Fridays — even with overlapping schedules.
Enable/Disable: A disabled recurring event does not grant any access permission. It serves as informative and/or a pre-registration tool.
Best Practices
- Complete data: Fill in as much information as possible, especially name, document, email and phone
- Quality first photo: Always capture a good-quality facial photo in the first position for integration with facial devices
- Well-defined categories: Associate the correct categories with appropriate validity dates — this is the most important configuration
- Companies when applicable: Associate people with companies mainly in condominiums and multi-tenant environments
- Registration validity: Always configure a validity date for temporary visitors and contractors
- Periodic review: Disable or delete inactive registrations periodically
- Recurring events: Use for fixed contractors instead of creating overly specific categories and time ranges
- Individual permissions sparingly: Use only for occasional exceptions; prefer categories for general rules
Next Steps
- Categories - Configure the access categories
- Identifiers - Manage the access identifiers (cards, tags, QRCode)
- Vehicles - Associate vehicles with people
- Companies - Configure companies and associations
- Events - Register visitors and manage events
- Association Types - Configure the person-company link types