Synapsis
Synapsis is IONGRADE's proximity tracking module, natively integrated with ACCELERO. It detects the presence of beacons (Bluetooth Low Energy tags) through antennas and gateways and applies controls configured per region — such as panic button, restricted area, dwell time and safety zone.
It also allows you to view on maps the approximate location of the detected beacons.
Navigation path: Synapsis > Gateways | Regions | Maps | Dwell time | Safety zone
Synapsis is a licensed module (synapsis). The menu and the screens are only available when the module is enabled in the license. See Licensing.
Beacons are small devices that emit Bluetooth Low Energy (BLE) signals. The antennas detect these signals and inform ACCELERO which beacon was seen and on which antenna. From there, ACCELERO applies the rules of each region.
Concept and architecture
Synapsis works on three levels:
| Level | Element | Role |
|---|---|---|
| 1 | Antenna | Detects beacons within its range radius |
| 2 | Gateway | Groups one or more antennas and sends the detections to ACCELERO |
| 3 | ACCELERO | Processes the detections and applies the controls of each region |
Flow: Beacon → Antenna → Gateway → ACCELERO → Control/Action
Each beacon is associated with an identifier (card) in ACCELERO, and this one with a person (or another object). That is why the controls can say "person X entered region Y".
Each Synapsis gateway is identified by its Device ID, which corresponds to the serial of a device already registered in ACCELERO. In the original beacon-tracking scenario, this device is a Kalium BLE gateway, which concentrates the Scandium antennas. In adaptations of the module — such as the Cold Room control — the gateway role can be played by a Neon controller.
When saving a gateway, the entered Device ID is validated against the existing devices (if there is no device with that serial, the system rejects it with "Invalid device ID") and the device is automatically provisioned in the MQTT communication: it becomes a broker user and receives the authorizations (ACL) for the Synapsis topics. That is why registering the gateway is what enables the device to exchange messages with ACCELERO.
Permissions
Access to Synapsis is controlled by two permissions:
| Permission | Description |
|---|---|
Synapsis - manage (synapsisManage) | Register and edit gateways, antennas, regions, controls and maps; access the Dwell time and Safety zone screens |
Synapsis - monitor (synapsisMonitor) | Monitor the location maps in real time |
Configuration
The complete configuration follows five steps: register gateways, register antennas on those gateways, create regions, associate antennas with the regions and, finally, add controls to the regions.
Step 1: register gateways
Path: Synapsis > Gateways
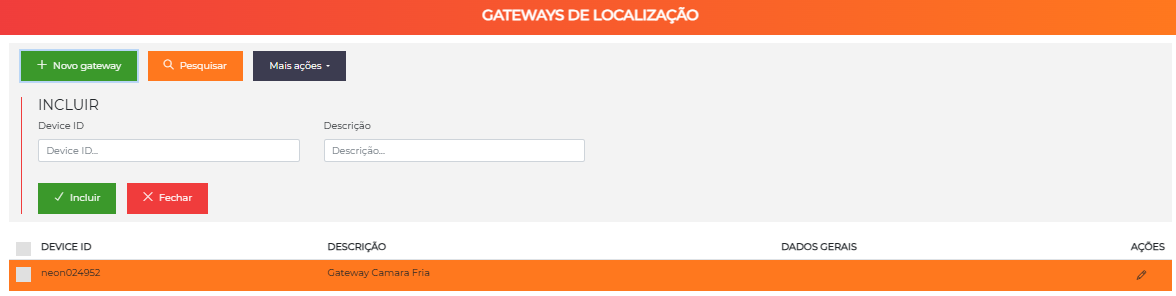
Click New gateway and enter:
| Field | Required | Note |
|---|---|---|
| Description | Yes | Identifiable name of the gateway (up to 50 characters) |
| Device ID | Yes | Serial of a device already registered in ACCELERO (Kalium gateway or Neon controller); up to 50 characters. A nonexistent serial is rejected with "Invalid device ID" |
Step 2: register antennas
Path: Synapsis > Gateways > [select gateway] > Antennas tab
In the gateway editing, open the Antennas tab, click New antenna and enter:
| Field | Required | Note |
|---|---|---|
| Type | Yes | Antenna model/origin (see below) |
| Description | Yes | Identifiable name (up to 50 characters) |
| Device ID | Yes | Unique identifier of the antenna (up to 50 characters) |
Recognized antenna types:
- Scandium — IONGRADE BLE beacon antenna (see Scandium Antenna), used in beacon tracking.
- Controller / channel — a channel of a controller (for example, a facial reader) acts as a detection point. This is the type used in adaptations such as the Cold Room, in which the access readers play the role of the antennas.
Each antenna needs a unique Device ID. When trying to register an antenna with an already existing Device ID, the system shows "Antenna already registered in the system!".
A gateway can manage several antennas. Repeat the registration for each antenna subordinate to it.
Step 3: create regions
Path: Synapsis > Regions
The region is the physical area where the controls are applied. Click New region and enter the Description (required, up to 100 characters) — for example, Parking or Server room.
Step 4: associate antennas with the regions
Path: Synapsis > Regions > [select region] > Antennas tab
In the region editing, open the Antennas tab and add the antennas that cover that space. An antenna can participate in more than one region and antennas from different gateways can make up the same region.
The logic is direct: a beacon only affects the controls of a region if it is detected by an antenna associated with that region.
Step 5: configure controls
Path: Synapsis > Regions > [select region] > Controls tab
In the Controls tab, click New control, choose the type and enter a description (optional). Each type opens its own parameter form. The same region can have several controls active at the same time.
Nothing prevents combining, for example, a Redzone and a Panic button in the same region.
Control types
Synapsis offers four types of control per region.
1. Alarm / panic button
Turns beacons into wireless panic buttons.
Configuration parameter:
- Card types — which card types work as a panic button. Only the detection of a beacon whose card belongs to one of these types triggers the alarm.
Behavior (on detection): when detecting a beacon of a configured card type, the system generates an incident of the Synapsis - Alarm/panic button type in the Incident Panel and publishes an alarm to the operators. Duplicate incidents for the same beacon and region (not yet normalized) are avoided.
It is common to use button-type beacons, which only emit a signal when pressed. This way, the alarm is triggered on demand by the person.
2. Redzone (restricted area)
Alerts when an unauthorized beacon is detected in the region.
Configuration parameter:
- Authorized categories — which person categories have permission to be in the region.
Behavior:
- On detection: the system identifies the person associated with the beacon and checks their categories. If any category is among the authorized ones, nothing happens. Otherwise, it generates an incident of the Synapsis - Redzone type and publishes the alarm.
- On leaving the region (undetect): the system automatically normalizes the open incident of that beacon in that region.
Beacons that are not linked to any person (or whose categories are not among the authorized ones) also trigger the Redzone.
3. Dwell time
Monitors how long each person stays in a risk area and alerts when the maximum time is exceeded. It is the basis of the native Cold Room control.
Configuration parameters:
- Maximum dwell time (minutes) — time limit allowed (default value: 10).
- Unsafe zone antennas — antennas that represent the risk area (e.g. inside the cold room).
- Safe zone antennas — antennas that represent the safe area (e.g. outside the cold room).
Behavior: while the beacon is detected by an antenna that does not belong to the safe zone, the person is considered inside the unsafe zone and the timer runs. When it is detected by a safe zone antenna, the stay ends. The entry and exit periods are recorded and feed the dwell time report.
When approaching the limit, the system sends a pre-alarm (about 5 minutes before) and, when it is exceeded, a dwell time alarm. These notices are delivered as real-time notifications, not as incidents in the Incident Panel.
For the complete detailing of this control and the monitoring screen, see Dwell Time.
The Dwell Time control is reused by the native Cold Room feature, which adds up the time accumulated per person and considers a rest period between entries. See Cold Room.
4. Safety zone
Follows, in real time, which people of certain categories are (or are not) present in a region — useful as a meeting point in evacuations or to ensure the presence of critical assets.
Configuration parameter:
- Categories to be detected — person categories that should be monitored in that zone.
Monitoring
Path: Synapsis > Safety zone
The screen lists the configured safety zones. When opening the monitoring of a zone, you follow in real time the list of people of the monitored categories, with the status of each one:
- Present (detected in the zone)
- Absent (not detected)
The update is continuous — as the beacons enter and leave, the status changes automatically on the screen.
This feature is also known as safety zone, green zone, muster point or meeting point.
Location maps
ACCELERO allows you to graphically view the approximate position of the beacons over a floor plan.
Path: Synapsis > Maps
Synapsis is not a precise positioning tool. The displayed position is an approximation and depends on the number and positioning of the antennas, physical barriers, interference, beacon battery and the environment. The real function is to indicate presence with an approximate location.
Create a map
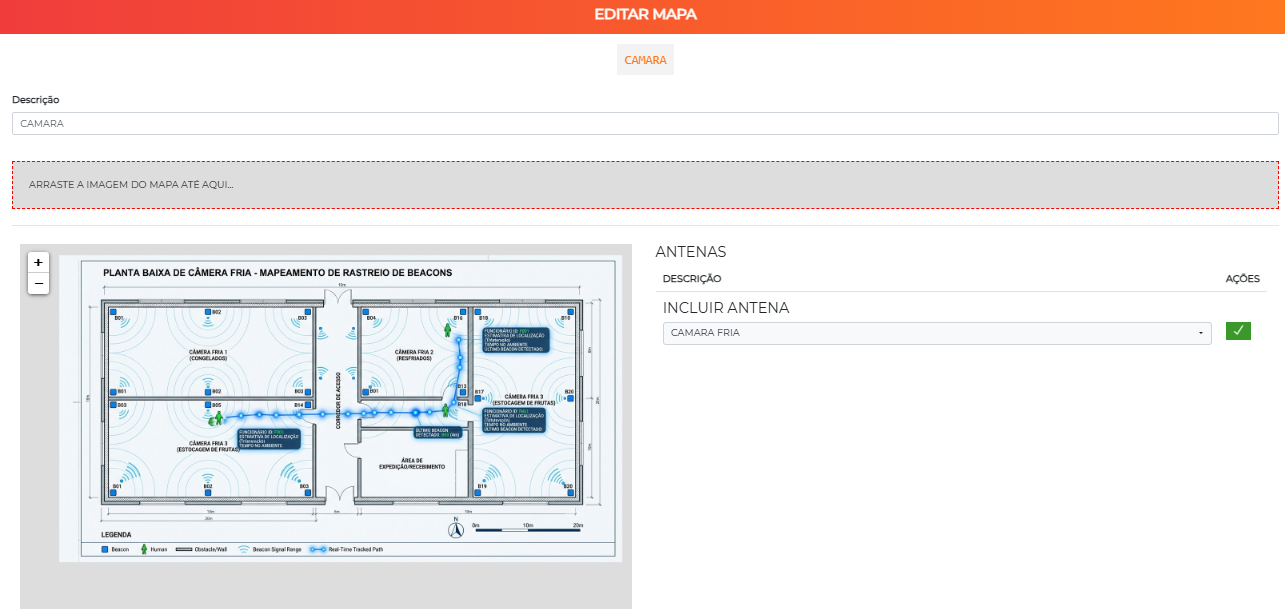
Click New map and enter the Description (required, up to 50 characters) and the background image (floor plan). You can drag the image to the area indicated on the screen or select it through the file picker.
Accepted formats: JPG, JPEG or PNG, up to 4 MB.
Recommendation: use an image in good resolution, but optimized in size, so the map loads quickly in monitoring.
Add and position antennas
- Add the relevant antennas to the map (they can be from different gateways; you do not need to include all of them).
- Each added antenna becomes a marker on the map.
- Drag each marker to the real physical position of the antenna and save.
- To remove an antenna from the map, use the delete button in the corresponding row.
The same antenna cannot be added twice to the same map ("Antenna already added to the map!").
Monitor a map
In the map listing, use the Monitor action (requires the synapsisMonitor or synapsisManage permission). The map starts updating automatically, showing markers of the detected beacons over the plan.
Features on the monitoring screen:
| Action | How to do it |
|---|---|
| Zoom | Mouse scroll |
| Drag (pan) | Click and drag the image |
| Beacon details | Click on the marker |
The update time is defined on the gateways and involves a trade-off: short intervals update faster, but leave the markers more unstable; long intervals stabilize the position, but update more slowly.
To stop the monitoring, use the Monitor button again — it works as a switch (turns the automatic update on/off). You can also open several maps at the same time in different browser tabs to follow distinct locations in parallel.
Include a screenshot of the map monitoring screen with beacon markers over the floor plan.
Dwell time report
Path: Reports > Dwell time
Extracts the history of stays recorded by the Dwell time control.
Filters: start date, end date, person name and antenna (unsafe zone).
Columns: date, location (antenna), name, entry time, exit time and dwell time (difference between entry and exit). The person's name is a link to the record.
Access to the report is controlled by the dedicated Reports - dwell time permission (reportPermanencyTime). See Reports.
Notifications
Operators can receive Synapsis notifications according to their user preferences:
- Synapsis - Alarm/panic button
- Synapsis - Redzone
- Synapsis - Dwell time alarm
- Gateway - connection status change
Integration with I/O
Combine Synapsis events with I/O and Automation to trigger physical devices:
Synapsis event            → I/O action (example)
Panic button detected     → Trigger siren + close locks
Redzone violated          → Turn on alarm + notify security
Dwell time                → Trigger visual signal
Flow and usage suggestions
Cold room in a food industry
Configure the cold room region with a Dwell time control: the internal antennas as the unsafe zone and the external antenna as the safe zone. The employee enters carrying the beacon, the timer starts and, when approaching the limit, security receives a pre-alarm; if the time runs out, the alarm triggers. For time accumulation per person and rest between entries, use Cold Room.
Server room with restricted access
Create the Data Center region and add a Redzone control with only the authorized IT categories. Any person from another category — or a beacon without a link — detected in the room generates an immediate incident in the Incident Panel for auditing. On leaving, the incident is normalized automatically.
Panic button in service
Distribute button-type beacons to a specific card type and create an Alarm / panic button control in the region served by antennas. When the button is pressed, the beacon is detected, generates an incident and alerts the security team with the approximate location.
Meeting point in evacuation
Define the meeting point region with a Safety zone control monitoring the employees' category. During an evacuation, the team follows through the Synapsis > Safety zone screen who is already present and who is still missing.
Best practices
- Plan the coverage: distribute the antennas so as to cover each region well.
- Test the detection: validate that the beacons are detected throughout the expected area.
- Define categories and types carefully: Redzone and Safety zone use person categories; the Alarm uses card types.
- Monitor the battery of the beacons — a weak battery reduces the range.
- Adjust the update time of the gateways seeking the balance between speed and stability.
- Keep the maps up to date when there is a physical change in the installation.
- Configure the appropriate notifications for each control type.
Troubleshooting
Beacons are not detected
Possible causes: weak beacon battery, defective or poorly positioned antenna, offline gateway or excessive distance between beacon and antenna.
What to check: replace/charge the beacon battery, confirm that the antenna is active and associated with the correct region and validate the gateway connectivity.
Positioning on the map too imprecise
Possible cause: few antennas in the area or inadequate positioning of the markers.
What to check: add more antennas to improve coverage and adjust the markers on the map to reflect the real physical installation. Remember that the positioning is always approximate.
False alarms in Redzone
Possible cause: beacons without an associated person (or with categories outside the authorized ones) circulating in the region, or interference.
What to check: confirm the link of the beacons to people and categories, and review which authorized categories are configured in the Redzone control.
Gateway does not connect
Possible causes: network problem, incorrect Device ID (does not match the controller's alias) or firewall blocking communication with the broker.
What to check: validate the network, check the gateway's Device ID and open the necessary ports for communication with ACCELERO.
Next Steps
- Dwell Time — detailing of the control and the monitoring screen
- Cold Room — native control based on dwell time
- Incident Panel — manage Redzone and panic button alarms
- Categories — configure the categories used in Redzone and Safety zone
- I/O and Automation — trigger devices from Synapsis events
- Logs and Monitoring — follow the system events