Global Settings and Resources
ACCELERO has global settings and resources that bring important features to the solution.
Main path: Advanced > System
Settings are organized into multiple tabs and sections. This chapter documents all the available global settings.
1. Inactivity Logoff
Automatic disconnection of inactive operators.
Path: Advanced > System > System - Advanced
Configuration:
- Field: Inactivity logoff (seconds)
- Value: Maximum inactivity time in seconds
How it works:
- The operator performs no action for X seconds
- The system disconnects them automatically
- Applies only to operators with the "Automatic logoff" flag enabled
Example:
Value: 1800 (30 minutes)
Result: Operators inactive for 30 min are disconnected
Use values between 15-30 minutes to balance security and usability.
2. Session Revalidation
Time for automatic session renewal after closing the browser.
Path: Advanced > System > System - Advanced
How it works:
- The user closes the browser
- ACCELERO waits the configured time
- If the user reopens the browser within that period: Session renewed automatically
- If it exceeds the time: Logoff is executed
Application:
- All operators are subject to this control
- No exceptions
Example:
Value: 300 seconds (5 minutes)
User closes the browser at 14:00
User reopens the browser at 14:03 → Session renewed
User reopens the browser at 14:06 → Needs to log in again
3. Periodic Login Revalidation
Requires operators to periodically revalidate access via email.
Path: Advanced > System > System - Advanced
Field: Login revalidation (days)
Values:
- 0 (zero): Function disabled
- Greater than zero: Enabled with a defined period
How it works:
- Every X days, the operator's access is automatically blocked
- ACCELERO sends an access link to the registered email
- The operator clicks the link
- The system confirms that the operator has access to the email
- Access is revalidated for another period
Example:
Value: 90 days
Operator logs in on 01/01
On 01/04 (90 days later): Access blocked
Email sent with a revalidation link
Operator clicks the link → Access granted until 01/07
Ensures the operator's email remains accessible and valid.
4. Default Validity of Provisional Identifiers
Defines the automatic validity of provisional identifiers when associating them with people.
Path: Advanced > System > System - Advanced
Field: Default validity of provisionals (days)
How it works:
- When associating a provisional identifier with a person
- The identifier's validity is automatically changed
- It follows the validity defined in this field
Options:
- Blank field: Does not change the validity (keeps the identifier's previous configuration)
- Defined value: Automatically changes it to X days
Example:
Value: 7 days
Provisional identifier associated today
Automatic validity: Up to 7 days from now
See Identifiers for details.
5. Action in a Duress Situation
Defines the system's behavior when it detects duress.
Path: Advanced > System > System - Advanced > Security
Field: Action in a duress situation
Options:
Automatic Opening
- Access always authorized
- Even if the person does not have permission at that location
- Objective: Not to alert the coercer that duress was detected
When to use:
- The priority is the person's safety
- It is important not to alert the intruder
Apply Access Policies
- The system performs the normal check of prerogatives
- It may deny access if the person does not have permission
- Duress is recorded even if access is denied
When to use:
- The physical security of the location is the priority
- Improper access cannot be allowed
In both cases:
- ACCELERO generates a duress event on the Incident Panel
See Identifiers - Duress for the configuration of duress identifiers.
6. QR Codes
Configuration of QR Code algorithms and formats.
Path: Advanced > System > System - Advanced > Security
QR Code Format
Field: QR Code format
Options:
Encrypted (Recommended)
- Additional security to avoid spurious generation
- Recommended for IONGRADE controllers
- Data cannot be easily read/copied
Open Text
- Data visible/readable in the QR Code
- Compatibility with non-IONGRADE controllers
- Less secure
Use Encrypted with IONGRADE controllers. Use Open text only if necessary for compatibility.
Numbering Model for Visitors
Field: Visitor QR Code numbering model
Options:
Optimized Format (Recommended)
- Numbering optimized for modern readers
- Better data density
Compatible Formats
- For readers with Wiegand output
- Compatibility with old readers
- May also require the "Open text" format
Consult support if you use Wiegand readers or legacy hardware.
7. Bidirectional Access
Configuration of how the system interprets bidirectional accesses.
Path: Advanced > System > System - Advanced > Security > Bidirectional accesses
Context:
- Controllers with a bidirectional reader (one reader, two directions)
- The system can try to interpret the direction automatically or not
Options:
Consider the Person's Current Area
- ACCELERO tries to identify the direction automatically
- Uses the person's current area as a reference
- If it can identify it: Converts bidirectional into unidirectional
- If it cannot: Treats it as bidirectional
Do Not Consider the Current Area (Recommended)
- ACCELERO always treats the access as bidirectional
- Does not make assumptions about the current area
- Default and recommended configuration by IONGRADE
This configuration does not affect anti-passback checking.
8. Use of HTTPS
Configuration of the secure HTTPS protocol.
Path: Advanced > System > System - Advanced > Security > HTTPS
Recommendation:
- Always use HTTPS in production
- Non-secure connections should be rejected
- Automatic redirection to HTTPS
Exceptions:
- Specific situations may require HTTP
- Configure on this screen when necessary
HTTPS protects credentials and sensitive data in transit.
9. People Who Can Receive Visits
Defines who appears as the visited person during visit registration.
Path: Advanced > System > System - Advanced > General
Field: People who can receive visits
Options:
Any Person
- All people associated with the company appear in the listing
- Any employee can be visited
Only "Authorizers"
- Limits the listing to people marked as "Authorizers" in the association
- Only specific people can receive visits
See Companies - Associations to configure authorizers.
10. Contingency Only If There Is Access
Filter for contingency lists based on the last access.
Path: Advanced > System > System - Advanced > General > Contingency only if there is access within
Objective:
- Reduce the size of contingency lists
- Avoid sporadic people taking up space unnecessarily
Configuration:
- Default: No filter (all people)
- With value: Only people with access in the last X days
Example:
Value: 30 days
The contingency list includes only people who accessed in the last 30 days
11. Default Area for New People
Initial area of registered people.
Path: Advanced > System > System - Advanced > General > Default area for new people
Importance:
- Critical for installations with anti-passback
- Defines where the person "is" when registered
Application:
- People registered via the People menu
- Visitors have their own specific rules
Recommendation:
- Define a logical area such as "External" or "Outside the building"
- Avoids anti-passback problems
12. Automatic Closing of Unclosed Visits
Automatic closing of expired visits.
Path: Advanced > System > System - Advanced > Visitors tab
Objective:
- Clean up expired visits that were not closed manually
- Avoid cluttering the registration screens
How it works:
- A visit expires (its end date/time passes)
- It was not closed manually
- After the configured period, it is automatically finalized
- The process runs at the turn of the day
Example:
Configuration: 3 days
Visit expires on 01/01
It is not closed manually
On 01/04: The system closes it automatically
13. Automatic Deletion of Expired Categories
Automatically removes associations of expired categories.
Path: Advanced > System > System - Advanced
Field: Expired categories
Objective:
- "Clean up" the registration screens
- Remove categories that have already expired
Behavior:
- Does not affect access (the category was already expired)
- Removes it only from the visual listing
- Makes it easier to view current data
14. Generate System Operation Log
Defines whether background actions generate logs.
Path: Advanced > System > System - Advanced
Field: Generate system operation log
Context:
- The system runs background actions (e.g., closing visits automatically)
- This flag defines whether these actions generate audit logs
Options:
Enabled
- All background actions are recorded in logs
- Maximum auditing
- Many logs can be generated
Disabled (Recommended)
- Background actions do not generate logs
- Avoids excessive use of the database
- Recommended for most installations
Enabling it can impact performance and disk usage. Use it only if full auditing is necessary.
15. Generate Alarms for Expired Visits
Creates incidents when a visit expires without being closed.
Path: Advanced > System > System - Advanced > Visitors tab
Default: Disabled
When to enable:
- It is important to be notified of unclosed visits
- Security requires tracking of all exits
How it works:
- A visit expires without being closed
- An incident is generated on the Incident Panel
- The operator can investigate
16. Allow Visitor Re-entry
Defines whether visitors can access again after leaving.
Path: Advanced > System > System - Advanced > Visitors tab
Options:
Re-entry Allowed
- The visitor has access during the entire period of the event
- They can leave and return as many times as they want
- More flexible
Re-entry Denied
- After leaving, access is blocked
- The visitor cannot return even within the time window
- More restrictive
Application:
- Only visits created in the ACCELERO interface
- Integration events (apps) follow the app's rules
Example:
Visit: 01/01 08:00-18:00
Re-entry allowed:
  - 10:00: Enters ✓
  - 12:00: Leaves ✓
  - 14:00: Enters again ✓

Re-entry denied:
  - 10:00: Enters ✓
  - 12:00: Leaves ✓
  - 14:00: Tries to enter ✗ DENIED
17. Notify Visited People When Resending a QR Code
Sends an email to the visited person when a QR Code is reissued.
Path: Advanced > System > System - Visitors
Objective:
- Additional security
- Detect possible fraud
How it works:
- A visitor's QR Code is reissued
- An email is sent to the authorizer/visited person
- The visited person knows that a new QR Code was generated
18. Re-disable Visitors After Finalization
Defines whether a visitor is disabled again after the visit ends.
Path: Advanced > System > System - Advanced > Visitors tab
Field: Re-disable visitors after visit finalization
Context:
- A person registered in ACCELERO but disabled
- A visit is registered → The person is automatically enabled
- The visit ends → What happens?
Options:
Flag Enabled
- The system "remembers" that the person was disabled
- When finalizing the visit, it disables them again
Flag Disabled
- The system disregards the history
- The registration remains enabled after the visit
19. Photos Coming from External Applications
How to handle photos received from integrated apps.
Path: Advanced > System > System - Advanced > Visitors tab
Field: Photos coming from external applications
Options:
| Option | Behavior | When to Use |
|---|---|---|
| Always use | The received photo always overwrites position 01 | The app is a trusted source of photos |
| Use only if the person has no photo | The received photo is used only if position 01 is empty | Recommended - Preserves existing photos |
| Never use | All received photos are ignored | You do not trust photos from apps |
20. Advance Time for Printing QR Codes
Allows generating QR Codes before the event time.
Path: Advanced > System > System - Advanced > Visitors tab
Field: Advance time (minutes) for printing QR Codes in self-service
Default:
- A QR Code can only be generated during the event period
With advance time:
- A QR Code can be generated X minutes before the event
- Better user experience
Important:
- Advance printing does not mean advance access
- Access is only possible during the scheduled time
Example:
Event: 14:00-18:00
Advance: 30 minutes
The visitor can print the QR Code starting at: 13:30
But can only access starting at: 14:00
21. Enable/Disable Fields in Screens
Hide unused fields to simplify the interface.
Path: Advanced > System > System - Advanced > Enable/disable fields tab
Functions that can be hidden:
| Function | What It Hides |
|---|---|
| QR Code | All fields related to QR Codes |
| Blocking categories | Fields for blocking categories |
| Access password | Access password fields for people |
| Family module | Photos of associated people in the Blocking Point Monitor |
| Occupancy | Area occupancy fields |
| Advanced logs | Generation of advanced audit logs |
| Locator | Visit locator fields |
When to use:
- Simplify the interface
- Avoid confusing operators
- Hide unlicensed resources
22. Customizable Access Rules
Enables/disables specific access rules.
Path: Advanced > System > Customization - Customizable access rules
Available rules:
- Pass validation
- Credit validation
- Shift control
Recommendation:
- Disable all rules that are not used
- Improves the system's response speed
23. Entity Naming
Allows renaming the system's standard entities so that the terminology fits the reality of the installation.
Path: Advanced > System > Customization - Entity naming
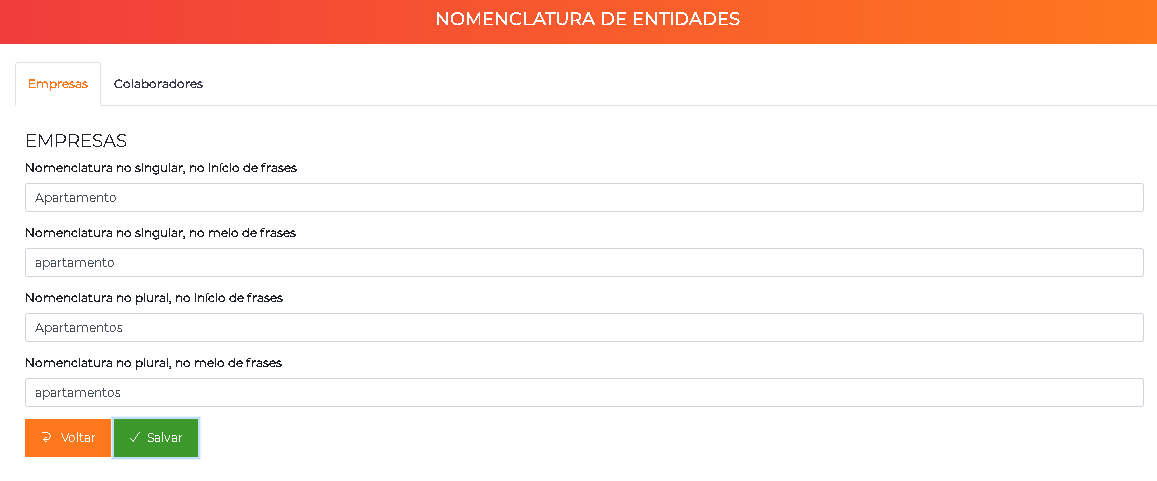
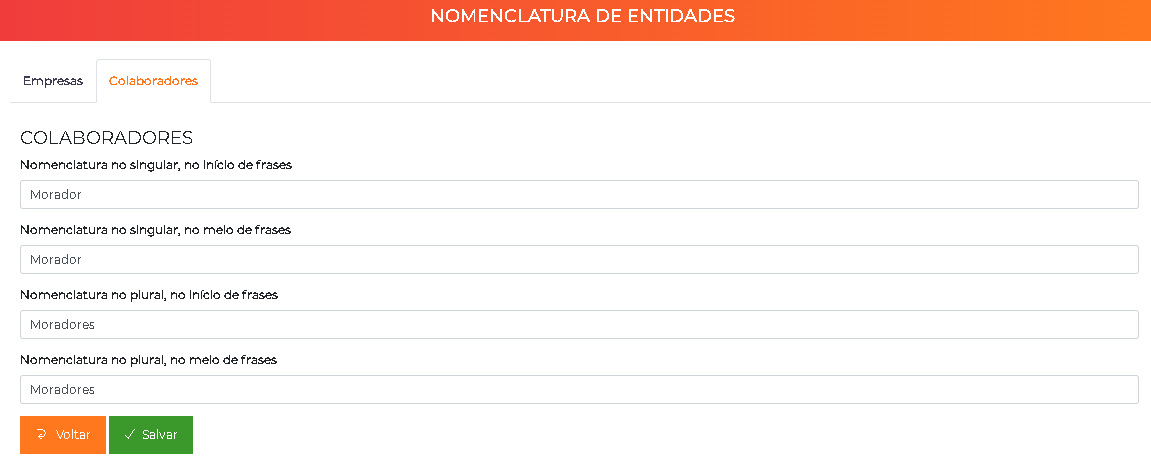
By default, ACCELERO uses generic naming such as company and employees. In residential condominiums, for example, it is common to rename company to "apartment" and employees to "residents", making the system more familiar to end users.
To change the naming, the operator's profile must have the corresponding permission. Check this before starting the procedure.
Step by Step
-
Go to
Advanced > Systemand locate the Customization - Entity naming option. -
Click Edit to open the screen.
-
On the Companies tab, change the naming as needed (e.g., "apartment").
-
Navigate to the Employees tab and repeat the procedure (e.g., "residents").
-
Save the changes.
Each naming must be filled in for the singular/plural and sentence start/end variations, ensuring that the system texts remain grammatically correct.
After saving, close the browser and open it again for the changes to take effect. The update may take a few minutes.
For the customization of the employees naming in the context of decentralized management, see also Multi-tenant - Naming.
24. Screen Customization
Advanced customization with CSS and JavaScript.
Path: Advanced > System > Customization - Advanced Layout
What it allows:
- Include custom CSS applied to all screens
- Inject JavaScript into all screens
- Complete visual customization
ACCELERO does not validate the suitability of the inserted data. Use it with the help of qualified web designers.
Usage example:
- Change default colors
- Add a corporate logo
- Custom JavaScript automations
25. QR Code Templates
Customization of the texts presented when generating QR Codes.
Path: Advanced > System > Customization - QR Code Templates
Customizable:
- Template for each sending method (email, SMS, etc.)
- Different templates for visitors vs. non-visitors
- Dynamic fields available (name, validity, etc.)
Example:
Hello {NOME_PESSOA},

Your access QR Code is ready!
Valid from {DATA_INICIO} to {DATA_FIM}.

Present it at the access reader.
Check-in Templates
Path: Advanced > System > Customization - Visitor check-in > Texts tab
Configurable:
- Email subject
- Message body
- Available variables listed on the screen itself
26. Default Values for Visitors
Default settings applied to new visitors.
Path: Advanced > System > Operation - Default values for visitors
Available settings:
| Field | Description |
|---|---|
| Initial area | Area where the visitor is placed when registered |
| Require escort | If enabled, conditions access on the presence of an escort |
| Contingency time range 01 | Time range for offline operation |
| Contingency time range 02 | Second time range for offline |
| Allow QR Code generation | Global flag to allow/block QR Code generation |
Sending to controllers depends on category configuration. It is generally not recommended.
27. Email Server
Configuration of the SMTP server for sending emails.
Path: Advanced > System > System - Email server
Modalities:
SaaS
- Can use the IONGRADE server (default)
- Or configure its own server
On-Premises
- Mandatory to configure its own server
See On-Premises Server - Email for details.
28. Arrivals Monitor - Quick Actions
Creates shortcut buttons in the Arrivals Monitor.
Path: Advanced > System > Arrivals monitor - Quick actions
Add Category
Associates a category with a person with a single click.
Configuration:
| Field | Description |
|---|---|
| Title | Text displayed on the shortcut button |
| Category | Which category should be associated |
| Duration (minutes) | Validity of the association |
Typical use:
- Grant temporary access
- Visitor without a suitable category
- Emergency access
Example:
Title: "Ground Floor Temporary Access"
Category: TEMP-GROUND
Duration: 60 minutes

The operator clicks the button → The person receives the category for 1 hour
See Logs and Monitoring - Arrivals Monitor for details.
Photo Encryption
The system offers the possibility of encrypting stored photos, adding an extra layer of security to protect biometric and personal data.
Next Steps
- On-Premises Server - On-premises specific settings
- Operation - Use operational features
- Maintenance - Log and data management
- Licensing - Licensed modules and resources