Accelero Server (On-Premises)
When ACCELERO is used in its on-premises version, additional configurations are possible (and necessary) for its correct operation.
This chapter applies only to the on-premises modality. In the SaaS modality, these configurations are managed by IONGRADE.
Navigation path: Advanced > System > Accelero Server
Initial Server Configuration
This section describes the complete first-time configuration procedure of a newly received on-premises server, from defining the IP to accessing the system through the browser.
Step 1: Define the Server IP
The on-premises server does not require an internet connection, but it needs a local connection between the controllers and the computers that will access ACCELERO.
To configure the IP:
- Connect a monitor and a USB keyboard to the server.
- Turn on the server using the power supply shipped with the equipment.
- On the monitor, enter the maintenance credentials:
- User:
manutencao - Password:
manutencao
- User:
- Go to the network configuration menu and adjust the IP according to the installation's needs.
When typing the password, Linux does not display the characters. This behavior is normal — continue typing and confirm.
The server comes configured in DHCP by default, but we always recommend using a fixed IP to ensure that controllers and operators always find the server. Note the IP defined, as it will be used in the following steps.
Step 2: Install the Digital Certificate in the Browser
The digital certificate must be installed on each computer that will access the system. The recommended browser is Google Chrome.
-
In the browser, go to the certificate path, replacing the IP with the IP defined in Step 1:
http://192.168.0.10/certs/accelero.crtThe certificate download starts automatically.
-
Double-click the downloaded file and click Install Certificate.
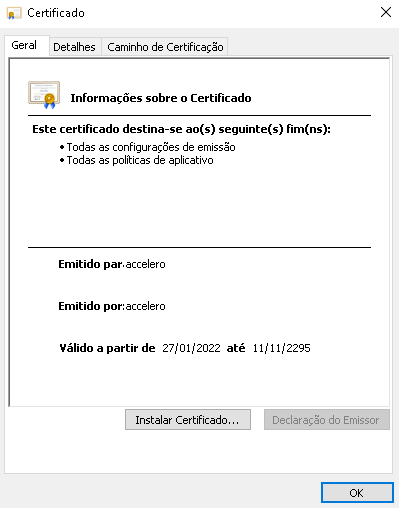
-
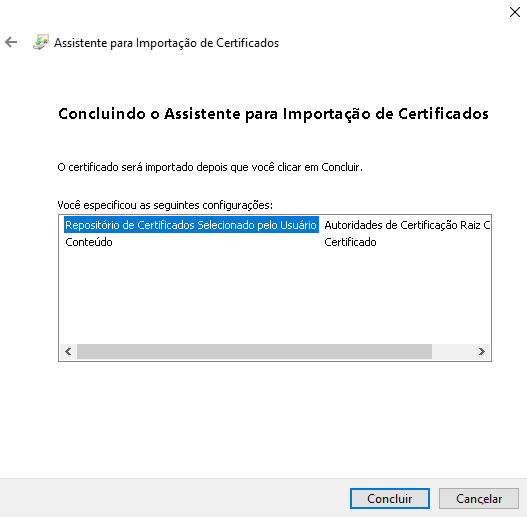
Advance through the import wizard, select the Place all certificates in the following store option, and click Browse.
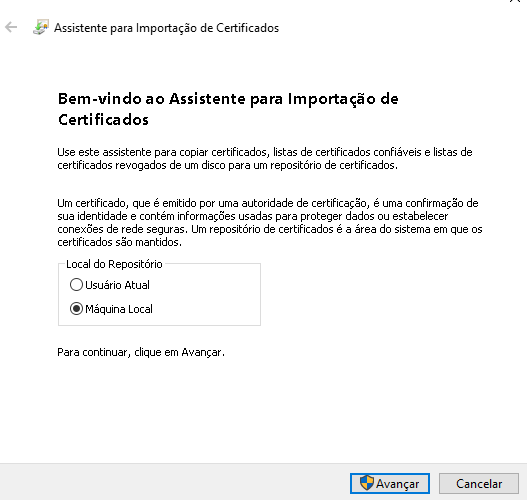
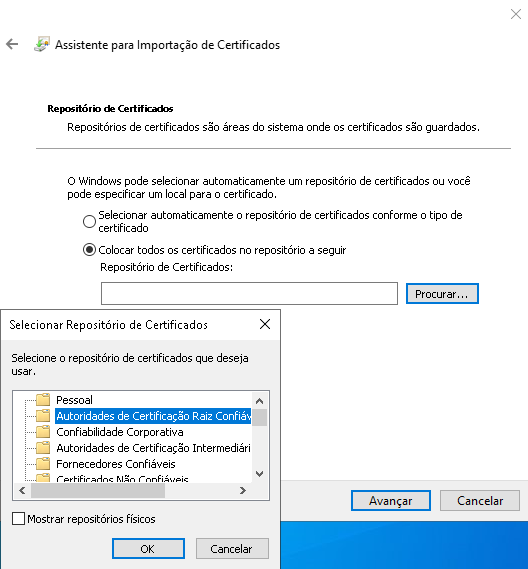
-
Select Trusted Root Certification Authorities and confirm.
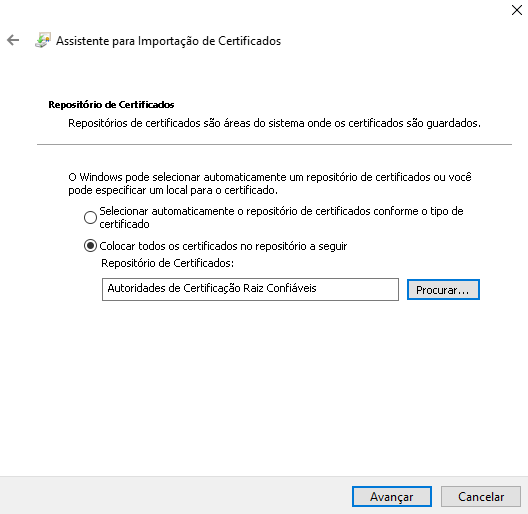
-
Complete the wizard.
Step 3: Edit the hosts File
The last step associates the server IP with the name accelero on the accessing computer.
-
Go to the
C:\Windows\System32\drivers\etcdirectory and locate the hosts file.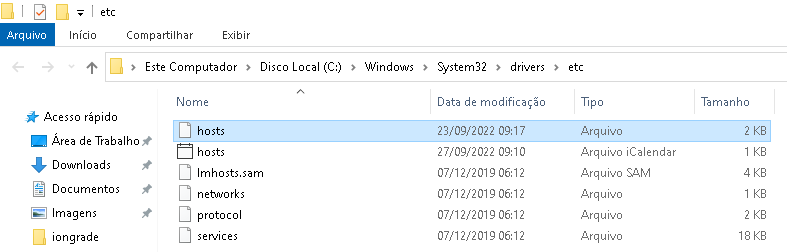
-
Copy the hosts file to the desktop — this avoids damaging the original during editing.
-
Right-click on the copy and select Open with > Notepad.
-
Add a line with the IP defined in Step 1 followed by the name
accelero:192.168.0.10 accelero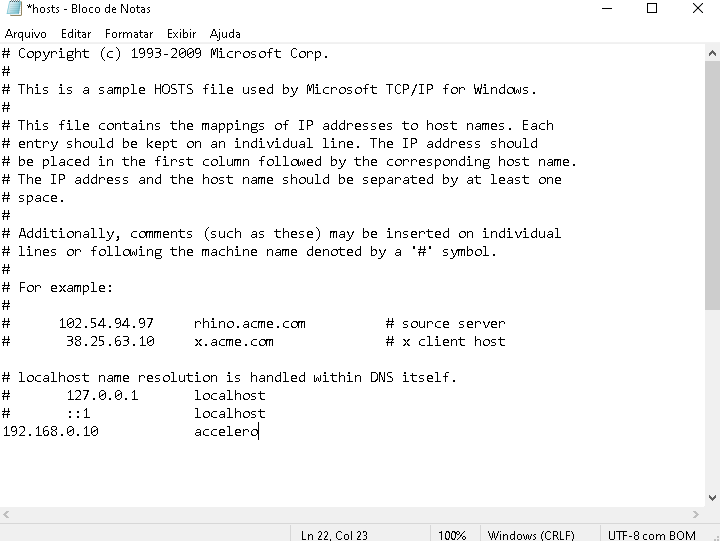
-
Save without changing the file format (do not add a
.txtextension). -
Copy the edited file back to
C:\Windows\System32\drivers\etc, replacing the existing file.
Step 4: Access the System
With the procedures completed, the on-premises server is configured and ready for use. Access ACCELERO at the address:
https://accelero
Editing the hosts file lets you access the system by a friendly name (https://accelero) instead of the IP. The certificate installed in Step 2 is issued for that name — that is why access only works correctly with hosts and certificate configured.
On-Premises vs. SaaS Differences
| Aspect | SaaS | On-Premises |
|---|---|---|
| Hosting | IONGRADE Cloud | Client's local server |
| Maintenance | IONGRADE | Client |
| Updates | Automatic | On demand |
| Network configuration | Not required | Client configures |
| Disk management | IONGRADE | Client |
| SMTP server | IONGRADE (default) | Client configures |
| Backup | IONGRADE | Client |
Available Configurations
The on-premises server has 4 configuration tabs:
- Network - IP, gateway, and DNS configuration
- Disk usage - Space monitoring
- Email - SMTP server for sending emails
- Remote access - IONGRADE technical support
1. Network
Configuration of the IP address and connectivity of the server.
Tab: Network
IP Configuration
Two options available:
Use DHCP
When to use:
- Network with a reliable DHCP server
- Dynamic environment
- Testing and staging
Configuration:
- Select "Use DHCP"
- Save
- The server will obtain an IP automatically
Fixed IP (Recommended)
When to use:
- Production (always!)
- Controllers need to access the server
- Stability required
Configuration:
- Uncheck "Use DHCP"
- Enter:
- IP address: Fixed IP of the server
- Network mask: Subnet mask (e.g., 255.255.255.0)
- Gateway: Network gateway
- DNS server: DNS server for name resolution
You can change the server's network mask directly through the interface, without needing access to the operating system.
Example:
IP address: 192.168.1.100
Gateway: 192.168.1.1
DNS: 192.168.1.1 or 8.8.8.8
Always use a fixed IP in a production environment to ensure that controllers and operators always find the server.
Server Controls
On the same Network tab, the following are available:
Control buttons:
| Button | Action | When to Use |
|---|---|---|
| Restart | Restarts the server | After critical changes, troubleshooting |
| Shut down | Shuts down the server | Physical maintenance, relocation |
Restarting or shutting down the server interrupts all accesses. Plan it for low-traffic hours!
Change via Interface vs. Equipment
You can configure the IP in two ways:
- Via the interface (this screen) - Easier and recommended
- Directly on the equipment - Physical/console access
Both are valid, but the web interface is more convenient.
2. Disk Usage
Monitoring of the disk space used by the system.
Tab: Disk usage
Client's Responsibility
In the on-premises version, disk space management is up to the user.
Displayed Information
The screen shows:
- Total disk space
- Used space
- Available space
- Usage percentage
- Top consumers of space
Top Consumers
Two items are the largest contributors to disk usage:
1. Database
What it takes up:
- Event logs
- Operation logs
- Access history
- Registration data
How to clean:
Path: Advanced > Maintenance > Log deletion
See Maintenance for the complete procedure.
2. People Photos
What it takes up:
- Registered facial photos
- Visitor photos
- Camera captures
How to clean:
Path: Advanced > Maintenance > Photo deletion
Delete photos of disabled people or old visitors.
Monitor disk usage regularly. A full disk can interrupt system operation!
Best Practices
- Monitor weekly: Check the usage percentage
- Set alerts: Configure a notification when the disk reaches 80%
- Clean periodically: Old logs and photos should be deleted
- Back up first: Always before deleting data massively
- Plan for expansion: If growth is constant, expand the disk
3. Email
Configuration of the SMTP server for sending emails by the system.
Tab: Email
Client's Responsibility
In the on-premises version, it is the user's responsibility to specify an email server.
When Emails Are Sent
ACCELERO sends emails for:
- Invites to new operators
- Password recovery
- QR Codes for visitors
- Check-in notifications
- System alerts
Without a configured SMTP server, these functions will not work.
Configuration
Available fields:
| Field | Description | Example |
|---|---|---|
| SMTP server | Server address | smtp.gmail.com |
| Port | Connection port | 587 (TLS) or 465 (SSL) |
| User | Login for authentication | sistema@empresa.com |
| Password | User's password | ********** |
| Use TLS/SSL | Encryption | ✓ Enabled |
| Sender | Name that appears in the emails | ACCELERO - Company XYZ |
| Sender email | Origin address | noreply@empresa.com |
Configuration Examples
Gmail
Server: smtp.gmail.com
Port: 587
Use TLS: ✓ Yes
User: your-email@gmail.com
Password: app-password (not the normal password!)
Gmail requires an app password, not the account password. Configure it in Google's security settings.
Office 365
Server: smtp.office365.com
Port: 587
Use TLS: ✓ Yes
User: your-email@company.com
Password: your-password
Own Server
Server: mail.company.com
Port: 25 (or according to your server)
User: accelero@company.com
Password: configured-password
Send Test
After configuring, test the sending:
- Try password recovery for an operator
- Check whether the email arrived
- Validate that the content is correct
Consult your email provider's documentation for specific SMTP settings.
4. Remote Access
Allows the IONGRADE team to access the server remotely for technical support.
Tab: Remote access
Security
Remote access is highly secure:
- Requires an encrypted key provided by IONGRADE
- The client must enter the key manually
- The client must request access explicitly
- Without the client's consent, access is impossible
IONGRADE never accesses the server without the client's express authorization.
When to Use
Remote access is necessary for:
- Specialized maintenance
- System updates
- Complex troubleshooting
- Advanced technical support
How It Works
- Client contacts IONGRADE support
- IONGRADE generates an encrypted key
- IONGRADE sends the key to the client (email, WhatsApp, etc.)
- Client goes to the Remote access tab
- Client enters the key in the "Key for remote access" field
- Client clicks "Request remote access"
- Connection is opened - IONGRADE can access
- Work is performed
- Connection is closed at the end
Step by Step
-
Receive the key from IONGRADE (example):
7f4a9c2e8b1d6f3a9e5c8d2b4f7a1e6c -
Go to
Advanced > System > Accelero Server > Remote access tab -
Paste the key in the "Key for remote access" field
-
Click "Request remote access"
-
Wait for IONGRADE to perform the work
-
The connection closes automatically after completion
Keys have limited validity. Use them right after receiving them from IONGRADE.
Best Practices
-
Always a fixed IP: Use a fixed IP in production
-
Monitor the disk: Check usage weekly
-
Configure email: Essential for full operation
-
Document configurations: Keep a record of IP, gateway, DNS
-
Test after changes: Validate connectivity after changing the network
-
Regular backup: Back up before critical changes
-
Update regularly: Keep the server up to date
-
Monitor logs: Track the operating system logs
-
Protect physically: Server in a secure, climate-controlled location
-
Controlled access: Only authorized personnel should access the server
Troubleshooting
Server does not respond after changing the IP
Cause: IP configured incorrectly
Solution: Access the physical console, reconfigure the IP
Emails are not sent
Causes:
- Incorrect SMTP server
- Invalid credentials
- Port blocked by firewall
Solution: Check the configurations, test SMTP connectivity
Full disk
Cause: Accumulated logs and photos
Solution: Run cleanup via the Maintenance menu
Remote access does not work
Causes:
- Expired key
- Key typed incorrectly
- Firewall blocking
Solution: Request a new key, check the typing, unblock the firewall
Next Steps
- Maintenance - Cleanup of logs and photos
- Global Settings - General system settings
- Concentrators - Configure access concentrators