Self-service
ACCELERO allows the creation and configuration of access for self-service devices.
Self-service devices are equipment (usually kiosks) that help operate and issue identifiers for visitors.
Concept
Self-service allows:
- Visitors to identify themselves without operator assistance
- QR Codes to be issued automatically
- Check-in to be performed autonomously
- Queue reduction at the reception
- A modern experience for visitors
Practically any device with a browser can be used: tablets, kiosks, laptops, or desktops.
Device Configuration
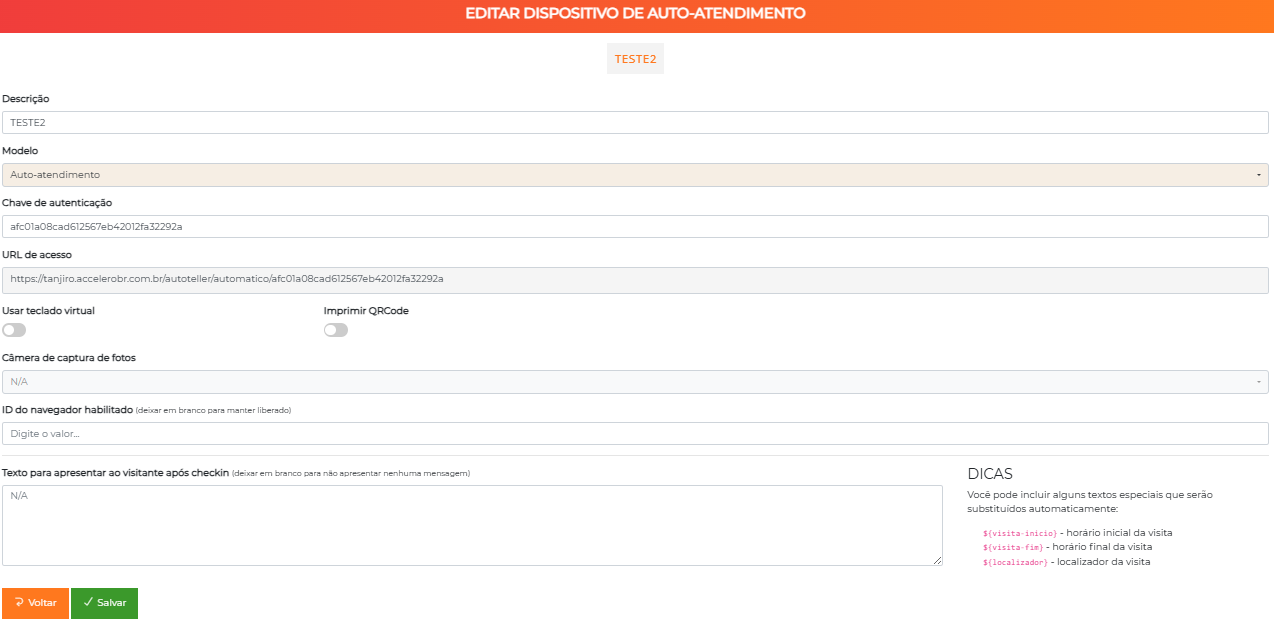
Path: Advanced > Self-service
Create a New Device
- Click "New device"
- Configure the required fields
- Save the configuration
- Note the generated access URL
Configuration Fields
| Field | Description | Required |
|---|---|---|
| Description | Identifying name of the device | ✓ Yes |
| Model | Device model (determines available functions) | ✓ Yes |
| Authentication key | Key for secure access to the screens | ✓ Yes |
| Access URL | Address to be accessed in the browser | Informational |
| Use virtual keyboard | Enables an on-screen keyboard (touchscreen) | No |
| Capture camera | Camera for capturing photos | No |
| Enabled browser ID | Restricts access to a specific browser | No |
| Text after check-in | Message for the visitor after obtaining the QR Code | No |
Description
Identification of the device for internal management.
Examples:
- "Main Reception Kiosk"
- "Side Gatehouse Tablet"
- "Ground Floor Self-service"
Model
Each model gives access to different on-screen functions.
Available models:
- Visitor self-service
- QR Code issuance
- Other models depending on licensing
Available models may vary depending on the license. Consult the specific documentation or technical support.
Authentication Key
Key that ensures secure access from the device's browser to the screens.
Security:
- Generated automatically by the system
- Can and should be changed manually if there is any suspicion of improper access
- Works as the device's "password"
For security, change the key if you suspect unauthorized access to the device.
Access URL
Address that must be accessed in the device's browser.
Informational field - generated automatically by the system.
Typical format:
https://your-accelero.com/self-service?key=AUTHENTICATION_KEY
Use Virtual Keyboard
Defines whether an on-screen virtual keyboard will be enabled.
When to enable:
- Devices with a touchscreen
- Kiosks without a physical keyboard
- Tablets
When to disable:
- Devices with a physical keyboard
- Tablets with the OS's own virtual keyboard
Photo Capture Camera
If selected, enables the photo capture function on the device.
Requirements:
- Camera registered in the system (see Cameras)
- Camera accessible over the network
- Compatibility with the device
Typical use:
- Capture a photo of the visitor during registration
- Improve security and identification
- Complement the QR Code with a photo
Enabled Browser ID
Restricts access to the screens to a specific browser.
How it works:
- Empty field: Any browser can access
- First access: The ID is generated and filled in automatically
- Subsequent accesses: Only the browser with that ID can access
- Different browser: Access blocked
To "release" a new browser:
- Leave the field blank
- The next browser that accesses will have the ID filled in automatically
Typical use:
- Block the use of a "lost" device
- Ensure a specific kiosk uses a specific browser
- Additional security
Text After Check-in
Message presented to the visitor after obtaining the QR Code.
When it is displayed:
- The visitor obtains a QR Code at a kiosk
- The visit is still not authorized
- Check-in is performed automatically
- The message appears on screen
Example text:
Your QR Code was generated successfully!

Wait for the host's authorization.
You will receive a notification when approved.

Please wait at the reception.
Use this field to guide the visitor on what to do while waiting for authorization.
Browser Configuration
Once the device is configured in ACCELERO, configure the browser of the physical equipment.
Recommended Settings
For security and usability reasons, configure:
1. Kiosk Mode
What it does:
- The browser starts in full screen
- The user cannot open new tabs
- The address bar is hidden
- System commands are blocked
How to enable:
Chrome/Chromium:
chromium-browser --kiosk --incognito https://accelero-url
Firefox:
firefox --kiosk https://accelero-url
Edge:
msedge --kiosk https://accelero-url
2. Silent Printing
What it does:
- QR Code printing happens automatically
- No user confirmation required
- The default printer is used
How to enable:
Chrome/Chromium:
chromium-browser --kiosk-printing https://accelero-url
Additional configuration:
- Set the default printer in the system
- Test printing before going into production
Always test silent printing before making a kiosk available for use.
Automatic Startup
Configure the operating system to:
- Auto-login: Automatic login on startup
- Start the browser: The browser opens automatically
- Open the URL: The self-service URL is loaded
Example (Linux with autostart):
# ~/.config/autostart/accelero.desktop
[Desktop Entry]
Type=Application
Name=Accelero Self-service
Exec=chromium-browser --kiosk --kiosk-printing https://url
Usage Flow
Visitor at the Kiosk
- The visitor arrives at the location
- Accesses the self-service kiosk
- Enters data:
- Name
- Document
- Company/person being visited
- Photo (if configured)
- The system validates the information
- A QR Code is generated and printed
- Automatic check-in is performed
- A message is displayed guiding the next steps
- The host receives a notification to authorize
See Visitor Check-in for details of the authorization flow.
Integration with Check-in
When a visitor obtains a QR Code but the visit is not yet authorized:
- The system performs check-in automatically
- Speeds up the approval process
- The host receives a notification
- The visitor waits for authorization
Integration with check-in is automatic when the device is configured correctly.
Device Types
Fixed Kiosk
Characteristics:
- Permanent installation
- Large (touch) screen
- Integrated printer
- Front camera
Typical use:
- Main reception
- Corporate lobbies
- Event entrances
Tablet
Characteristics:
- Portable
- Touchscreen
- No printer (digital QR Code)
- Integrated camera
Typical use:
- Temporary events
- Small receptions
- Mobile installations
Desktop/Laptop
Characteristics:
- Conventional equipment
- Monitor + keyboard/mouse
- USB printer
- Webcam
Typical use:
- Receptions with an attendant
- Backup for the main kiosk
- Corporate environments
Best Practices
-
Position strategically: A visible and easily accessible spot at the entrance
-
Signal clearly: Signs indicating "Visitor Self-service"
-
Provide visual instructions: Stickers/screens showing a step-by-step guide
-
Test regularly: Validate operation daily
-
Monitor supplies: Printer paper, connectivity
-
Have a backup: A plan B if the kiosk fails (manual service)
-
Train the reception: The team should know how to operate and troubleshoot
-
Protect physically: Prevent vandalism and improper use
-
Keep it clean: A clean screen, presentable equipment
-
Update messages: Adapt texts based on feedback
Security
Access Control for the Device
- Use the browser ID to restrict use
- Change the authentication key periodically
- Monitor the device's access logs
Physical Protection
- Fix the equipment to prevent theft
- Use a lockable cabinet/mount
- Security cameras monitoring the kiosk
Sensitive Data
- Configure a session timeout
- Do not save visitor data locally
- Always use HTTPS
Troubleshooting
The kiosk does not print the QR Code
Causes:
- Printer offline or out of paper
- Silent printing not configured
- Incorrect default printer
Solution: Check the printer, configure silent printing
The virtual keyboard does not appear
Cause: The option is not enabled in the configuration
Solution: Edit the device and enable "Use virtual keyboard"
Access denied when opening the URL
Causes:
- Incorrect authentication key
- Blocked browser ID
Solution: Check the URL, release the browser ID
The camera does not work
Causes:
- Camera not configured in the system
- Network/connectivity problem
- Browser permissions
Solution: Check the camera registration, browser permissions
Next Steps
- Visitor Check-in - Understand the authorization flow
- Events - Configure visit types
- Cameras - Configure cameras for capture
- Operation - Monitor visitors in real time