Visitor self-registration
Self-registration allows the creation of publicly accessible links through which a visitor performs their own registration — without an operator — providing name, document, and photo directly from their phone. Upon completion, ACCELERO automatically creates the visitor and the visit event, and displays the access data (with an optional QR Code).
To keep the process reasonably secure, you configure which companies/units can receive self-registration visits and which people are visible as hosts on the link. In addition, access to the link is restricted by a token in the URL, location validation (geofence), and a request rate limit per minute.
This feature is provided as a plugin (autoenroll) and must be installed and enabled by the IONGRADE technical team. Contact support to check compatibility with your version of ACCELERO.
Current plugin version: 1.0.0 — compatible with ACCELERO 2.17.0 or higher.
What the plugin does
| Feature | What happens in ACCELERO |
|---|---|
| Public self-registration link | Provides a public URL (autocadastro/{token}) where the visitor registers through the browser |
| Link QR Code | Optionally generates a QR Code for the link, making access easier at the reception/gatehouse |
| Enable per unit | Only companies/units marked as Enable for self-registration visits appear to the visitor |
| Host control | Only the selected people in each unit are visible as who the visitor will visit |
| Location validation | The visitor only proceeds if they are within the configured radius from the installation's position |
| Visitor photo | Captures the visitor's photo (front camera) during registration |
| Visitor and event creation | Creates the visitor person (if it does not yet exist) and the visit event, linking visitor and host |
| Abuse protection | Token in the URL and a request rate limit per minute per user (rate limit per IP) |
Reduces queues at the reception: the visitor arrives already registered, with a photo and access data ready, without the need for an operator to fill in the registration manually.
Configuration
Navigation path: Settings > Plugins - self-registration
The configuration screen has the General tab, organized into the sections below.
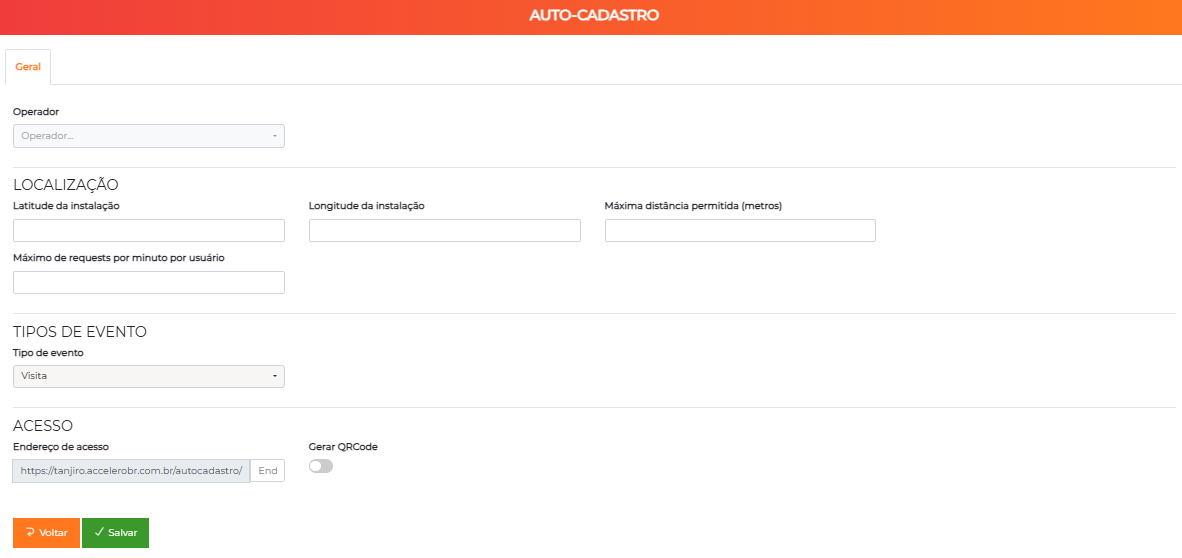
General
| Field | Description |
|---|---|
| User | ACCELERO operator used as the responsible party (internal logged-in user) during the processing of public registrations. Required — without it, the link does not work |
Location
Defines the geofence: the visitor can only proceed if the phone's location is within the configured radius.
| Field | Description |
|---|---|
| Installation latitude | Latitude of the physical reference location (the gatehouse/reception) |
| Installation longitude | Longitude of the physical reference location |
| Maximum allowed distance (meters) | Maximum radius, in meters, between the visitor's position and the installation's position. Beyond that, access is denied |
| Maximum requests per minute per user | Request limit per minute per IP (rate limit). Above the limit, new requests are temporarily blocked |
Use Google Maps to get the exact latitude and longitude of the reception. Adjust the Maximum allowed distance according to the size of the location — a radius that is too small may block legitimate visitors due to the phone's GPS inaccuracy.
Event type
| Field | Description |
|---|---|
| Event type | Event type applied to the visits created by self-registration |
Access
| Field | Description |
|---|---|
| Access address | Token (text) that makes up the public URL. The final link is in the format {server-address}/autocadastro/{token}. It works as a "password" for the link — only those who have the exact URL can access it |
| Generate QR Code | When enabled, the access data displayed at the end of registration includes a QR Code |
The Access address is the main barrier of the public link: requests with a token different from the configured one are rejected. Treat the full URL as sensitive data and avoid sharing it beyond what is necessary.
Screen buttons
| Button | Function |
|---|---|
| Back | Returns without saving |
| Save | Persists the configuration |
Fields added to the entities
Company
The company registration (Companies > Edit) gains the Self-registration section, which controls whether the unit participates in self-registration and which hosts are visible in it.
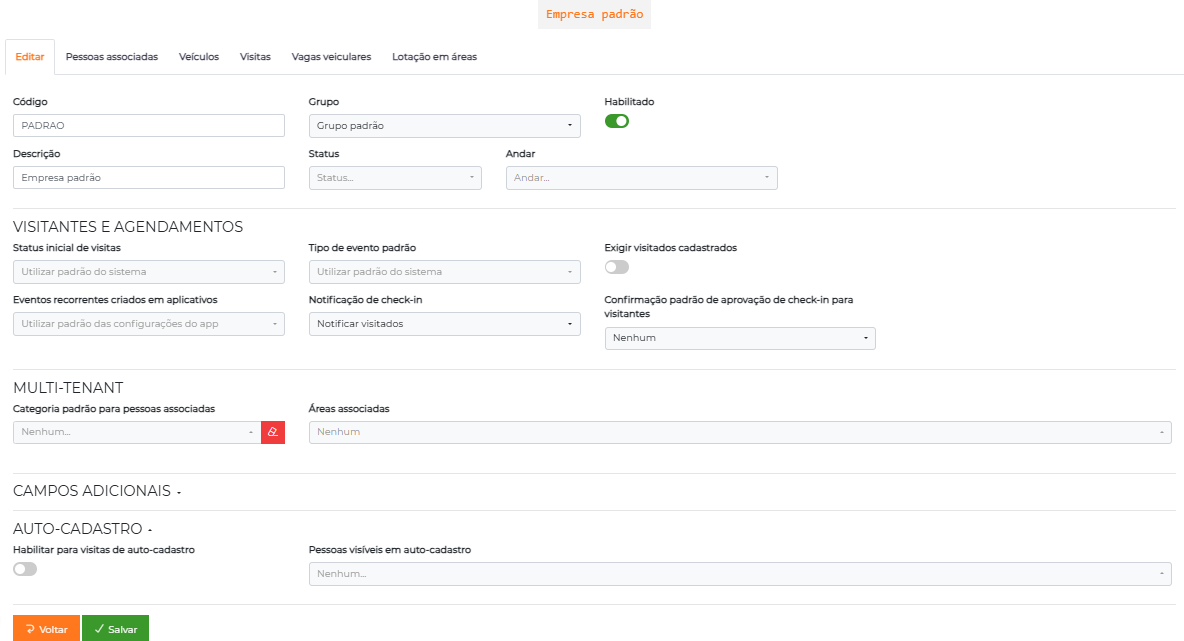
| Field | Description |
|---|---|
| Enable for self-registration visits | Switch that defines whether the unit appears in the unit list of the public link |
| People visible in self-registration | Multi-selection of the people (hosts) that the visitor can choose as "who you will visit" in this unit |
Only units with Enable for self-registration visits turned on enter the public link's list. And even in them, only the people marked in People visible in self-registration are available as hosts.
Visitor flow (public link)
When opening the URL {server-address}/autocadastro/{token} in the phone's browser, the visitor goes through the steps below. The form is optimized for use on a smartphone.
Sequence of screens of the public self-registration form on the phone: location request, welcome, LGPD consent, unit selection, host selection, name, document, and photo capture.
- Location permission — The page requests access to the device's location. It is mandatory: without it (or outside the allowed radius), the visitor is redirected away.
- Welcome — Message: "Welcome! Complete your self-registration to gain access."
- Consent (LGPD) — The visitor must agree to the privacy notice to continue; upon declining, they are redirected away.
- Unit selection — "Which of the units below are you going to?" — lists only the units enabled for self-registration.
- Host selection — "Who are you going to visit?" — lists only the people marked as visible for the chosen unit.
- Name — The visitor provides their own name (between 3 and 50 characters).
- Document — The visitor provides their document (between 3 and 50 characters).
- Photo — Capture of the visitor's photo by camera. The photo is mandatory.
- Completion — "Data was sent successfully. Access data will be shown in a new tab." — a new tab displays the access data, with a QR Code when Generate QR Code is enabled.
If there is already a person registered with the provided document, ACCELERO reuses the existing registration instead of creating a new one. The photo is only set when the person does not yet have a registered photo.
How the data is created
Upon completing the registration, with the location validated, the plugin:
- Creates a visit event in the selected unit, using the configured Event type, and records the visitor's geolocation (latitude/longitude) in the event.
- Creates or reuses the visitor person from the provided document (name and document).
- Sets the visitor's photo, if it does not yet exist.
- Links visitor and host to the event.
- Displays the access data to the visitor (with an optional QR Code).
The status of the visitor's link follows the unit's rule. When the unit is configured to release entry, the plugin issues the visitor's check-in automatically. Check the company's visit configuration to understand the expected behavior.
Public link security
The link is public, but it has three layers of protection:
| Layer | How it works |
|---|---|
| Token in the URL | The URL must end with exactly the configured Access address; divergent tokens are rejected |
| Geofence (location) | Each step that loads data or saves the registration validates the distance between the visitor and the installation's position against the Maximum allowed distance |
| Rate limit | Requests are counted per IP every minute; exceeding the Maximum requests per minute per user temporarily blocks new requests |
Without location permission in the visitor's browser, the flow does not proceed. Instruct visitors to allow access to location when the browser requests it.
Use cases
Enable self-registration at a reception
- Request the installation of the
autoenrollplugin from IONGRADE. - In
Settings > Plugins - self-registration, set the responsible User. - Fill in Latitude, Longitude, and Maximum allowed distance with the reception's position and an appropriate radius.
- Set the Event type for the visits and adjust the Maximum requests per minute per user.
- In Access address, set the URL token and, if desired, enable Generate QR Code. Save.
- In each unit (
Companies > Edit), turn on Enable for self-registration visits and select the People visible in self-registration. - Share the URL
{server-address}/autocadastro/{token}(or the QR Code) at the reception.
Restrict who can be visited
- Edit the desired unit in
Companies > Edit. - In the Self-registration section, adjust People visible in self-registration to contain only the authorized hosts.
- Save — from then on, the link only offers those people for the unit.
Best practices
- Strong and discreet token: Use an Access address that is hard to guess and avoid sharing it publicly beyond the point of use (reception).
- Coherent radius: Adjust the Maximum allowed distance to the actual size of the location. Radii that are too small block legitimate visitors due to GPS inaccuracy; too large weaken the geofence.
- Lean host list: In People visible in self-registration, select only those who actually receive visits, reducing the exposure of names.
- Dedicated responsible user: Use a specific operator (e.g., "Self-registration") as the responsible User, instead of a personal account.
- QR Code at the gatehouse: Enable Generate QR Code and display the link's QR Code at the reception to speed up access for visitors.
Troubleshooting
The link does not open / is redirected away
Possible causes:
- The URL token is different from the configured Access address.
- Location not allowed in the browser or outside the configured radius.
Solution:
- Confirm that the URL ends exactly with the token saved in Access address.
- Check whether the visitor allowed access to location.
- Check Latitude, Longitude, and Maximum allowed distance in the configuration.
No unit appears for the visitor
Possible causes:
- No company has Enable for self-registration visits turned on.
- The visitor is outside the allowed radius.
Solution:
- Edit the units in
Companies > Editand turn on Enable for self-registration visits. - Validate the location configuration.
No host appears in the unit
Possible causes:
- The unit has no one in People visible in self-registration.
- The selected people are not linked to the company.
Solution:
- Edit the unit and adjust People visible in self-registration.
- Confirm the link between the people and the company.
Registration is blocked after several attempts
Possible cause:
- The request rate limit per minute (rate limit) was reached for the IP.
Solution:
- Wait about a minute before trying again.
- If it happens with legitimate frequency, increase the Maximum requests per minute per user in the configuration.
Integration with other modules
Companies
The Self-registration section lives in the Companies registration — that is where you enable the unit and define the visible hosts.
People
The visitor becomes a registration in People (created or reused by the document), and the hosts are people already registered and linked to the company.
Events (Visits)
Each completed registration generates a visit event. See Events to understand the visit's life cycle and the check-in.