Suprema Integration
The Suprema integration lets you use the FaceStation F2 and BioStation 3 facial terminals in ACCELERO access control. The device recognizes the person (by face, fingerprint or card) and the access decision follows the ACCELERO rules: categories, time ranges, areas, registration validity and so on. Who applies those rules depends on the device mode: ACCELERO itself (Direct mode) or a Neon Controller wired to the device through the Wiegand output (Neon mode).
This page is the complete guide to the integration: how it works, every screen and every field, how registration, cards, fingerprint, time ranges and contingency behave, and the device specifics worth knowing before deployment.
This feature requires the Suprema module enabled in the license, with the contracted number of Suprema Devices (each registered facial terminal counts as one). See Licensing.
Navigation path: Settings > Suprema
The Suprema screen groups everything in four tabs, in this order:
| Tab | What it does |
|---|---|
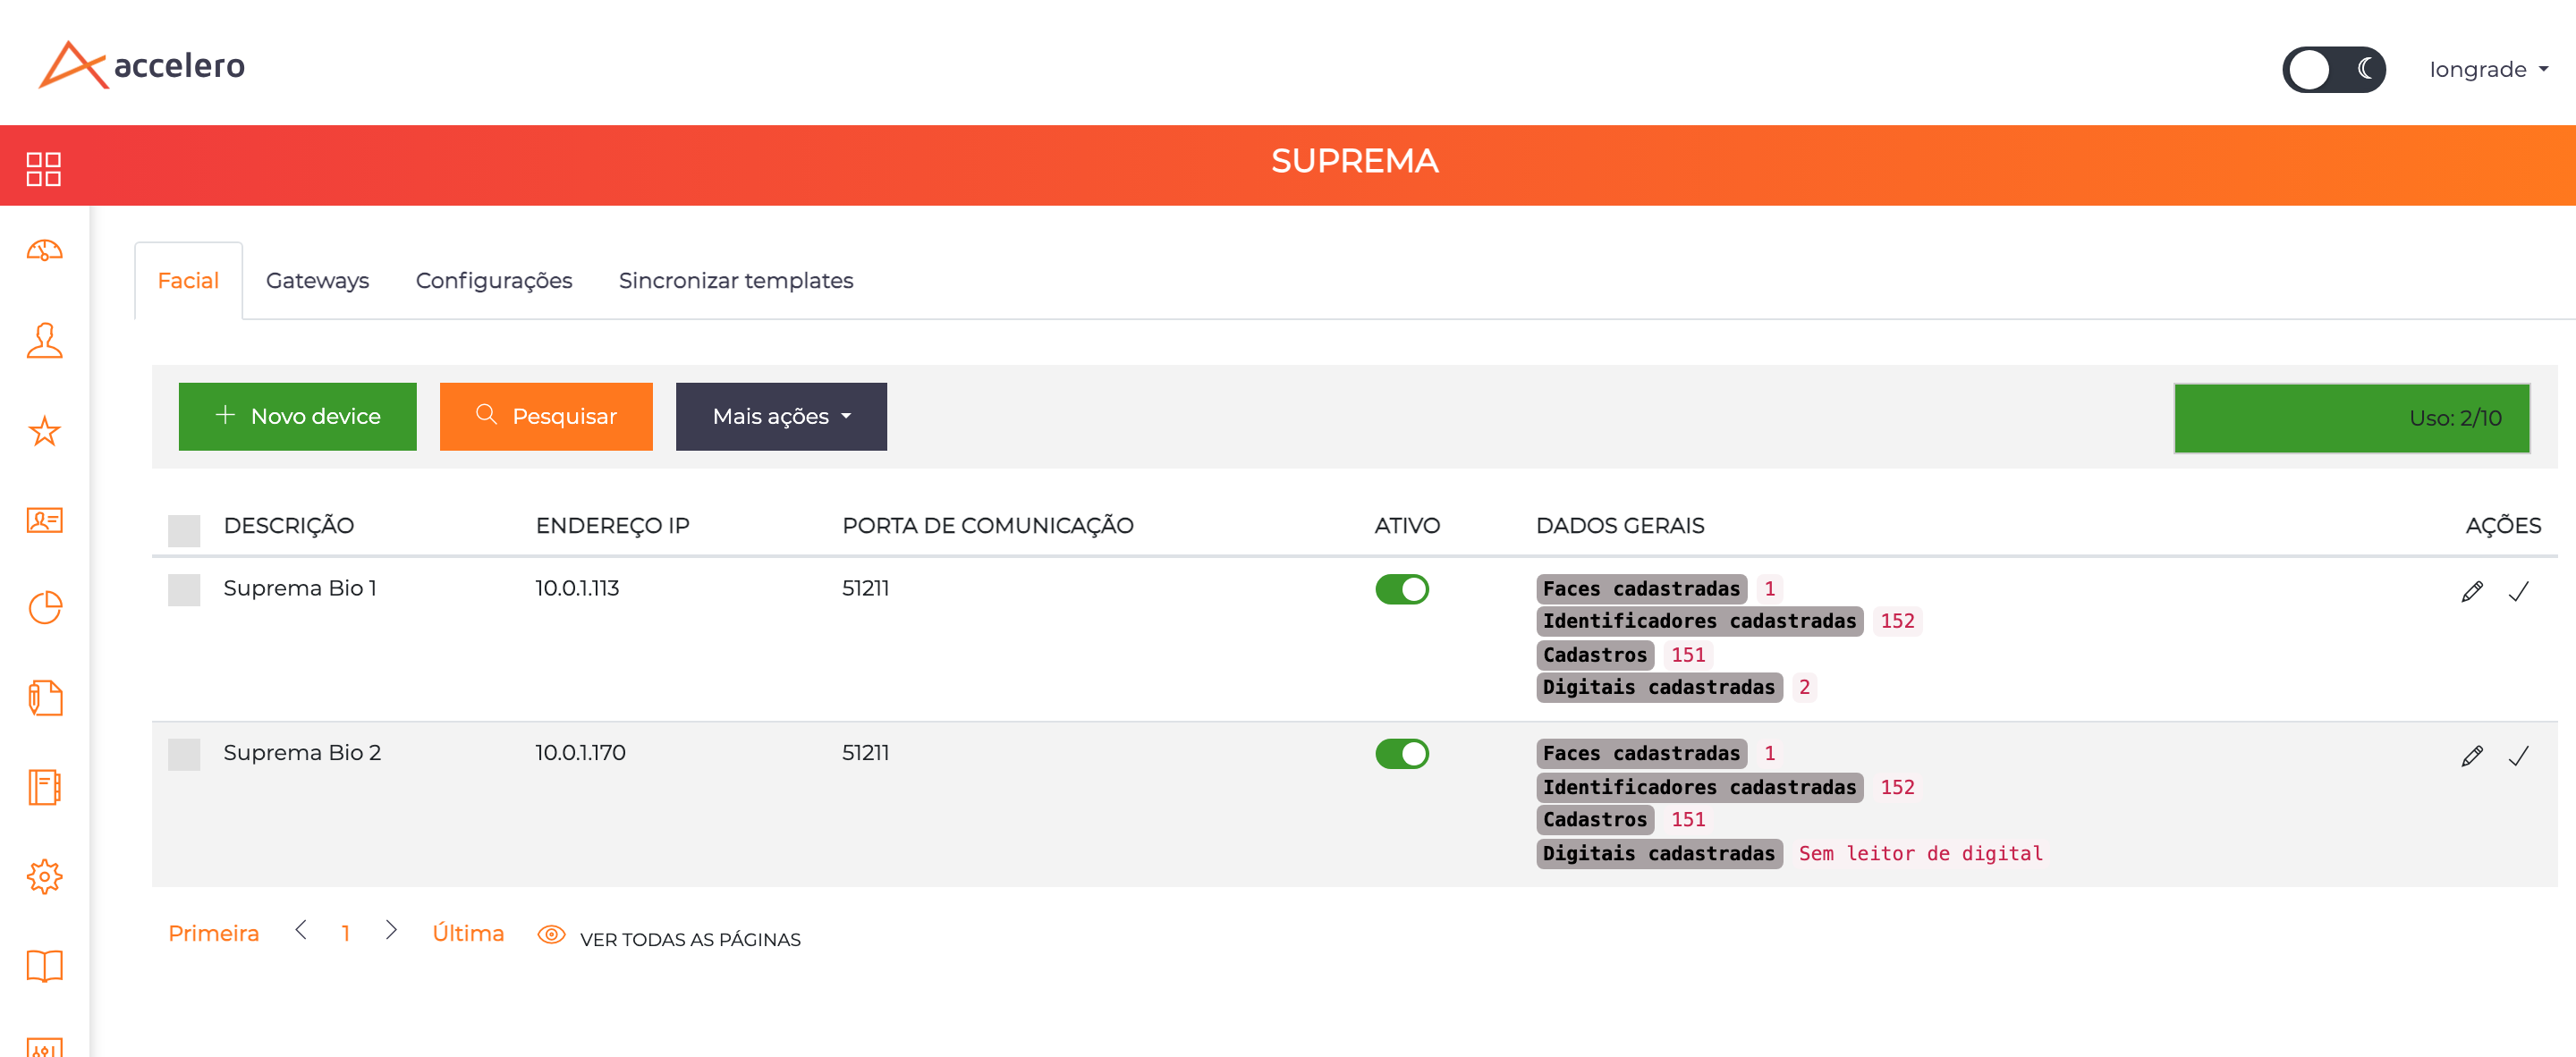
| Facial | List and registration of the facial devices. See Facial device registration |
| Gateways | Registration of the Suprema gateways and the communication status with each device. See Gateway registration |
| Settings | Module settings, valid for every device. See Module settings |
| Sync templates | Bulk sending, checking and deletion of the registrations on the devices. See Template Synchronization |
Overview
Supported devices
| Device | Face | Fingerprint | Card | Note |
|---|---|---|---|---|
| FaceStation F2 | ✓ | ✓ | ✓ | Tested with firmware 2.2.1. The card types read depend on the model version (see Card types read) |
| BioStation 3 | ✓ | no reader | ✓ | Tested with firmware 1.4.0. See specifics |
The device model is detected automatically on connection: there is no model field in the registration.
How the integration works
- The Suprema gateway is a service that runs on a computer in the facial devices' network. It talks to the devices on TCP port 51211 and to ACCELERO through the MQTT broker, like the other gateways of the platform.
- Registration is done in ACCELERO. Face, cards, fingerprints, time ranges, menu administrators and the card reader configuration reach the device from ACCELERO. There is no need to enroll anything on the device itself.
- The access decision depends on the mode of each device, described below.
Operating modes: Direct and Neon
The mode is set per device, by the Associated virtual controller field of the registration:
| Direct mode | Neon mode | |
|---|---|---|
| How to configure | Virtual controller filled in | Virtual controller blank |
| Who decides access | ACCELERO, asked by the device on every access | The device grants whoever is enrolled on it and the Neon Controller applies the rules |
| How the decision reaches the door | The device drives its own relay | The device sends the card number through the Wiegand output to the Neon, which drives the door |
| Who records the passage | The gateway, on the virtual controller channel | The Neon, on its own channel |
| Registration sync | Yes | Yes (the gateway stays connected) |
| Duress by finger | Yes | No |
| Time ranges on the device | From the area of channel 1 of the virtual controller | From the area of the Associated physical channel |
Switching modes (filling in or clearing the virtual controller) takes effect right away, without reconnecting the device. See Neon mode.
ACCELERO takes over the device's user records, time ranges and access groups. A device shared with another access control software will have that software's records treated as foreign (they may be removed by the synchronization), and its rules may interfere with the decision.
Decision time
In Direct mode, the device waits up to 5 seconds for the ACCELERO answer; the gateway waits up to 4 seconds for ACCELERO. In normal operation the decision takes a fraction of a second. If ACCELERO does not answer in time, the contingency rule applies.
Requirements and Installation
Gateway computer
- x86-64 computer (mini-PC or server) with Docker. The Suprema SDK does not exist for ARM processors, so the gateway does not run on the ARM computers used by the gateways of other manufacturers.
- One Suprema gateway per computer. The manufacturer SDK only allows one instance per machine. A single gateway serves several devices.
- The gateway must reach ACCELERO (MQTT broker) and each device (TCP 51211).
- Time zone: the gateway sets the clock and time zone of the devices from its own time zone. Gateway and devices must be in the same time zone. See Device Clock.
Network
The Suprema device does not authenticate network connections: anyone who reaches port 51211 can enroll, delete, open the door and reconfigure the device. The only protection at this layer is the network. Install the devices on an isolated VLAN, reachable only by the gateway.
- Fixed IP on the devices. The device registration in ACCELERO points to an IP. A device on DHCP that gets a different address disappears from the gateway until the registration is fixed. Set a fixed IP on the device or reserve the address in DHCP.
- Port 51211 open from the gateway to each device. It is the Suprema default port; only change it if it was changed on the device itself.
- A device off the network does not delay the other devices of the same gateway: the gateway tests the port before trying to connect and keeps retrying in the background.
Installer options
The gateway is installed with the same process as the other gateways (deploy.sh with facility, broker address and serial number). The installer menu has an option specific to Suprema: offline access, that is, what to answer when ACCELERO is not responding. The three options and the effect of each are in Contingency.
Step-by-Step Setup
The recommended order is: gateway → virtual controller (Direct mode only) → devices → module settings → person registration.
1. Gateway registration
Path: Settings > Suprema > Gateways
Register the gateway with the serial number used in the installation. The registration creates the gateway user on the MQTT broker; without it, the gateway cannot connect to ACCELERO.
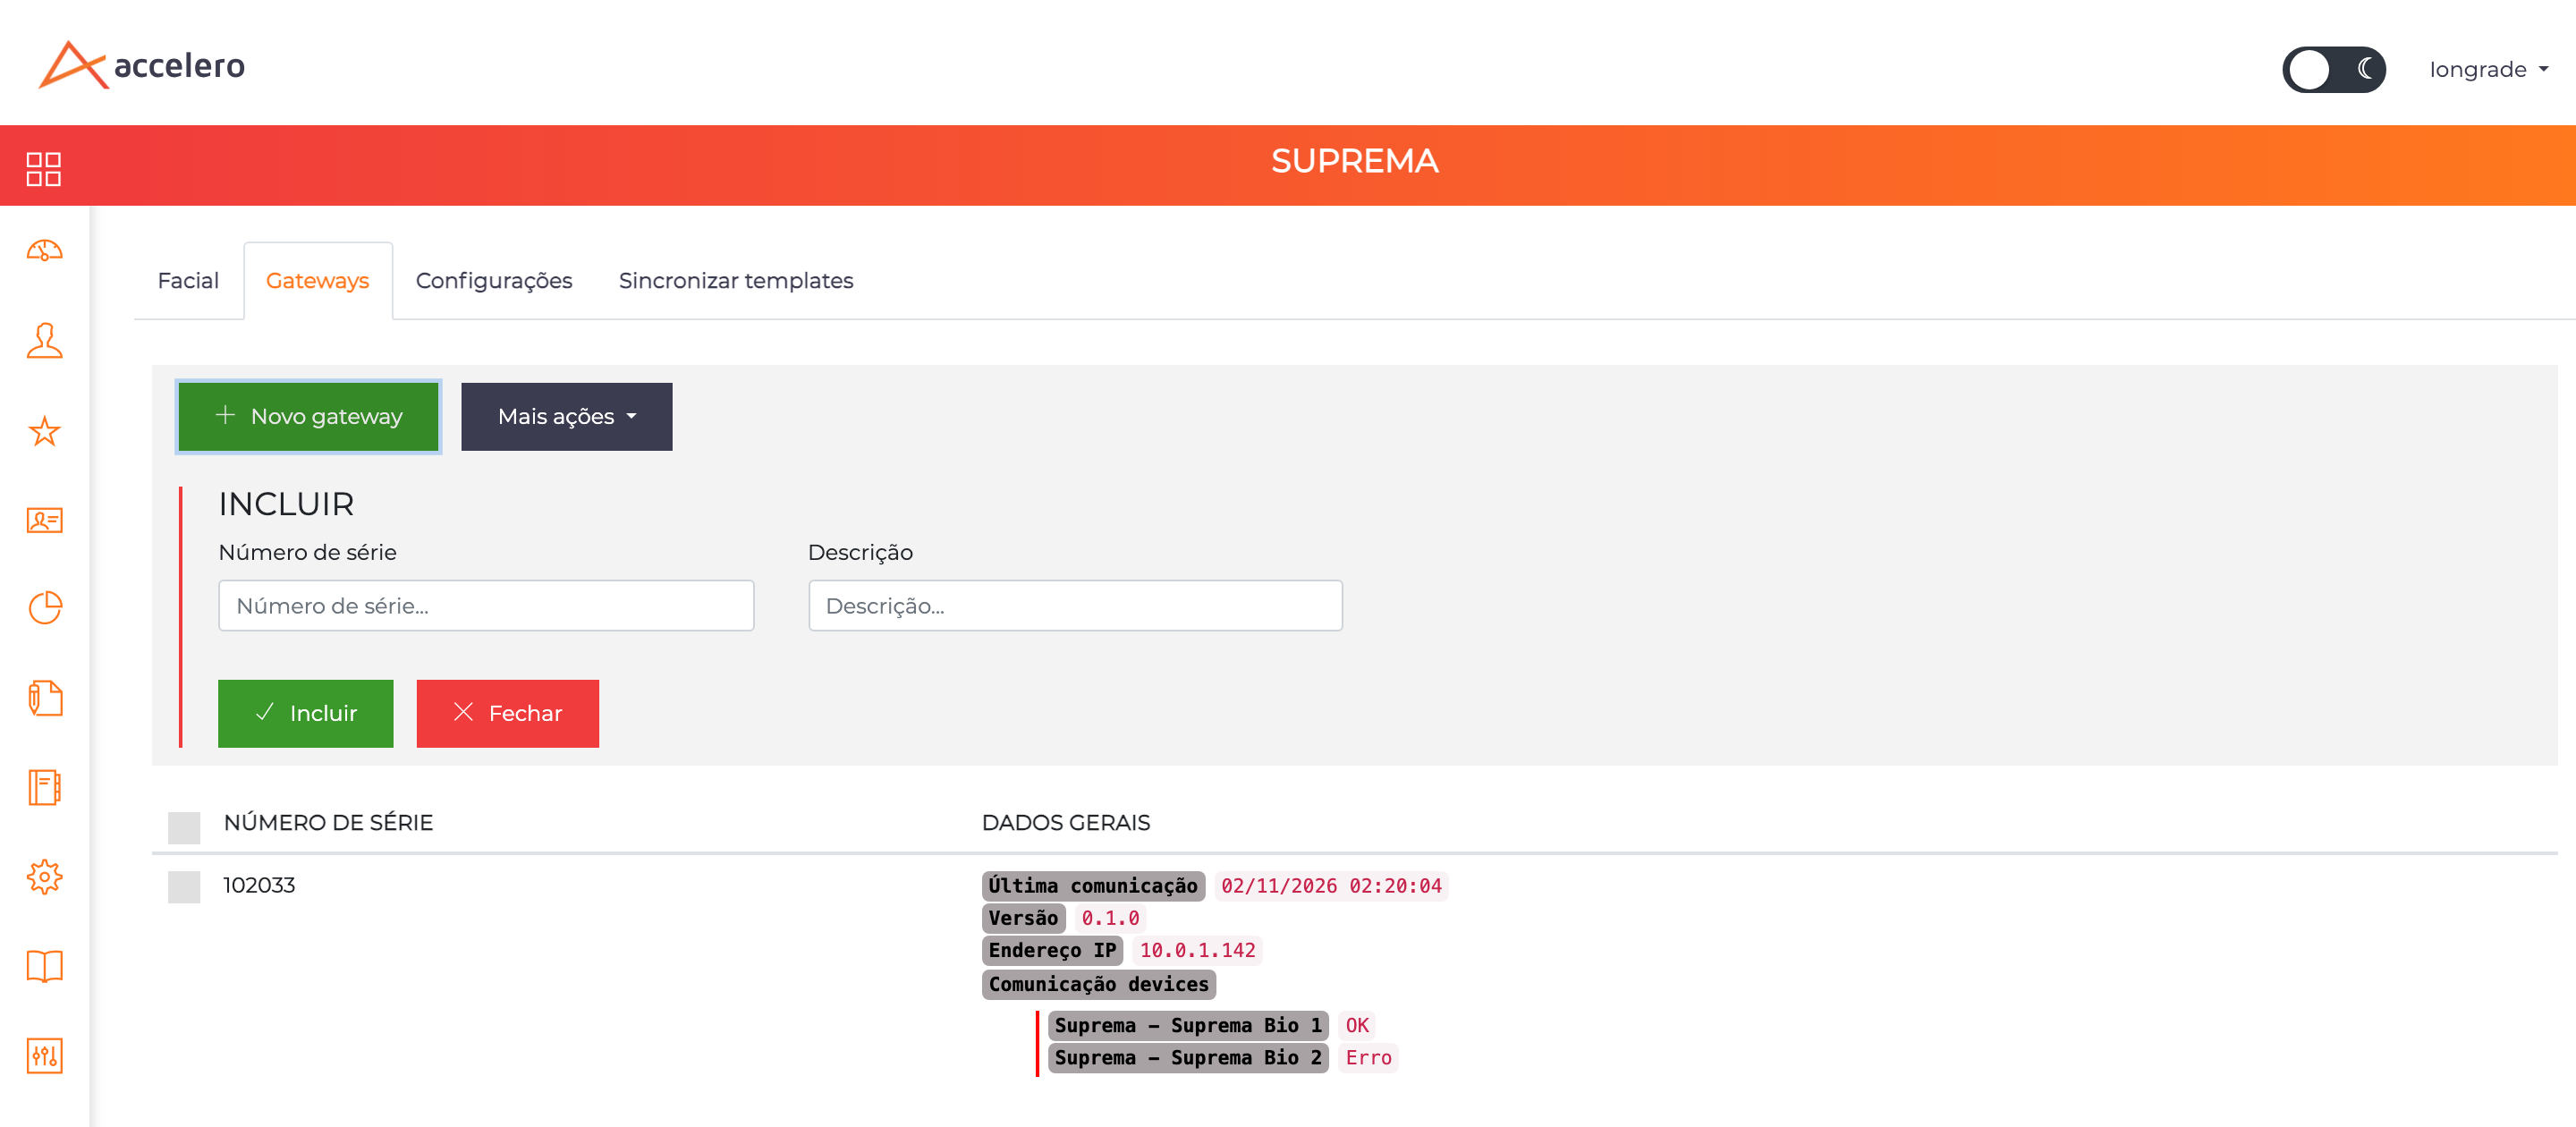
Add (New gateway button):
| Field | What it means |
|---|---|
| Serial number | Serial number given in the gateway installation (3 to 10 characters). It links the registration to the installed gateway |
| Description | Gateway name on the screens (3 to 50 characters) |
List:
| Column | What it shows |
|---|---|
| Serial number | The gateway serial number |
| General data | Last communication (date and time of the last gateway signal), gateway Version, IP address of the gateway computer and Communication devices, with each device served (Suprema - <description>) and its connection status: OK or Error |
In More actions > Delete, the selected gateways are removed.
2. Virtual controller
In Direct mode, the device answers ACCELERO through the topic of a virtual controller, as in the other facial integrations. Before registering the device, create (or choose) a virtual controller with:
- alias filled in;
- at least one channel registered.
Channel 1 of that controller is the access point the device represents: it is there that ACCELERO applies the area and time range rules, and there that accesses show up in reports. See Controllers.
In Neon mode there is no virtual controller: skip this step. See Neon mode.
3. Facial device registration
Path: Settings > Suprema > Facial
Device list
| Element | What it does |
|---|---|
| New device | Opens the quick add of a device |
| Search | Filters the list by Description |
| More actions > Delete | Deletes the selected devices |
| Use: X/Y | Registered devices (X) and number of Suprema Devices contracted in the license (Y) |
| Column | What it shows |
|---|---|
| Description | Device name |
| IP address | Device IP |
| Comm port | SDK port |
| Active | Turns the device on and off right in the list (save the row with the save button) |
| General data | The usage reported by the device |
| Actions | Edit opens the full registration; the save button stores the change made on the row |
Usage
The General data column shows what the device itself reports to the gateway, refreshed periodically:
| Item | What it counts |
|---|---|
| Registered person | Users stored on the device |
| Registered faces | Faces stored |
| Registered identifiers | Cards stored (virtual and physical cards) |
| Registered fingerprints | Fingerprints stored. The BioStation 3 shows No fingerprint reader |
N/A means the device has not reported its usage yet (for example, right after connecting).
Quick add
The New device button opens a short form with the essential fields. The other fields are in the full registration (Edit).
| Field | What it means |
|---|---|
| Description | Device name (3 to 50 characters) |
| IP address | Device IP |
| Comm port | SDK port. Comes filled in with 51211 |
| Gateway | Suprema gateway that serves the device (required) |
| Associated virtual controller | Filled in, Direct mode; blank, Neon mode |
| Active | Check it for the gateway to connect the device |
Full device registration
The full registration (Edit Suprema device) has three parts: identification and connection at the top, Access decision and Card reader and Wiegand. Fields with a question mark icon show their help on mouse hover.
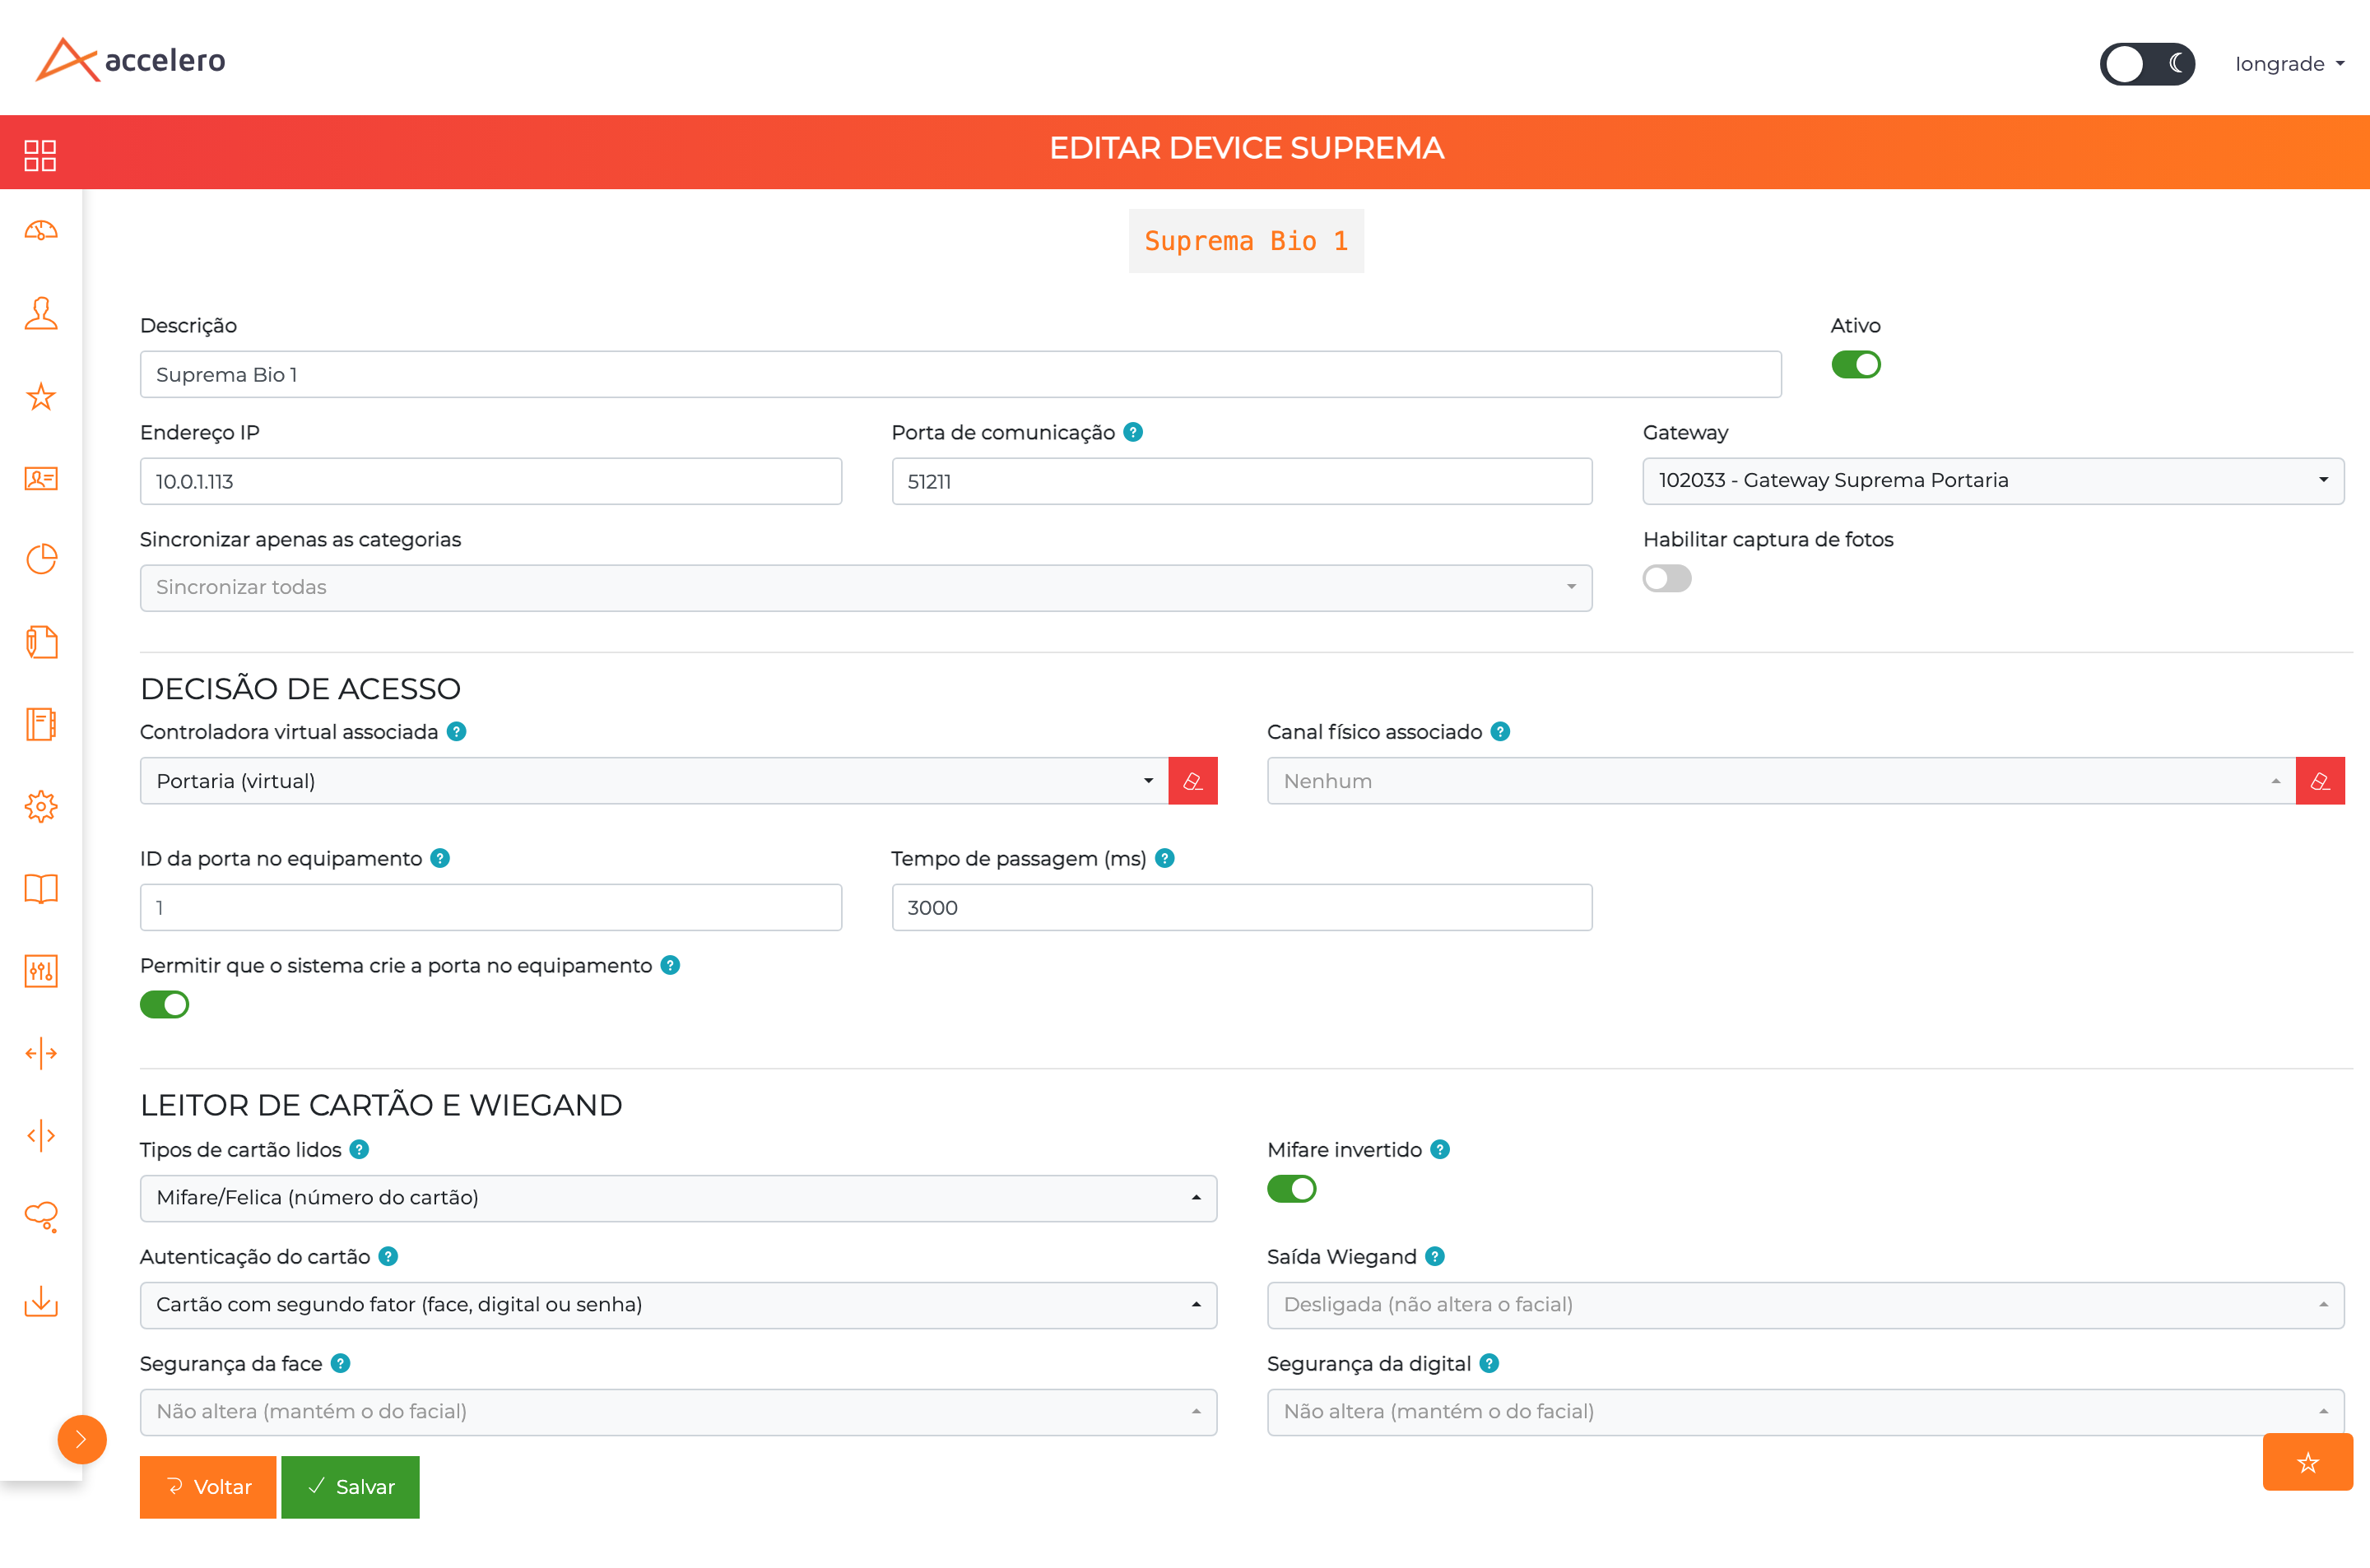
Identification and connection (top):
| Field | What it means |
|---|---|
| Description | Device name on screens and reports (3 to 50 characters) |
| Active | A deactivated device leaves the gateway list: it is no longer connected, receives no registrations and is left out of synchronizations. Use it to take a device out of operation without losing its registration |
| IP address | Device IP on the network (use a fixed IP) |
| Comm port | SDK port on the device. Default 51211; only change it if it was changed on the device itself |
| Gateway | Suprema gateway that serves this device |
| Sync only categories | Restricts this device to some of the categories configured in the module. Blank (Sync all), it receives all of them. See Who goes to each device |
| Enable photo capture | The device shows up as a camera on the ACCELERO photo capture screens, taking the photo with the device's own camera |
Access decision section:
| Field | What it means |
|---|---|
| Associated virtual controller | Filled in, the device works in Direct mode: it asks ACCELERO and receives the answer on this controller's topic. Only virtual controllers are listed, and the chosen one must have an alias and at least one channel (without them the registration is refused with a message stating what is missing). Blank, the device works in Neon mode. The red button next to it clears the field |
| Associated physical channel | Channel of the physical controller the device is wired to, such as the Neon in Neon mode. With Send time schedules on, the device time ranges follow this channel's area. With the virtual controller filled in, it has no effect. Blank (None) and without a virtual controller, the device receives no time ranges. The red button next to it clears the field |
| Door ID on the device | Number of the door registered on the device itself, which drives the relay. Blank means 1, which covers most installations |
| Passing time (ms) | Time the relay stays energized after access is granted, in milliseconds (3000 = 3 seconds). Accepts 500 to 60000; a value outside that range is clamped to the limit when saving; blank, 3000. The Suprema relay does not re-lock on its own: the system counts the time and orders it closed |
| Allow the system to create the door on the device | Authorizes the system to create the door on the device when it does not have one yet (without a door, the device does not drive the relay). Unchecked by default. An existing door is never changed. If the existing door is wrong, fix or delete it on the device itself: the system creates a new one on the next connection |
Card reader and Wiegand section:
| Field | What it means |
|---|---|
| Card types read | The card types the device reader accepts (multiple selection). Blank, the system does not change the reader and the device keeps its current setting. See Card types read |
| Inverted Mifare | Shows only with Mifare/Felica (card number) selected. Chooses the byte order the reader uses to build the card number: off, the factory order (MSB); on, the inverted order (LSB). See Inverted Mifare |
| Card authentication | Card with second factor (face, fingerprint or PIN), the factory default, or Card only, which grants with just the card. See Card authentication |
| Wiegand output | Off (does not change the device), Wiegand 26 bits or Wiegand 34 bits. On every granted access, the device sends the person card number through Wiegand. Used in Neon mode. See Wiegand output |
| Face security | How strict face recognition is: Keep (device setting), Normal (factory default), Secure or More secure. See Recognition security |
| Fingerprint security | The same, for fingerprints. Only applies to devices with a fingerprint reader; ignored on the others |
The reader, Wiegand and recognition security options do not exist in the device's local menu (Suprema only exposes them in its own management software), and card only is not among the menu's authentication modes. So they are configured by ACCELERO. The system applies them when the device connects and whenever the registration is saved, without reconnecting the device.
The device does not ask for a user or password: the SDK connection does not use credentials. That is why these fields are not in the registration.
4. Module settings
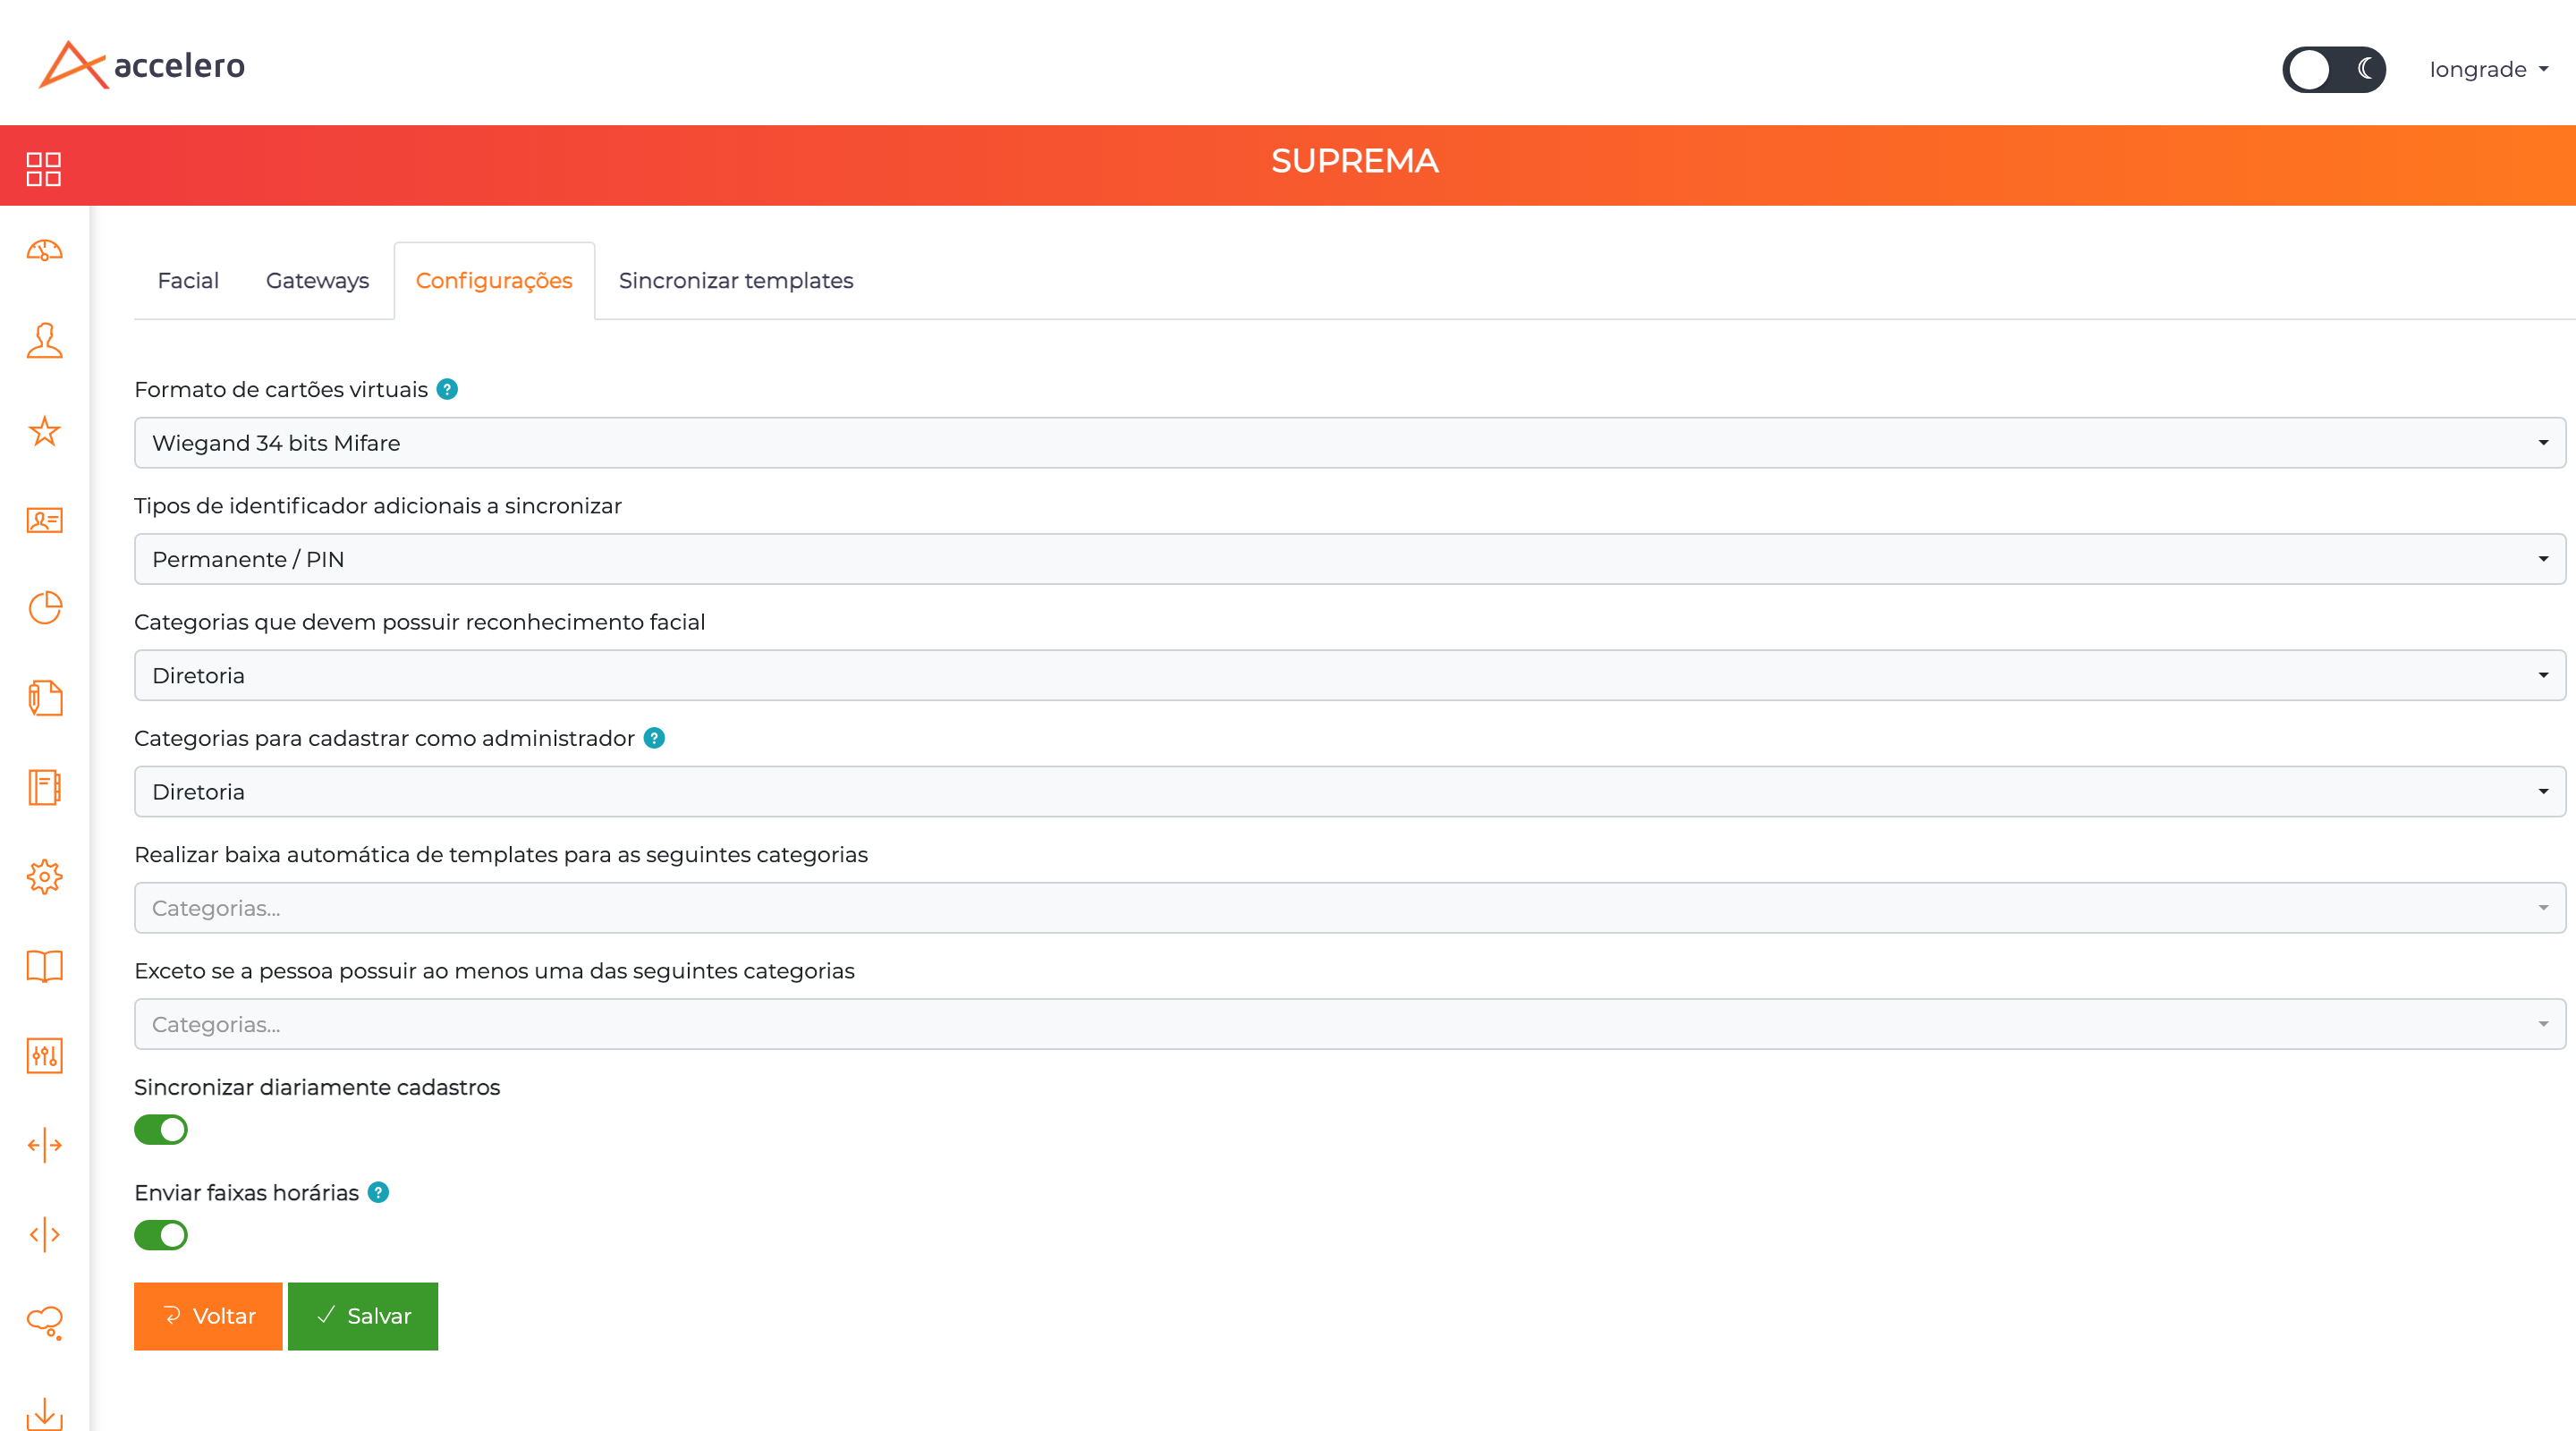
Path: Settings > Suprema > Settings
| Field | What it means |
|---|---|
| Virtual cards format | Number format of the virtual card ACCELERO creates for people enrolled by face: Wiegand 26 bits (default) or Wiegand 34 bits Mifare. It is a deployment choice: changing it after devices are provisioned renumbers everyone |
| Additional identifier types to sync | Identifier types (proximity card, for example) that also go to the device. People from the configured categories who have an enabled identifier of these types are sent even without a photo. Blank (Do not sync identifiers), only the face and the virtual card go |
| Categories that must have facial recognition | The categories whose people are sent to the devices. It is the main filter of the integration |
| Categories to enroll as device administrator | People in these categories are enrolled as the device's menu administrator. See Menu administrator |
| Download templates automatically for the following categories | Removes people in these categories (typically visitors and contractors) from the devices on exit, so they do not fill the device memory |
| Unless the person has at least one of the following categories | Exceptions to the automatic removal (for example, a visitor who is also an employee stays on the device) |
| Synchronize records daily | Turns on the daily synchronization, which checks every device once a day. Off by default |
| Send time schedules | Writes each person's time ranges to the device, so the device checks the schedule on its own, even without communication. Off by default. See Time Ranges on the Device |
Saving the settings republishes the devices to the gateway right away (no need to wait for the periodic refresh).
5. Person registration
With the settings above, sending is automatic: when you save a person who belongs to one of the configured categories, ACCELERO sends the registration to the devices. See People and Categories.
What Goes to the Device
Who goes to each device
A person goes to an active device when they belong to one of the Categories that must have facial recognition and, if the device has Sync only categories filled in, also to one of those. A blank device list means "all module categories", not "none".
The person is sent if they have a photo (goes with the face) or, with Additional identifier types to sync configured, if they have an enabled identifier of those types (goes with the card only).
As in the other facial integrations, the filter for who goes to each device is the category, not the channel area. The area applies to the access decision and to the time ranges written to the device.
What makes up the registration on the device
| Item | Source in ACCELERO |
|---|---|
| Face | The person's registration photo. The template is generated by the device itself from the photo |
| Virtual card | Created by ACCELERO for each person enrolled by face, in the format chosen in the settings |
| Physical cards | Enabled identifiers of the types chosen in Additional identifier types to sync. The number goes to the device exactly as registered in ACCELERO |
| Fingerprints | Captured on the person record. See Fingerprint Biometrics |
| Time ranges | With Send time schedules on. See Time Ranges on the Device |
| Menu administrator | With the person in one of the administrator categories. See Menu administrator |
Each send updates only its own part and keeps the rest: saving the record does not erase the fingerprint, and updating the card does not erase the face. When saving the record produces a deletion followed by a write on the same device, both reach the device in the order ACCELERO issued them.
When the person leaves the device
The person is removed from the devices when they leave the configured categories, are disabled or deleted, or by the automatic removal on exit.
Fingerprint Biometrics
The person record has the Suprema Biometrics section, with two independent cards:
- Standard biometrics: the finger for normal use;
- Duress biometrics: the finger that grants access normally and triggers the silent duress alarm. See Duress.
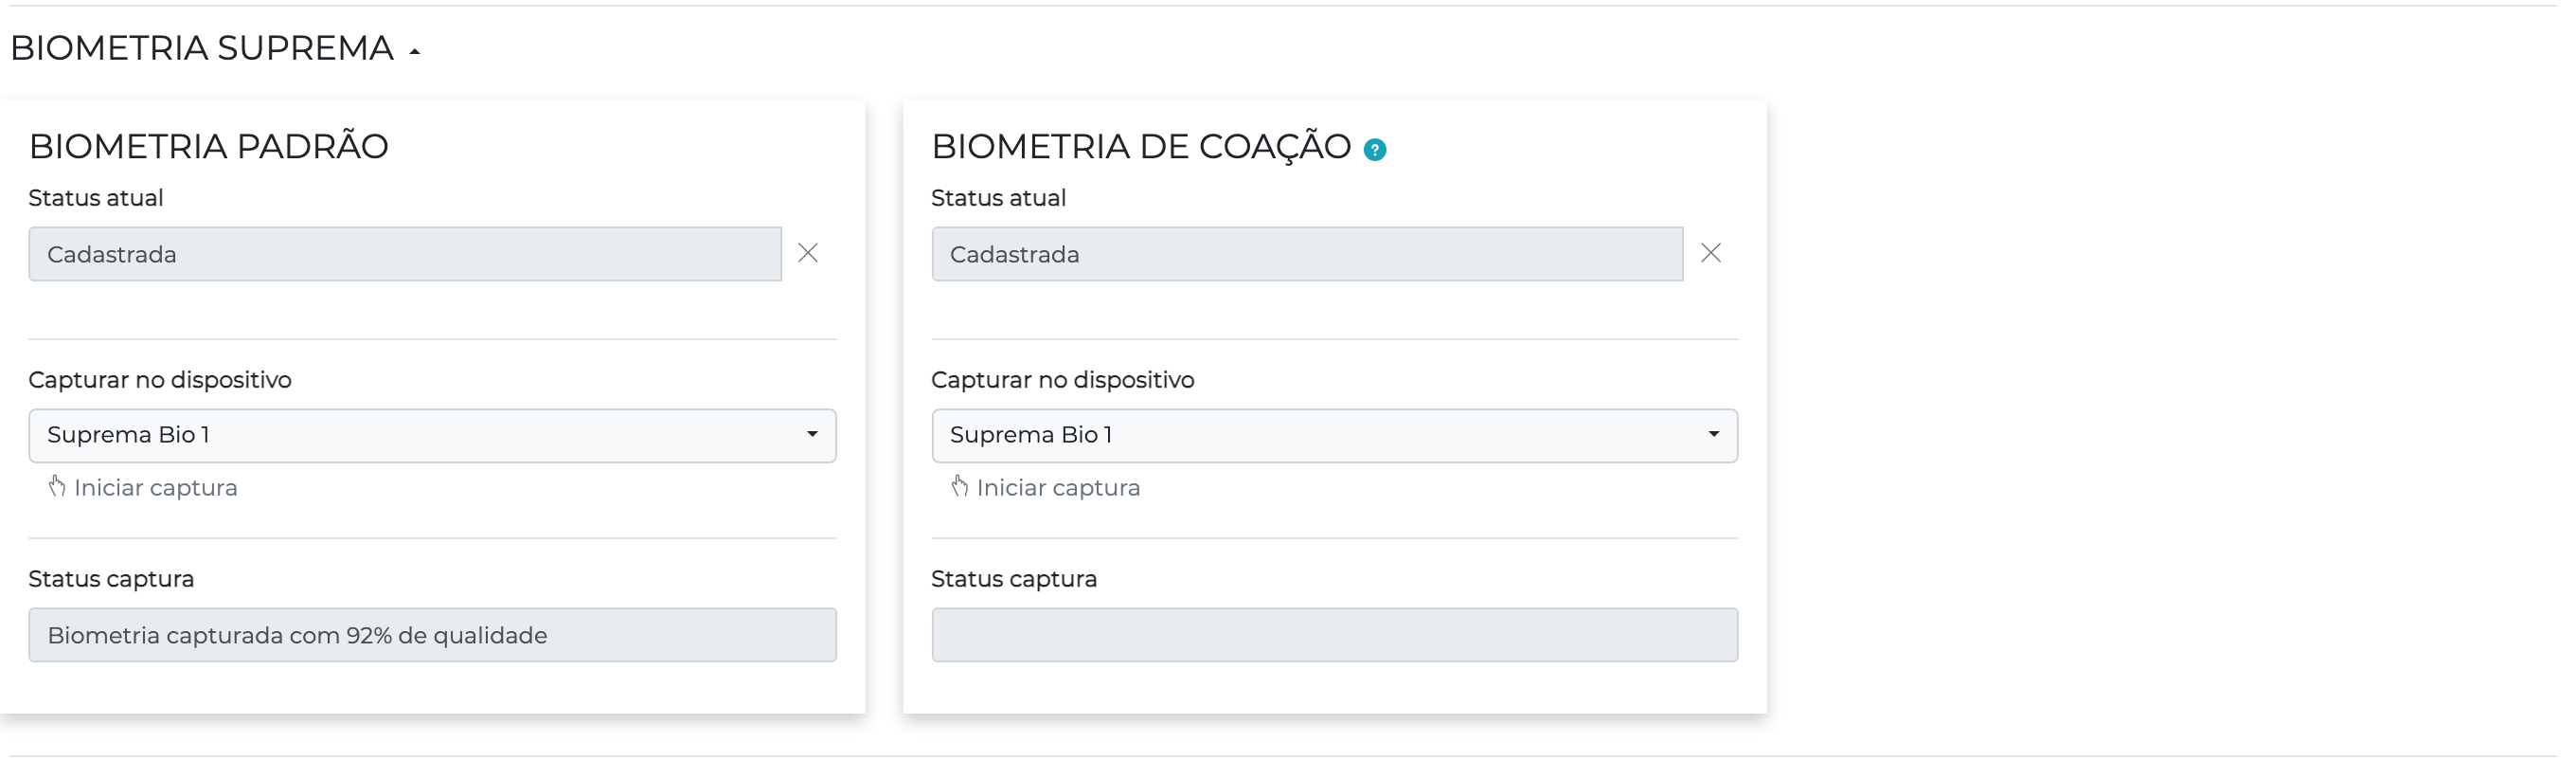
Each card has the same fields:
| Field | What it means |
|---|---|
| Current status | Whether the person already has a fingerprint on that card. The X next to it removes the fingerprint |
| Capture to device | The device where the person will place the finger |
| Start capture / Stop capture | Starts the capture on the chosen device, or cancels it |
| Status capture | The progress and result of the capture |
Capture
- In Capture to device, choose the device where the person will place the finger (it needs a fingerprint reader: the FaceStation F2).
- Click Start capture. The reader lights up and asks for the finger.
- The person places the same finger twice. The two readings form the fingerprint.
- Status capture shows the result: "Fingerprint captured with X% quality".
The fingerprint is saved on the person and sent to all devices where they have a category, not only to the capture device.
The reader rejects readings with quality below 80%. Above that, the percentage shown is the weaker of the two readings. The higher it is, the more reliable the recognition: if it is close to the minimum, it is worth capturing again with a clean, well-placed finger.
Capture error messages:
| Message | What to do |
|---|---|
| No finger was read on the reader in time. Place the finger and try again | The reader waited and no finger was placed |
| Fingerprint quality below the 80% minimum. Clean the finger and place it again, without pressing too hard | Reading rejected for quality |
| Could not read the fingerprint. Clean the finger and place it again | Reading failure |
| The readings are not from the same finger. Use the same finger both times | The two readings do not match |
| The reader did not accept the finger as real. Place a clean finger and try again | Fake finger detection |
| The device did not respond in time | Device without communication with the gateway |
Remove the fingerprint
The X next to Current status removes the fingerprint of that card (standard or duress) and updates the devices.
Access Decision and Records
This section describes Direct mode. For Neon mode, see Neon mode.
Flow of an access
- The person presents themselves to the device (face, fingerprint or card).
- The device identifies the person. If it has time ranges written and the person is outside them, the device denies on its own, without asking ACCELERO.
- Otherwise, the device asks ACCELERO, which applies all the rules and answers.
- Granted: the relay is activated for the Passing time and the screen shows "Acesso autorizado!" (the message is in Portuguese). Denied: the screen shows the denial.
What shows up in ACCELERO
| Situation | Record |
|---|---|
| Access granted by ACCELERO | Access authorized by the server + Passage actually performed |
| Access denied by ACCELERO | The denial event with the reason (time range, validity etc.) |
| Denied by the device itself, outside the written time range | Access denied (invalid time range) |
| Duress finger | Access performed under duress + Passage actually performed, and a Duress incident |
| Face, fingerprint or card the device does not know | Unknown credential record. With a card, the record carries the number read; when the device shows Auth Failed, the record has no identification, because the device does not report the credential |
| Denied by the device with no answer from the server (gateway down, contingency that denies everyone) | Access denied (user not enabled on the reader), sent when communication returns |
| Accesses during a communication loss | Sent when communication returns, with the device time and marked as offline |
The supported devices have no door sensor input. So the passage is recorded when access is granted, and the integration does not offer sensor-based "passage confirmation".
Messages on the device screen
| Screen | When it shows up |
|---|---|
| Acesso autorizado! | Access granted |
| access rule | Any denial: by ACCELERO (for any reason) or by the device itself outside the time range |
| APB violation | Contingency denial when the gateway is down and the device is set to block (see Contingency) |
| Auth Failed | The device did not complete authentication: a credential it does not know, or the second factor not presented in time |
Denial messages come from the device firmware, in English, and do not state the reason: "access rule" looks the same for a time range, an expired registration or any other rule. The reason is recorded in ACCELERO. Tell the front desk to check the access history when someone is denied.
Recognition security
The Face security and Fingerprint security fields of the device registration set how strict the biometric comparison is:
| Option | Effect |
|---|---|
| Keep (device setting) | Default. The system does not change the device |
| Normal (factory default) | The factory level |
| Secure | Stricter comparison |
| More secure | The strictest |
The stricter it is, the lower the risk of granting the wrong person, and the higher the chance of rejecting someone enrolled with a poor photo or passing under difficult lighting. Raise the level only where the risk justifies it and check recognition afterwards. Fingerprint security is only written to devices with a fingerprint reader; on the BioStation 3 it is ignored.
Neon Mode (no virtual controller)
Without a virtual controller in the registration, the device works as a reader of a Neon Controller, like the facial devices of other manufacturers:
- the gateway stays connected and keeps the device in sync: face, cards, fingerprints, removals, clock, card types and Wiegand output;
- the device does not ask ACCELERO: it grants whoever is enrolled on it and, on every granted access, sends the person card number through the Wiegand output, including the virtual card of those who enter by face only;
- the Neon applies the ACCELERO rules (area, time range, antipassback) and drives the door. The passage is recorded by the Neon, on its own channel;
- the gateway makes no access request and records no passage for this device. The whole access history comes from the Neon.
To set it up, see the example Device wired to a Neon.
With Send time schedules on and the device linked to an Associated physical channel, the time ranges of that channel's area go to the device, which then denies on its own whoever is outside the time range (this denial reaches neither the Neon nor ACCELERO). Without any channel there is no area: the device receives no time ranges, grants everyone enrolled, and the Neon applies the time range.
Duress by finger and the records made by the gateway (such as "invalid time range") belong to Direct mode. In Neon mode, the duress finger grants like a regular fingerprint and sends the card number as usual.
Cards and Wiegand
Card types read
The Card types read field of the device registration defines which technologies the reader accepts. The selected types are read and the others stop being read. The change is applied right away, without reconnecting the device. Blank, the system does not change the reader.
| Type | What it reads |
|---|---|
| EM (125 kHz) | Number of EM proximity cards |
| HID Prox (125 kHz) | Number of HID Prox proximity cards |
| Mifare/Felica (card number) | Number of 13.56 MHz cards (Mifare, DESFire, Felica). It is the type used for regular Mifare cards |
| iCLASS (card number) | Number of iCLASS cards |
| Mifare Classic/Plus | Reading of data stored on the card, with a key |
| DESFire EV1 | Reading of data stored on the card, with a key |
| iCLASS SR/SE | Reading of data stored on the card, with a key |
| Seos | Reading of data stored on the card, with a key |
| NFC (mobile) | Mobile NFC credential |
| BLE (mobile) | Mobile BLE credential |
ACCELERO identifies the person by the card number. Select the type that matches the card in use: Mifare/Felica (card number) for Mifare cards, EM (125 kHz) for EM cards, and so on. Mifare Classic/Plus, DESFire EV1, iCLASS SR/SE and Seos are data reading with a key and do not read the number.
Selecting a type the hardware does not have does not make the device read it. The FaceStation F2 in the FSF2-ODB version, for example, reads EM cards and 13.56 MHz cards (Mifare, DESFire, Felica), plus NFC and BLE, and does not read HID Prox or iCLASS. Check the model version before defining the project cards.
Card authentication
From the factory, the device treats the card as a first factor: after the card, it asks for the face, fingerprint or PIN. The device menu only offers combinations with a second factor. The Card authentication field of the device registration chooses between:
| Option | Behavior |
|---|---|
| Card with second factor (face, fingerprint or PIN) | Default. After the card, the device asks for the second factor |
| Card only | Presenting the card is enough |
In both cases the access decision stays with ACCELERO (Direct mode). Unlike the other reader fields, both options write to the device: with Card with second factor, a device where card only was turned on by other means goes back to the default. The change applies at once, without resending registrations.
With card only, whoever holds another person's card gets in as that person. Use it where the front desk accepts that risk, and keep the second factor where identifying the person matters.
Inverted Mifare
The same physical card can have its number read in two byte orders, and each system adopts one. The Inverted Mifare toggle chooses which one the device reader uses:
| Inverted Mifare | Reader byte order |
|---|---|
| Off | MSB, the device factory order |
| On | LSB, the inverted order |
The card number goes to the device exactly as registered in ACCELERO. The toggle does not change the registration: it chooses the pattern the reader uses to build the number read, so that it matches the registered one. If the registered card is not recognized on the device, switch the toggle. The switch takes effect right away and does not require resending the registrations.
The toggle shows only with Mifare/Felica (card number) selected, but it applies to every card read by number on that device.
The same Mifare card is read as 3171084566 with the toggle off and as 384369341 with the toggle on. If the card is registered in ACCELERO as 384369341, turn the toggle on; if it is registered as 3171084566, leave it off.
Wiegand output
The Wiegand output wires the device to the reader input of a Neon Controller (Neon mode).
| Option | Effect |
|---|---|
| Off (does not change the device) | Default. The system does not change the device Wiegand configuration |
| Wiegand 26 bits | The device sends the card number in 26 bits |
| Wiegand 34 bits | The device sends the card number in 34 bits |
- On every granted access, the device sends the person card number, including the virtual card of those who enter by face only.
- Use the same format set on the Neon reader.
- Recommended: 34 bits. With 26 bits, the virtual card number that reaches the Neon has not been verified yet.
- The registration refuses the 26-bit output when the module Virtual cards format is
Wiegand 34 bits Mifare: the number does not fit in 26 bits.
The Wiegand output configuration on the device is already validated. The arrival of the number at the Neon Controller through Wiegand has not yet been verified with a Neon. On the first installation in Neon mode, check in the Neon history that the number received matches the person's card, both for a physical card and for those who enter by face only.
Time Ranges on the Device
By default, the schedule is checked by ACCELERO, when each access is queried (Direct mode), or by the Neon (Neon mode). With Send time schedules on, ACCELERO also writes the time ranges to the device, and the device starts checking the schedule on its own:
- online: outside the time range, the device denies without asking ACCELERO ("invalid time range" record in Direct mode); inside, the normal flow follows;
- without communication: the device keeps applying the time ranges (see Contingency).
How the time ranges reach the device
- Each device receives the time ranges that the module categories have in the channel area of the device: channel 1 of the virtual controller in Direct mode, or the Associated physical channel in Neon mode. A device with neither receives no time ranges. See Time Range.
- Each person is linked to their time ranges. A person with more than one time range passes when any of them applies.
- Editing or deleting a time range in ACCELERO updates the devices right after, without reconnecting.
- Holidays also go to the device. A time range that does not allow holidays denies on the holiday, as in ACCELERO. See Holidays.
After turning the option on
- Turn Send time schedules on and save. The time ranges are written to the devices right away.
- Run Smart synchronization (Sync templates tab). People already on the device before the option receive the time ranges in this synchronization.
Each synchronization fixes the time ranges of up to 40 people per device, so as not to slow down people passing the door. On a large base that was already on the devices, run the smart synchronization a few times (or let the daily synchronization complete over the days). People registered or saved after the option was turned on already go with the right time ranges.
While anyone on the device has no time range, the device keeps the local check open and, without communication, denies everyone ("APB violation" screen). Once everyone has a time range, it also applies the time ranges without communication.
When the option is turned off, the time ranges leave the devices and the schedule is checked again only by ACCELERO (or by the Neon).
Limits
| Item | Limit |
|---|---|
| Time ranges per device | 128 |
| Time ranges per person | 16 |
| Intervals per day in each time range | 5 |
| Holidays sent per device | 128 (the yearly ones and the upcoming ones) |
A time range that goes past midnight (for example, 22:00 to 06:00) does not grant on the device, because the device cannot represent that interval. For shifts that cross midnight, use two time ranges (22:00 to 23:59 and 00:00 to 06:00).
Contingency
In Direct mode there are three situations, and in each one a different party decides:
| Situation | Who decides | Result |
|---|---|---|
| Everything working | ACCELERO | Full ACCELERO rules |
| Gateway down, or device without network to the gateway | The device itself | Depends on Send time schedules (below) |
| ACCELERO down, gateway working | The gateway | Depends on the installer offline access option (below) |
In Neon mode, the device already decides on its own from its enrollments: the gateway or ACCELERO going down does not change the decision at the door (it only pauses synchronization until they return). The Neon's own contingency applies.
Gateway down
| Send time schedules | Device behavior |
|---|---|
| Off | Grants whoever is enrolled on it, at any time (allow list) |
| On | Applies each person's time ranges: inside grants, outside denies |
| On, but with people still without a time range | Denies everyone ("APB violation" screen) until the synchronization finishes |
ACCELERO down
Offline access option in the gateway installer menu (the menu is in Portuguese only):
| Option | Behavior |
|---|---|
| Acesso offline - usar regra do equipamento (use device rule, default) | Grants whoever the device recognized. Since the device only asks after applying its own rules, the result is the same as the gateway contingency: allow list with time schedules off, time ranges with them on |
| Acesso offline - liberar reconhecidos (grant recognized) | Grants whoever the device recognized |
| Acesso offline - sempre bloquear (always block) | Denies everyone ("access rule" screen) |
Keep the default (usar regra do equipamento, use device rule). With it, the front desk sees the same behavior in any communication failure. With sempre bloquear (always block), the device grants the enrolled people when the gateway goes down, but denies everyone when only ACCELERO goes down.
Contingency records
Accesses made without communication are kept (on the device or on the gateway) and sent to ACCELERO when communication returns, with the time they happened and marked as offline. Duress made without communication also goes up and opens the incident on return.
Attempts denied during the outage also go up: those denied outside the time range, as invalid time range, and those denied with "APB violation" (contingency that denies everyone), as access denied by the reader. So the history shows who tried to get in while the system was down.
Duress
The finger registered in Duress biometrics works like a regular fingerprint at the door: the person passes normally, with no visible sign to whoever is with them. In ACCELERO, the access is recorded as Access performed under duress and a Duress incident is opened. See Incident Panel.
- Duress also works without communication: it goes up to ACCELERO when communication returns.
- There is no duress card on Suprema: duress is by finger.
- Duress requires Direct mode. In Neon mode the duress finger grants like a regular fingerprint, with no incident.
Device Menu Administrator
With Categories to enroll as device administrator filled in, the people in those categories are enrolled on the device as menu administrator, and only they can enter the local settings.
- The administrator goes along with the registration: after Delete all and resending, it comes back on its own, with no visit to the device.
- The change applies from each person's next send; to apply it to everyone, synchronize the templates.
- Blank, the system does not touch the device administrators.
Every person in the category becomes a menu administrator. A large category (a whole board of directors, for example) gives dozens of people access to the device settings. Create a category only for those who actually manage the devices.
The BioStation 3 ships asking for a PIN after the face to enter the menu (two factors). Since ACCELERO does not send a PIN, the gateway turns this requirement off when it connects to the device: the administrator enters the menu with the face only. The menu still requires an administrator enrolled through the category above. The FaceStation F2 does not have this option.
Template Synchronization
Path: Settings > Suprema > Sync templates
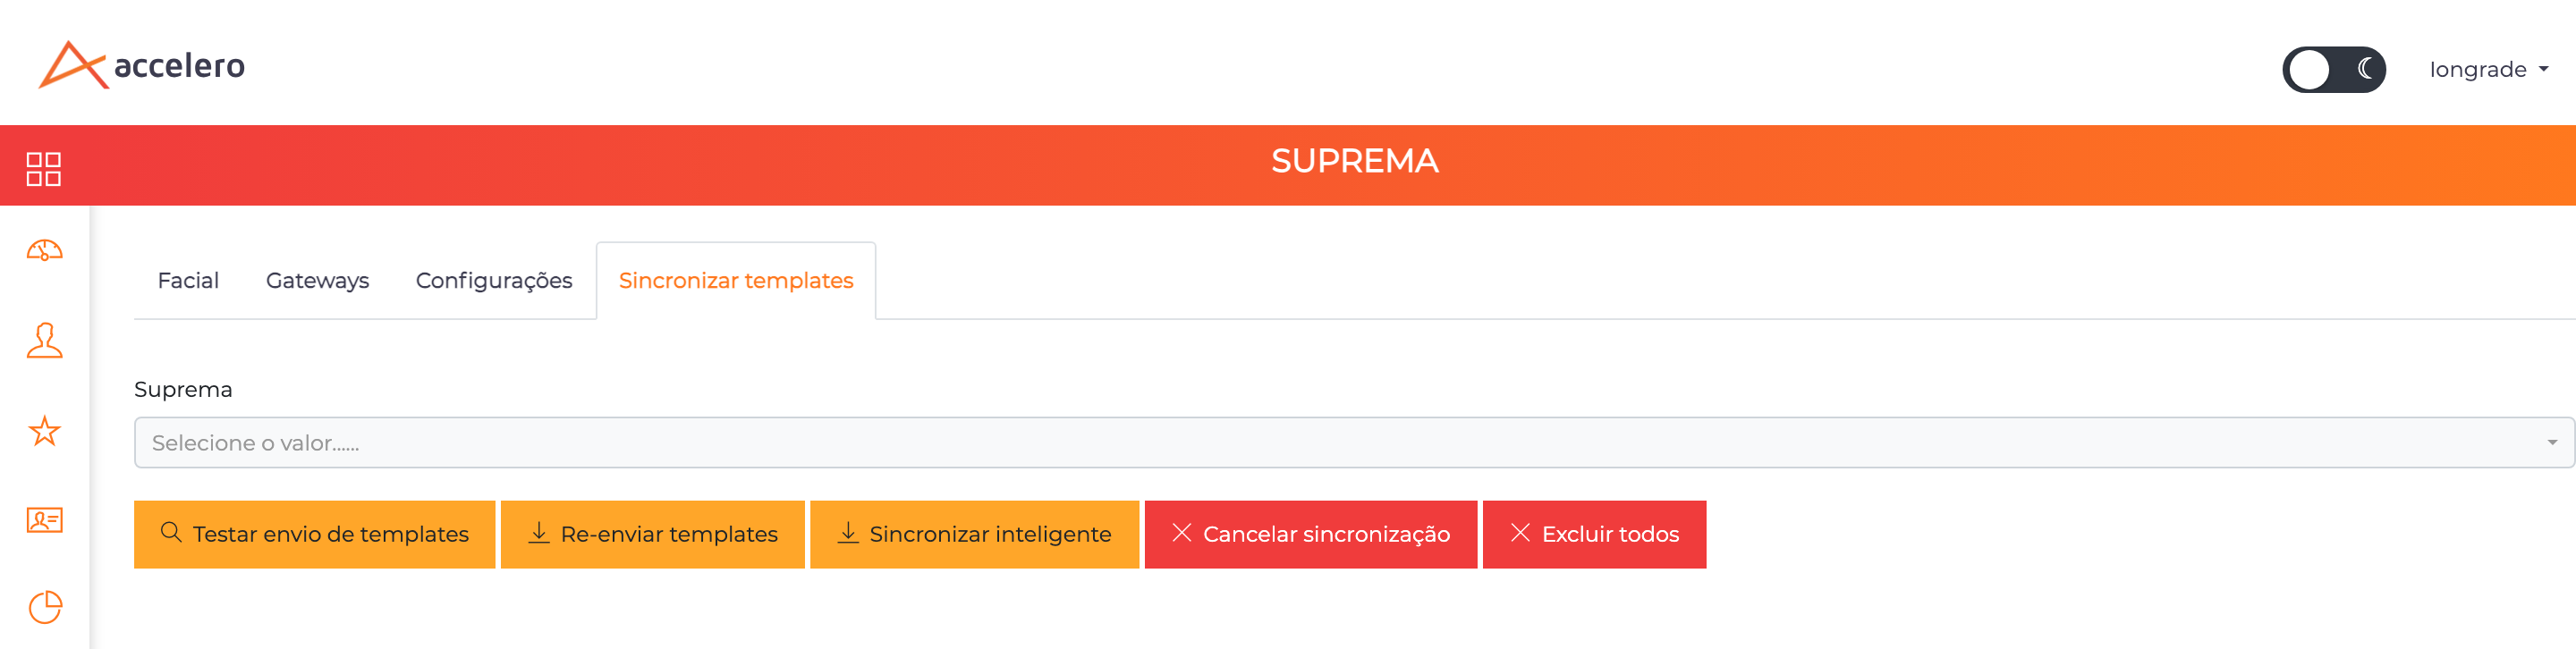
Select one or more devices in the Suprema field and choose the action. The actions that change the devices ask for confirmation with a verification code.
| Action | What it does |
|---|---|
| Test sending templates | Only counts how many registrations would be sent. Sends nothing |
| Resubmit templates | Resends every registration that should be on the device, updating in place: no one is deleted first, and face, cards and fingerprints are kept |
| Smart synchronization | Compares the device with ACCELERO: removes whoever should not be there, enrolls whoever is missing and resends what is missing to those already there (face, card or fingerprint deleted on the device). With time schedules on, it also fixes the time ranges (up to 40 people at a time). The operator receives a notification with how many items will be removed and enrolled on each device |
| Cancel synchronization | Stops the synchronizations in progress |
| Delete all | Deletes every registration on the device, including menu administrators left without a user. Irreversible: afterwards, use Resubmit templates |
If the device does not answer the listing of enrolled users, the smart synchronization is not done and the operator receives a notification with the device name.
Deactivated devices (Active field off) are left out of synchronizations.
Daily synchronization
With Synchronize records daily on, once a day, on the ACCELERO daily schedule, each device goes through the same check as the smart synchronization.
The smart and daily synchronizations remove from the device whoever should not be on it according to ACCELERO, including records made by hand on the device or by another software. That is why the device must be dedicated to ACCELERO.
Device Clock
The gateway keeps the device clocks set and, in the same routine, fixes the time zone and sets the screen to 24 hours and the date to DD/MM/YYYY. The time zone used is the gateway's: gateway and devices must be in the same time zone.
This matters mainly with time ranges on, where the device's own clock decides who passes.
Configuration Examples
Device in Direct mode
Scenario: building front desk, with ACCELERO deciding each access.
- Register the gateway in
Settings > Suprema > Gateways. - Create a virtual controller with an alias and a channel, in an area with the time ranges of the categories that use this door.
- Register the device: Description, IP address, Comm port
51211, Gateway, Active checked and the Associated virtual controller. - In Access decision, leave Door ID blank and Passing time at
3000. If the device is new and has no door, check Allow the system to create the door on the device. - In Card reader and Wiegand, leave the Wiegand output off. If the front desk also uses cards, select the card type (for example, Mifare/Felica (card number)).
- In the Settings tab, choose the Categories that must have facial recognition and save.
- Check in the Gateways tab that the device shows OK in Communication devices.
Device wired to a Neon
Scenario: the device is a reader of the Neon Controller, which applies the rules and records the passages.
- Wire the device Wiegand output to the Neon reader input and set that reader on the Neon to 34 bits.
- In the Settings tab, check the Virtual cards format. With
Wiegand 34 bits Mifare, only the 34-bit output is accepted. - Register the device with the Associated virtual controller blank (use the clear button if it was filled in).
- In Associated physical channel, choose the Neon channel the device is wired to.
- In Wiegand output, choose Wiegand 34 bits.
- If the device will also read cards, select the type in Card types read.
- Make one access by face and one by card and check the number received in the Neon history (see Wiegand output).
Cards in the inverted pattern
Scenario: the customer already has Mifare cards registered in ACCELERO, but the device recognizes none.
- In Card types read, confirm that Mifare/Felica (card number) is selected.
- Turn Inverted Mifare on and save. There is no need to resend the registrations.
- Test with a registered card. If it is now recognized, keep it; if not, turn the toggle off and check that the registered number matches the card.
Time ranges valid without communication
Scenario: the door must respect the schedule even with the gateway down.
- In the Settings tab, turn Send time schedules on and save.
- In the Sync templates tab, run Smart synchronization until everyone has a time range (each run fixes up to 40 per device).
- From then on, with the gateway down, the device grants only within each person's time ranges.
Best Practices
- Isolated network and fixed IP. Devices on their own VLAN, reachable only by the gateway, with a fixed or reserved IP.
- Dedicated device. Do not share the device with another access control software.
- Virtual card format at deployment. Define the Virtual cards format before provisioning the devices; changing it later renumbers everyone. In Neon mode, prefer
Wiegand 34 bits Mifarewith the 34-bit Wiegand output. - Only the card types in use. Select only the "card number" type that matches the customer's cards.
- Small administrator category. A category created only for those who manage the devices.
- Time ranges and midnight. Split time ranges that cross midnight in two.
- Daily synchronization on in sites with high turnover, so that what drifted on the devices is fixed on its own.
- Deactivate instead of deleting a device that leaves operation temporarily: the registration is kept and the gateway stops trying to connect to it.
Specifics and Limitations
| Topic | What to know |
|---|---|
| Network security | The device does not authenticate connections. A segregated network is mandatory (Network) |
| English messages with no reason | Denial screens ("access rule", "APB violation") come from the firmware and do not state the reason (Screen messages) |
| BioStation 3 without fingerprint reader | The BioStation 3 does not read fingerprints, but accepts and stores the fingerprints it receives (they show in the device count). The list shows "No fingerprint reader". People use face or card on it |
| No passage confirmation | The supported models have no door sensor input: the passage is recorded at recognition |
| Dedicated device | Records, time ranges and groups from another system on the same device are treated as foreign |
| Fixed IP | A device that changes IP (DHCP) disappears until the registration is fixed |
| Time range across midnight | Does not grant on the device; use two time ranges |
| First activation of time ranges | Gradual fix, up to 40 people per synchronization on each device |
| New holiday | Reaches the devices at the periodic refresh (hourly). To send it right away, save the Suprema settings |
| Virtual card format | A final deployment choice: changing it renumbers all virtual cards |
| Card number | Goes to the device exactly as registered. The reading byte order is chosen by the Inverted Mifare toggle (Inverted Mifare) |
| Reader and Wiegand outside the local menu | Card types, byte order and Wiegand output do not show in the device menu: they are configured by ACCELERO |
| Card types per model | Each model version reads different technologies; the FSF2-ODB does not read HID Prox or iCLASS (Card types read) |
| Neon mode | No access request, no passage recorded by the gateway and no duress; the Neon records (Neon mode) |
| Device door | The system only creates the door if the device has none, and never changes an existing one |
| Menu administrator | The whole category becomes administrator; on the BioStation 3 the gateway turns off the menu PIN, which ACCELERO does not send |
| One gateway per computer | The SDK allows one instance per machine; the gateway requires an x86-64 computer |
Capacities
| Item | Limit |
|---|---|
| Fingerprints per person | 10 |
| Time ranges per device | 128 |
| Time ranges per person | 16 |
| Holidays per device | 128 |
The capacity of users, faces and cards depends on the device model. The usage of each device shows how much is already in use.
Troubleshooting
| Symptom | Probable cause | What to do |
|---|---|---|
| Device with Error in Communication devices (Gateways tab) | No network to the gateway, IP changed (DHCP), device turned off | Check network and IP; use a fixed IP |
| Device missing from Communication devices | Device with Active off, or linked to another gateway | Check Active and the Gateway field |
| Device registration refused on save | Virtual controller without alias, without channel or removed; or 26-bit Wiegand output with a 34-bit virtual card | Follow the screen message: complete the controller, choose another one, or use the 34-bit output |
| Device denies everyone with "access rule" | ACCELERO not answering and installer set to sempre bloquear (always block) | Check communication with ACCELERO and the offline access option |
| Device denies everyone with "APB violation" | Gateway down with time schedules on and someone still without a time range | Restore the gateway; run the smart synchronization until everyone has a time range |
| Person denied on the device outside hours with no query record | Time schedules on: the device itself denied ("invalid time range" record) | Check the person's time range in the channel area |
| Person does not go to the device | Outside the module or device categories; no photo and no identifier of the configured types; device deactivated | Check categories, the module settings and the Active field |
| Person on the device without the fingerprint | Fingerprint deleted on the device | Run Smart synchronization: it resends only what is missing |
| Fingerprint capture with an error | See the capture error messages table | Follow the message guidance |
| Card grants without asking for the face, or asks for the face when it should not | The device's Card authentication | Choose Card with second factor or Card only in the device registration (Card authentication) |
| "Auth Failed" screen | A credential the device does not know, or the second factor not presented in time | Check that the person and the card are enrolled; the history shows it as an unknown credential |
| Enrolled person rejected by face after changing security | Face security at a stricter level | Go back to Normal or re-enroll the person's photo |
| Registered card is not recognized | Reader byte order different from the registration pattern | Switch the Inverted Mifare toggle (no resend). In Direct mode, the number read from an unknown card shows in the access history: compare it with the registration |
| Device does not read the card (no reaction) | Card type not selected, a "data reading" type selected instead of the "card number" one, or a technology the model does not read | Select the matching "card number" type; check the model version |
| Neon mode: the Neon receives nothing | Wiegand output off, format different from the Neon reader, wiring | Choose the output in the same format as the Neon and check the wiring |
| Neon mode: the Neon receives a number different from the registered one | Output format different from the Neon reader, or virtual card in 26 bits | Use 34 bits on both sides (Wiegand output) |
| Neon mode: accesses do not show as passages of the device | Expected: in Neon mode the passage is recorded by the Neon, on its channel | Check the history by the Neon channel |
| Time range did not reach the device | Option off, time range from another area, device without a channel (Neon mode without an Associated physical channel), time range across midnight, limit of 128 | Check the option, the channel and area, and the time range hours |
| Smart synchronization did not happen and a notification came | The device did not answer the listing | Check communication with the device and repeat |
| Wrong time on the device screen | Gateway time zone different from the local one | Fix the gateway time zone; the device follows at the next clock synchronization |
| Administrator cannot enter the menu | Person outside the administrator category, or the registration has not been resent yet | Check the category and save the person record (or synchronize the templates) |
Next Steps
- Certified Equipment
- Dahua / Intelbras Integration, another facial integration with synchronization and time ranges
- Time Range and Holidays
- Categories and People
- Controllers
- Incident Panel
- Licensing