Initial System Configuration
This guide walks you through the 7 essential steps to configure Accelero and get it ready to operate.
⏱️ 45-60 minutes for complete configuration
Process Overview
You will configure in this order:
- ✅ Areas - Define control locations (front desk, garage, rooms)
- ✅ Time Ranges - Create access periods (business hours, 24h, etc.)
- ✅ Controllers - Connect physical devices to the system
- ✅ Access Categories - Create permission groups (employees, visitors, etc.)
- ✅ Identifiers - Create permanent proximity cards
- ✅ Profiles and Operators - Register users of the web system
- ✅ Test First Access - Validate the configuration
Accelero already comes with some default categories and configurations created. In this guide, you will create all the time ranges, categories, and identifiers that will be used in your operation.
Step 1: Create Areas
What are Areas?
Areas represent the physical spaces controlled by the system. They are the locations where access control is applied, such as:
- Reception
- Meeting rooms
- Parking lot
- Corporate floors
- Production areas
- Cafeteria
Between one area and another there must be an access controller (turnstiles, doors, barriers) so that the system applies the security policies.
How to Create Your First Area
Path: Settings > Areas > New Area
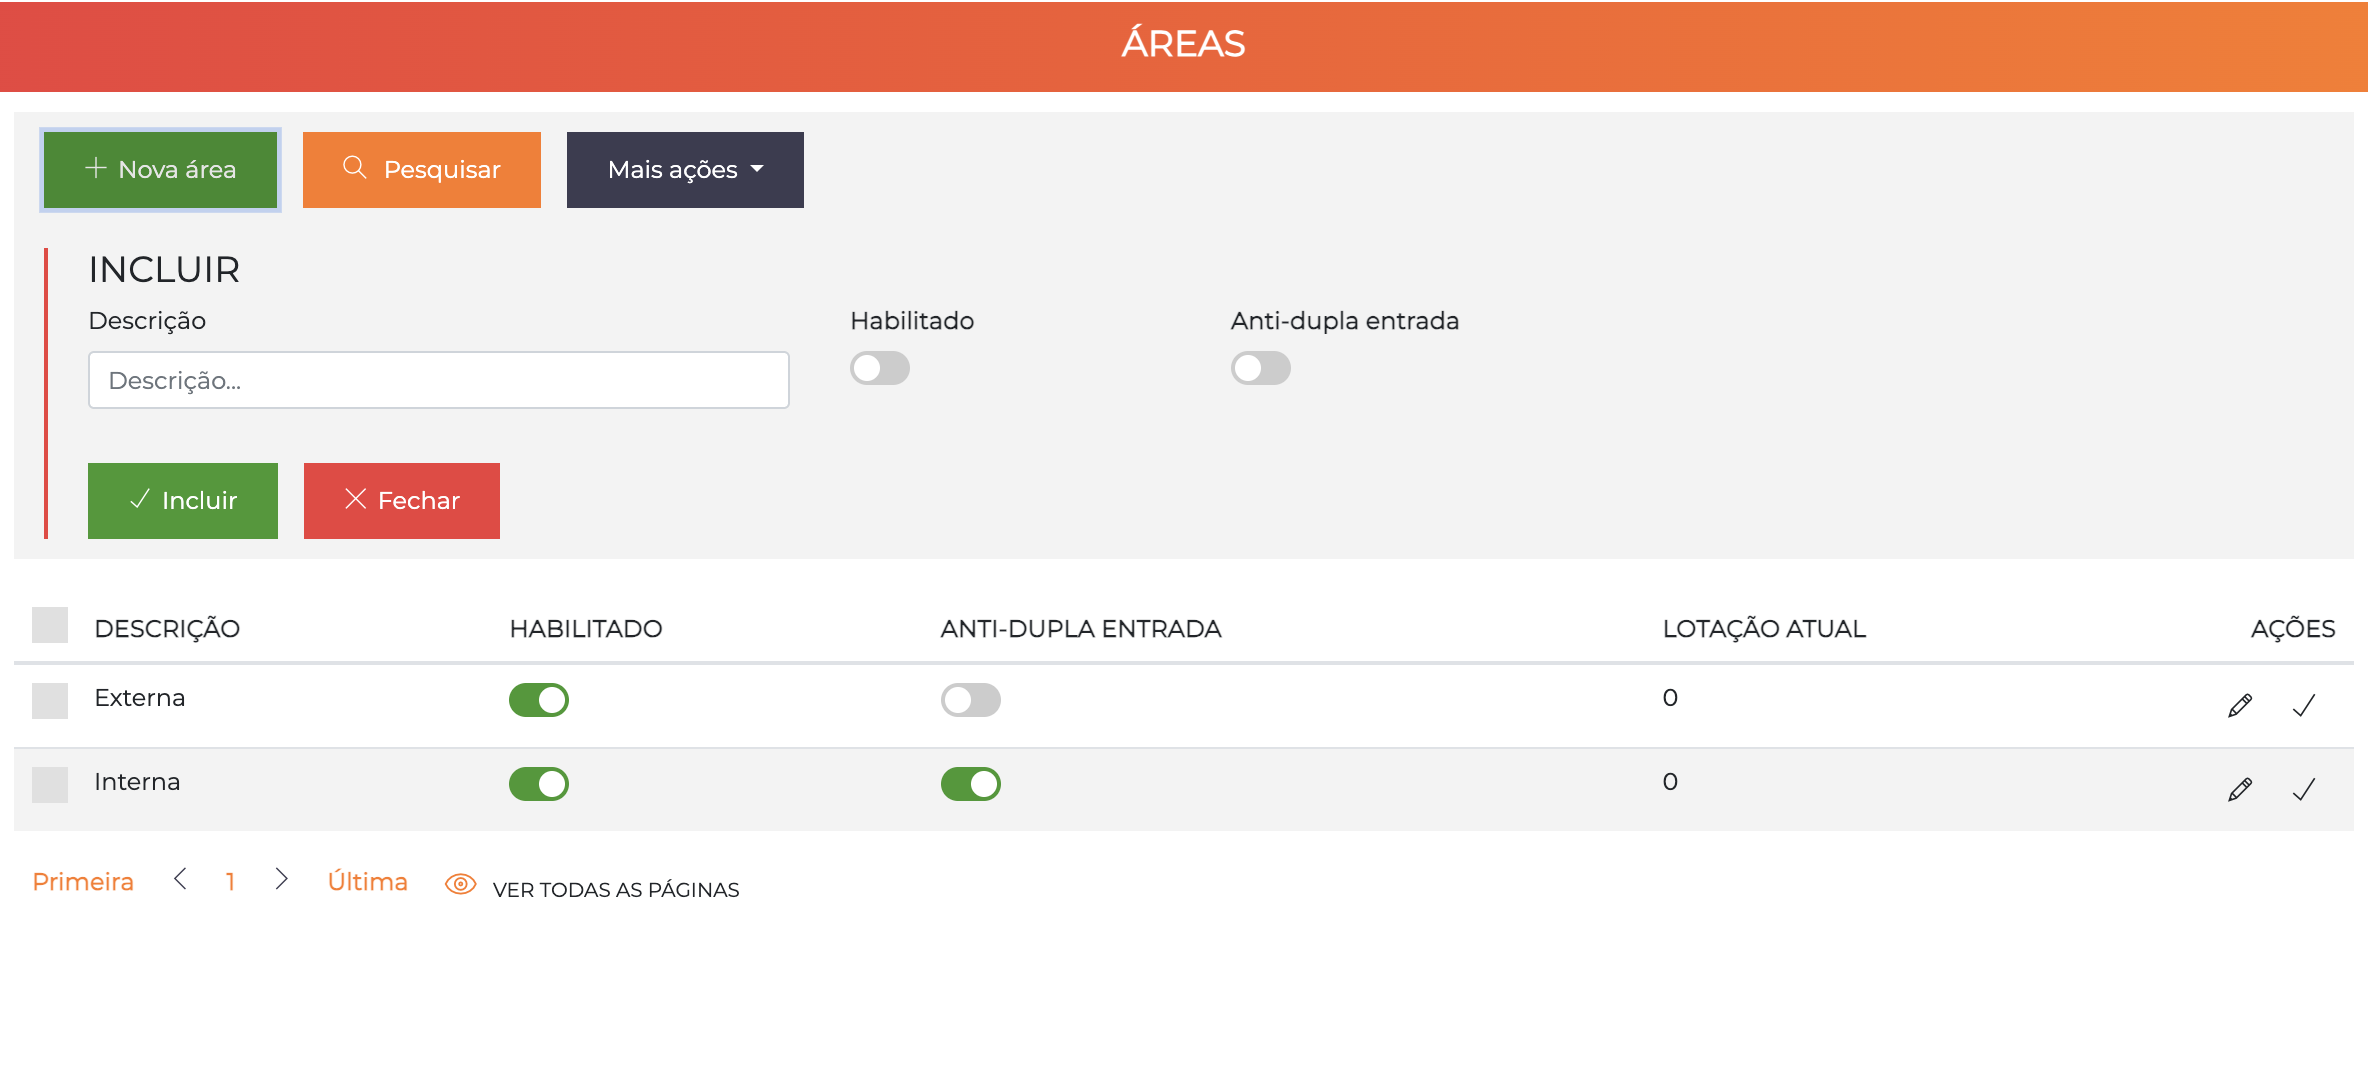
When you click "New Area", the system does not open a new page. It simply displays an inline form (text box) with the basic fields for quick creation.
Fields available in quick creation:
- Description: Name of the area (e.g., "Main Reception", "Basement Parking 1")
- Enabled: Switch to enable/disable the area ✅
- Control anti-passback: Switch to activate control (leave off for now ❌)
Fill it in and click Save.
The advanced settings (occupancy, credits, passes, parking spots, etc.) only become available after creating the area.
To access them:
- After saving, click the pencil (✏️) icon on the right side of the area in the listing
- You will be directed to the complete edit page
- There you will have access to all tabs and advanced settings
Always click "Save" before leaving the edit screen, otherwise all changes will be lost!
Recommended Minimum Areas
To start, create at least these basic areas:
| Area | Description | Purpose |
|---|---|---|
| External Area | Area outside the building | Starting point for tracking |
| Reception | Entrance hall | First controlled area |
| Internal Area | Main circulation area | General access zone |
Start simple! You can add more areas as needed. Do not create too many areas right at the start.
Complete reference: Entities > Areas
Step 2: Configure Time Ranges
What are Time Ranges?
Time ranges define when access is allowed. They are configurable time periods such as:
- "Monday to Friday, from 08:00 to 18:00"
- "Weekends, any time"
- "24 hours, every day"
You combine time ranges with areas and categories to create access rules.
Create Basic Time Ranges
Path: Settings > Time Ranges
1. "Business Hours" Range
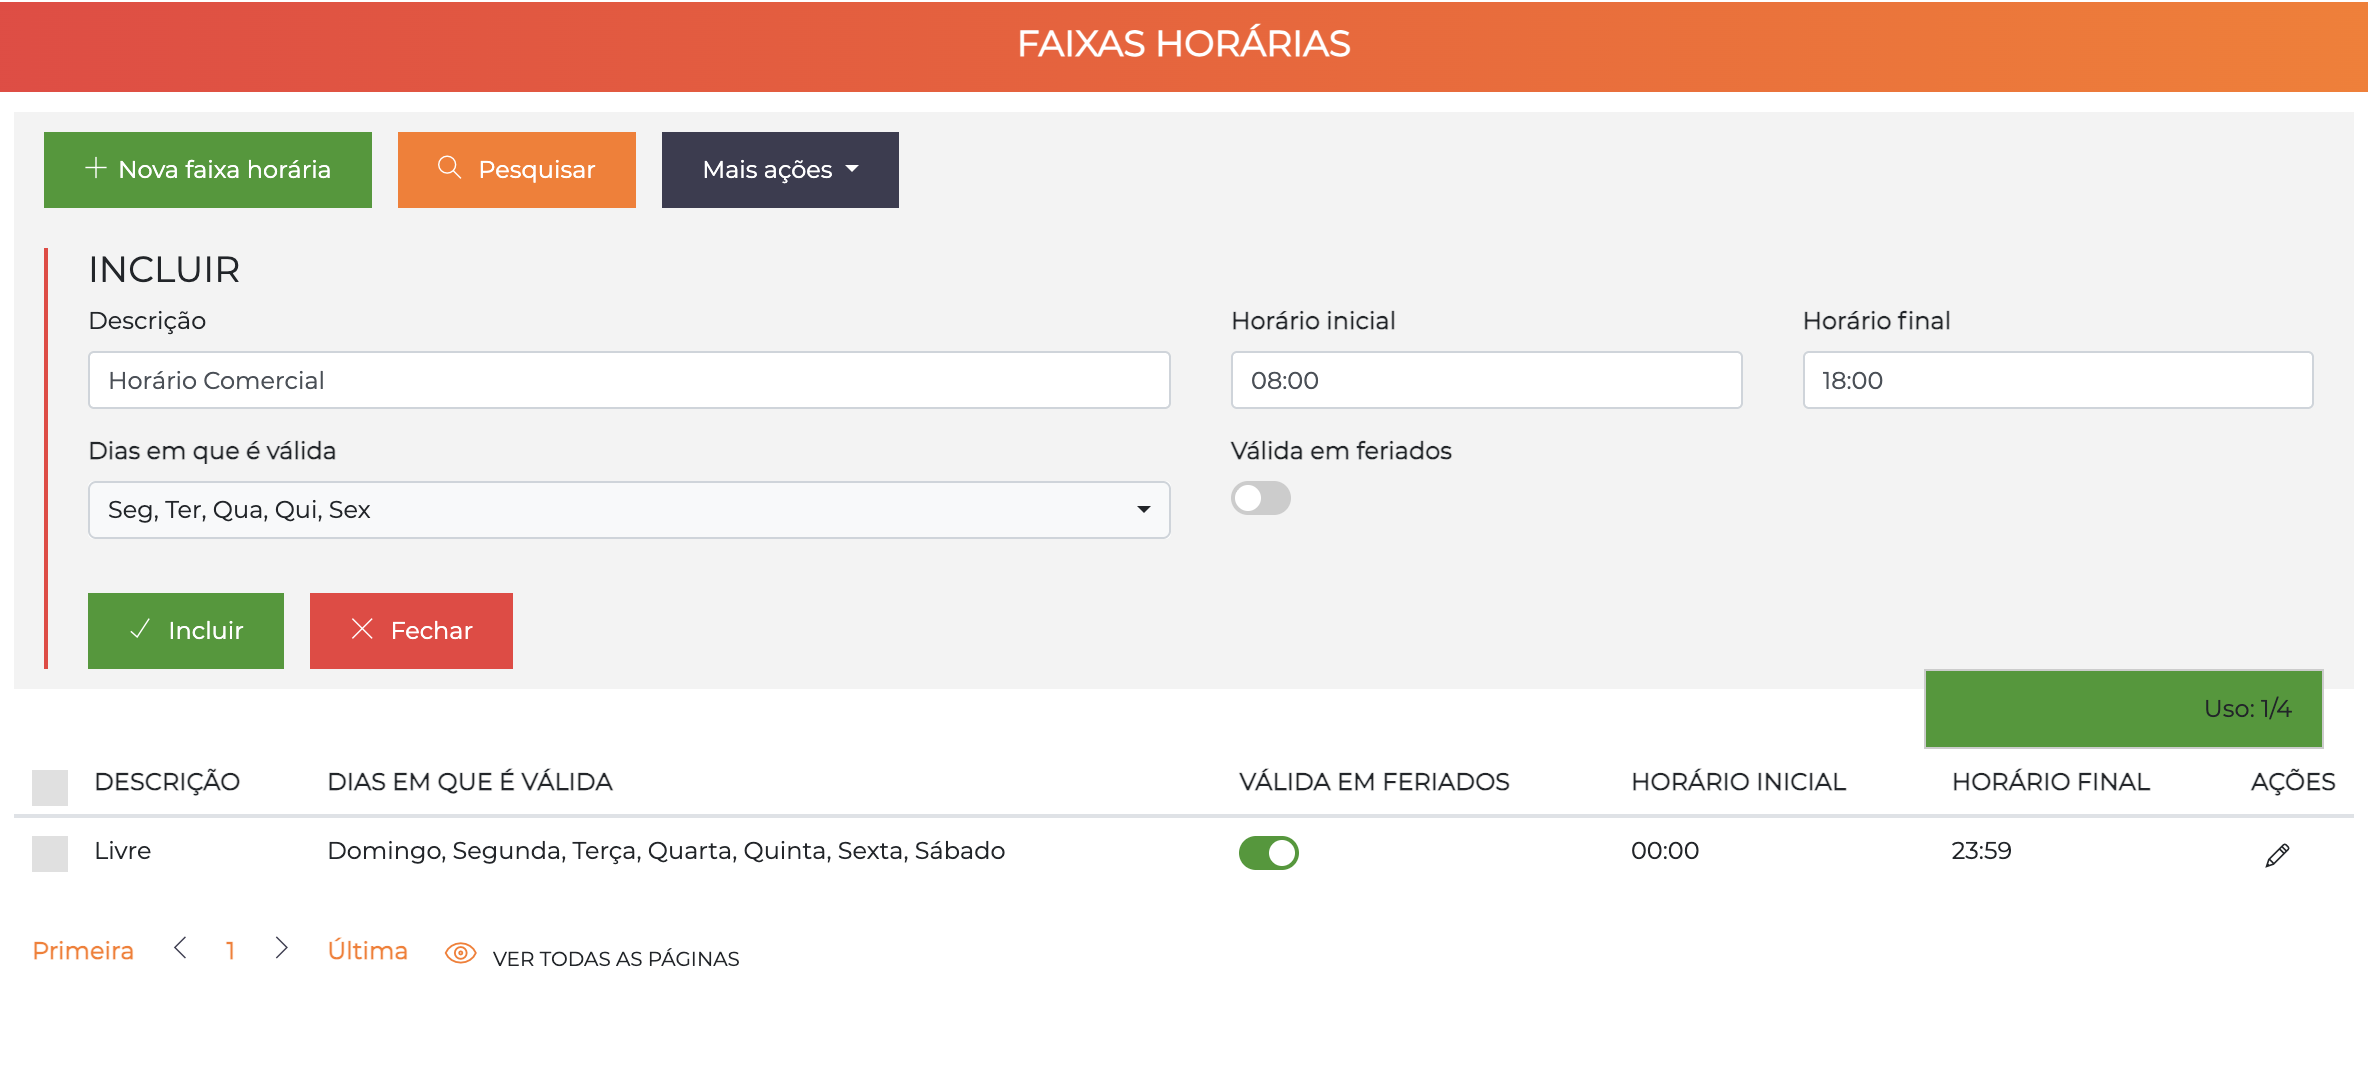
- Click "New Time Range"
- Fill in:
- Description:
Business Hours - Valid days: Monday to Friday ✅
- Holidays: Not applicable ❌
- Start time:
08:00 - End time:
18:00
- Description:
- Click Save
2. "24 Hours" Range
- Click "New Time Range"
- Fill in:
- Description:
24 Hours - Valid days: Every day ✅
- Holidays: Applies ✅
- Start time:
00:00 - End time:
23:59
- Description:
- Click Save
Configure holidays in Settings > Holidays so that the ranges that consider holidays work correctly.
Complete reference: Entities > Time Ranges
Step 3: Register Controllers
What are Controllers?
Controllers are the physical devices installed at the access points:
- Turnstiles
- Automated doors
- Parking barriers
- Turnstile gates
They read the credentials (cards, biometrics, QR Code) and communicate with the Accelero server to validate the access.
Before registering the controller in the system, the equipment must be configured beforehand following the hardware manual instructions.
📖 Example: Neon Manual (available in the Hardware section)
Add Your First Controller
Path: Settings > Controllers
The Device ID is identified physically on the equipment (label or engraving on the hardware).
Correct format:
- Locate the serial number on the equipment (e.g.,
026647) - Add the equipment name in lowercase before the number
- Complete example:
neon026647
Other examples:
- Neon with serial 026647 →
neon026647 - Neon with serial 123456 →
neon123456
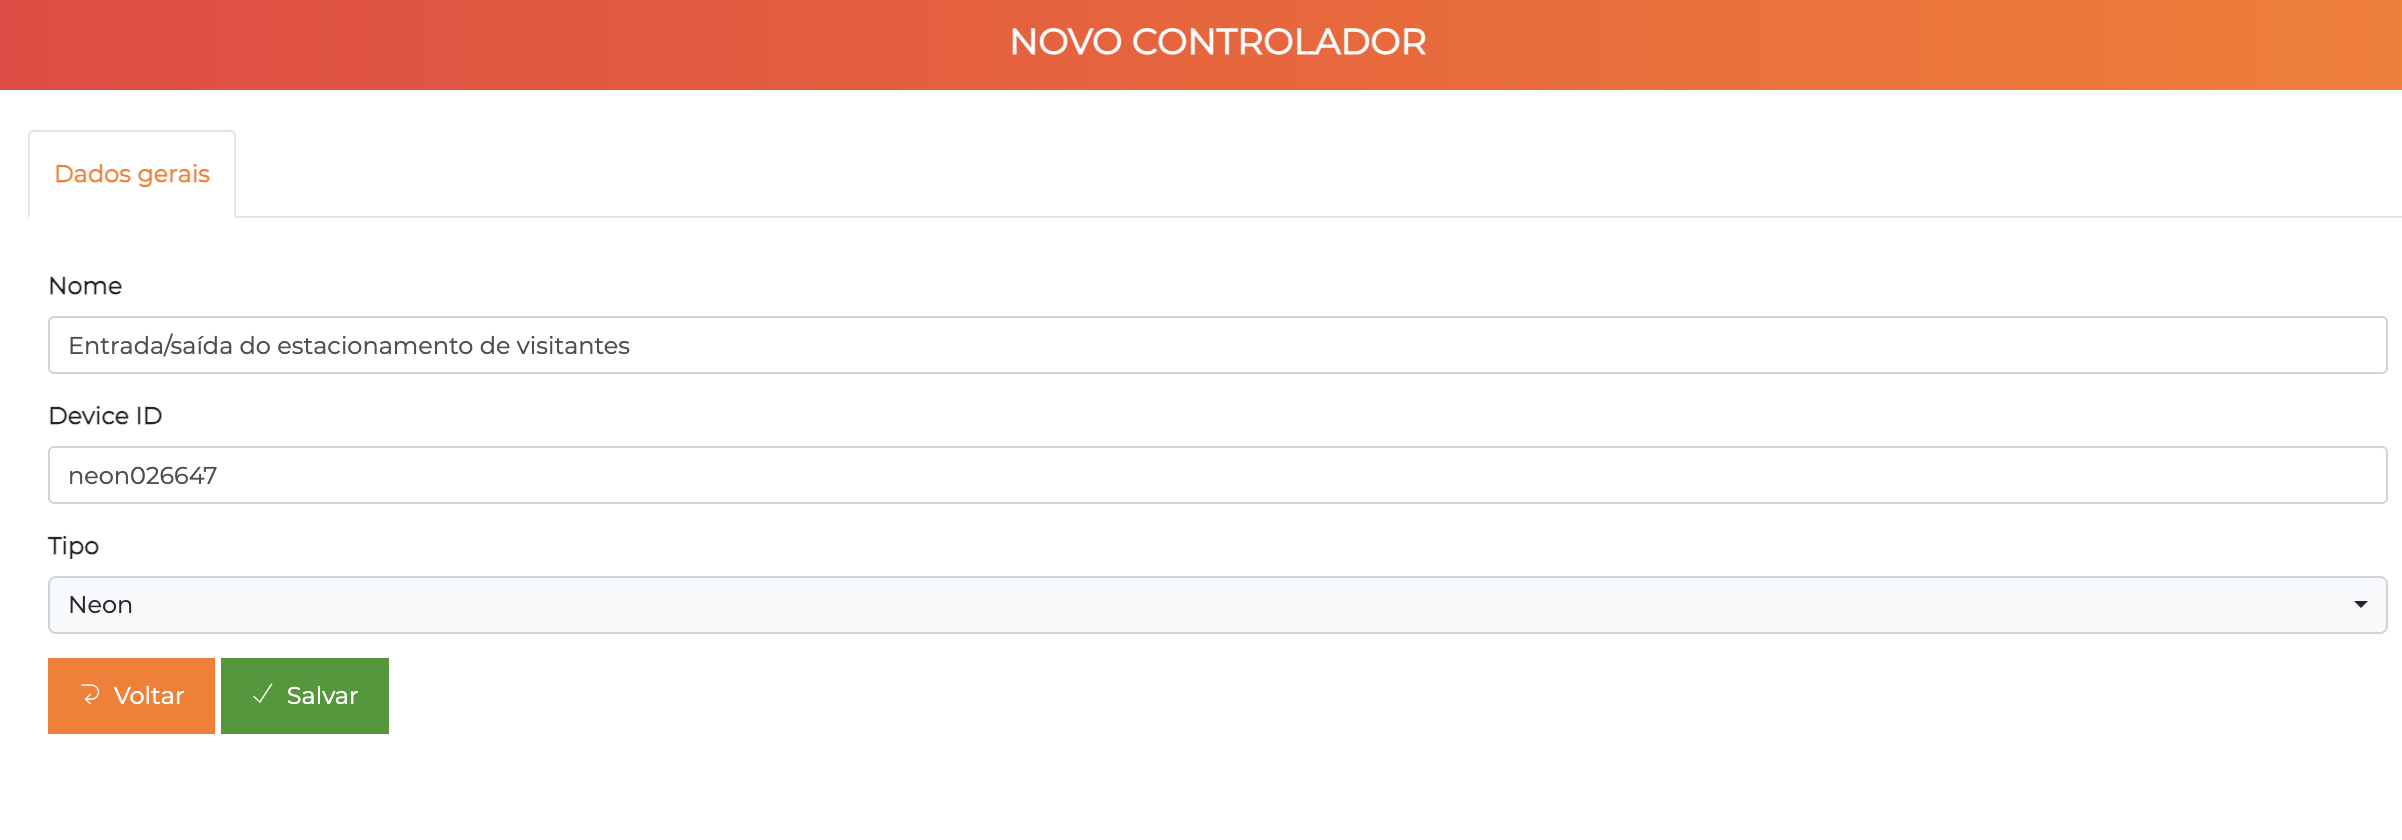
Fill in the fields:
- Click "New Controller"
- Name: Clear identification (e.g., "Main Entrance Turnstile")
- Device ID: Type in the correct format (e.g.,
neon026647) - Type: Select the equipment model (e.g., Neon)
Even though the Device ID already specifies the equipment name (neon026647), you still need to select the Type in the appropriate field.
- Click Save
Configure Channels
Each controller has channels (passage directions). For example:
- Channel 1: Entry (Reception → Internal Area)
- Channel 2: Exit (Internal Area → Reception)
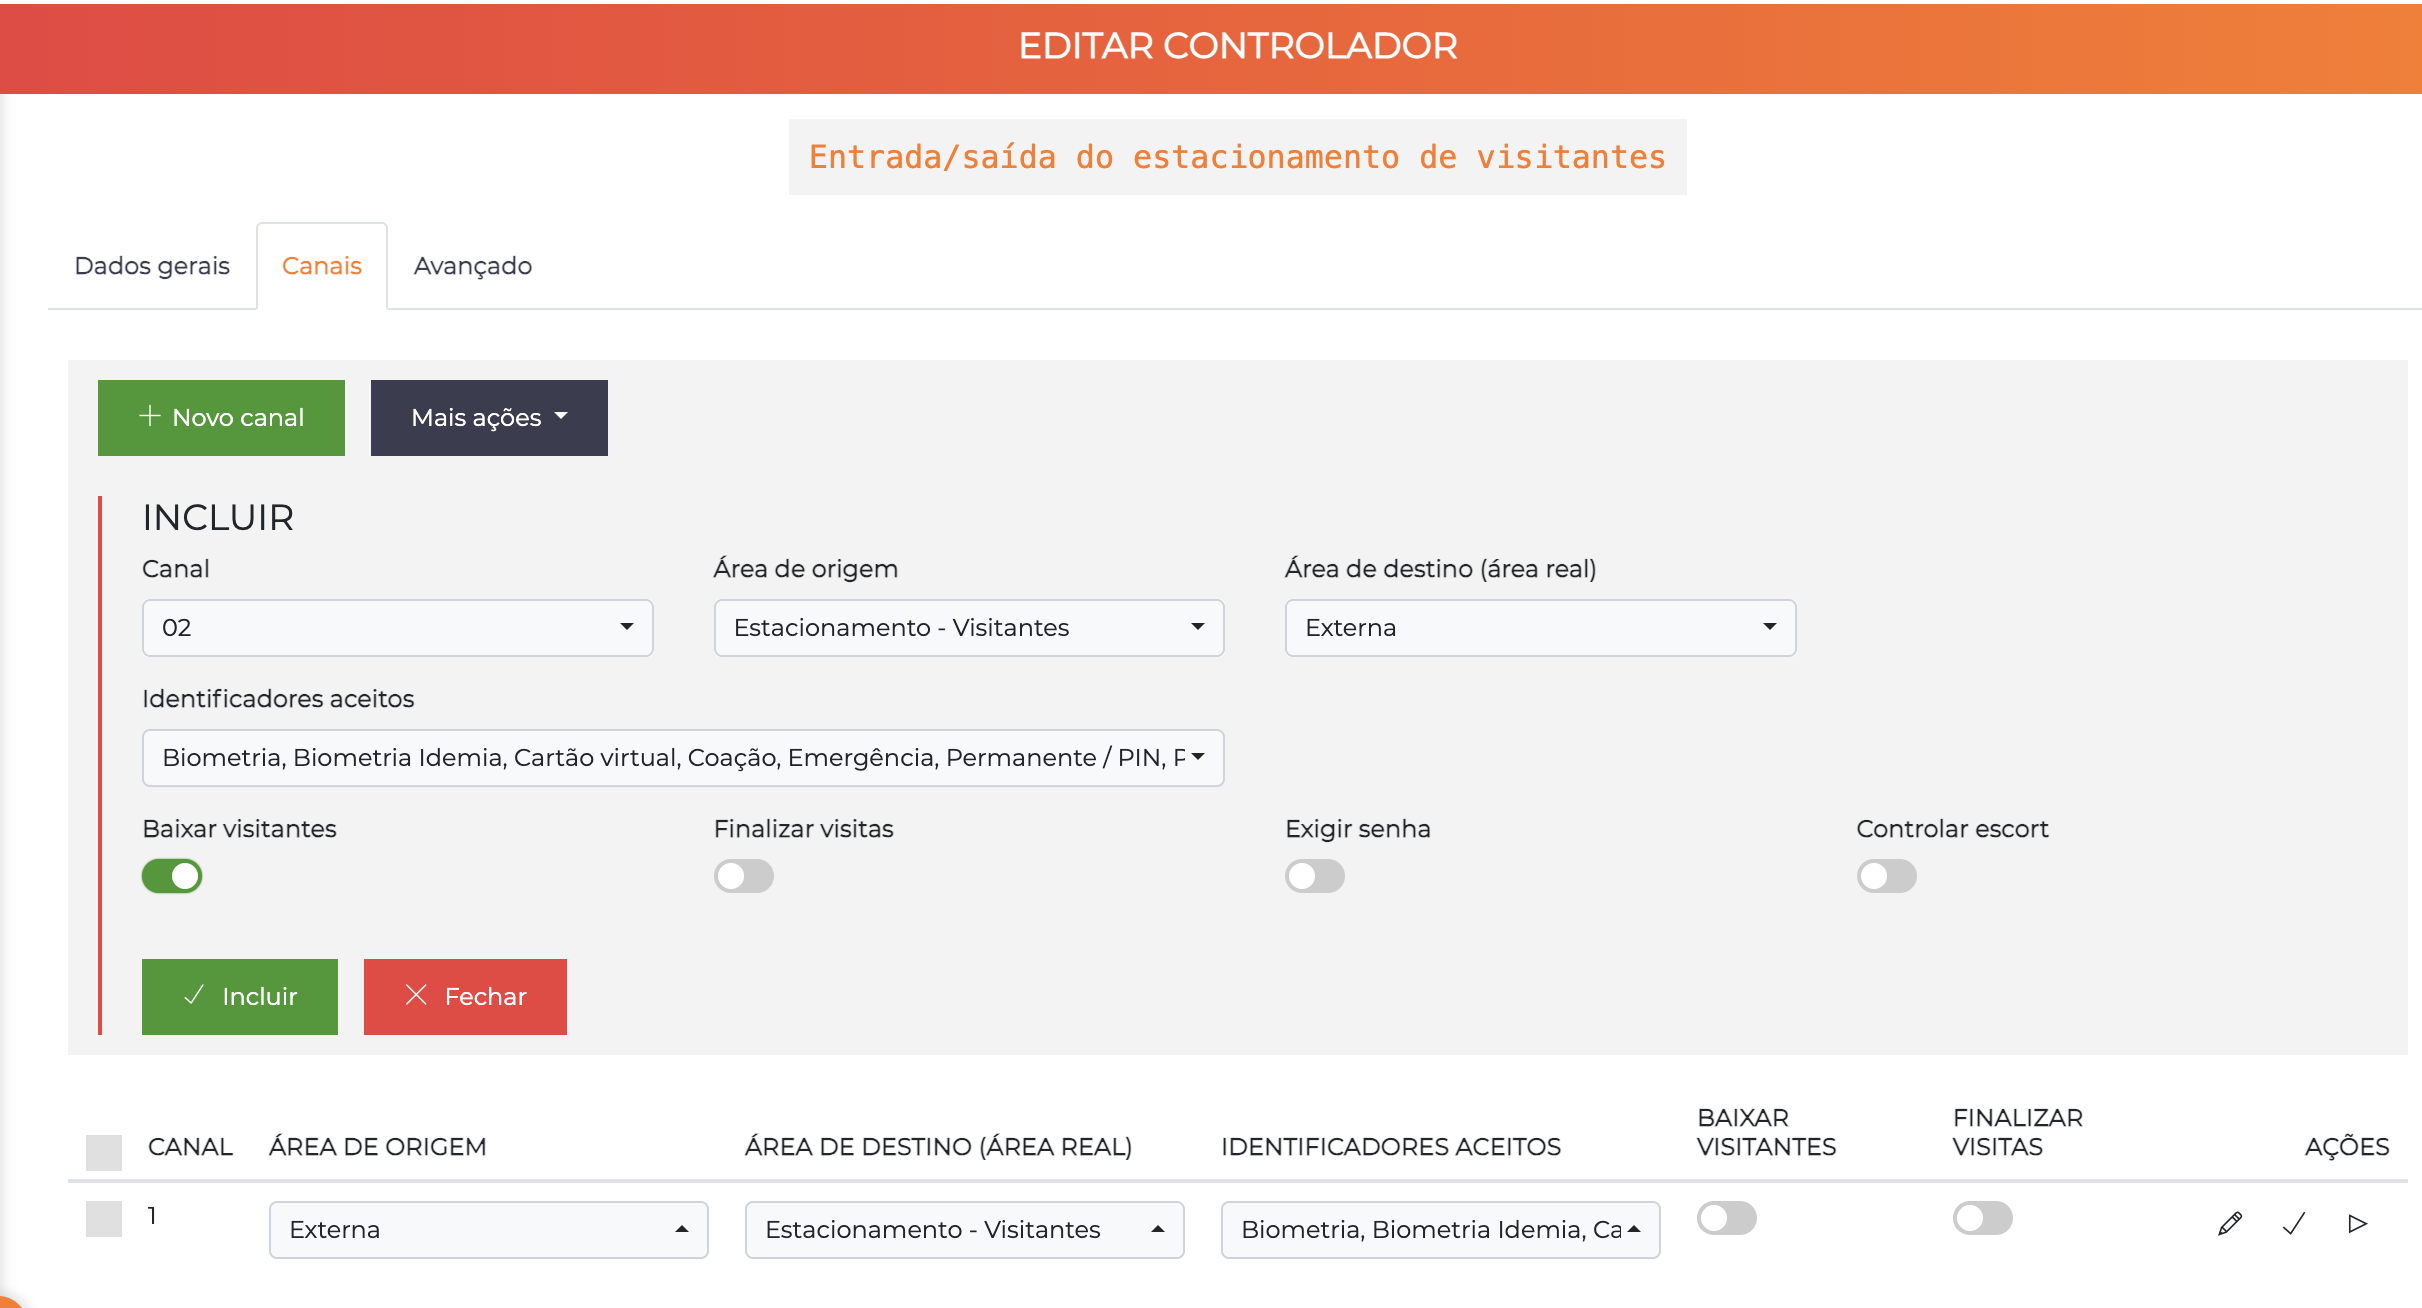
- In the controller's Channels tab, configure each channel:
- Description: Name of the channel (e.g., "Entry", "Exit")
- Origin area: Where the person comes from
- Destination area: Where the person is going
- Accepted identifiers: Select the allowed identifier types (Card, QR Code, Biometrics, etc.)
- Save each channel
Just like with areas, the advanced channel settings only become available after creation.
To access them:
- Click the pencil (✏️) icon next to the channel in the listing
- You will be directed to the complete channel edit page
- There you will have access to settings such as: escort control, dual custody, inverted QR codes, elevator integration, etc.
Always click "Save" before leaving the edit screen, otherwise all changes (controller and channels) will be lost!
After saving, check whether the controller appears as "Online" in the listing. If it appears "Offline", check the network connection and the Device ID.
For settings of other device types such as:
- 📷 Facial devices (Hikvision, Control ID, Dahua, ZKTeco)
- 🚗 LPR cameras (license plate recognition)
- 🔧 Other specialized hardware
See the Reference Manual → Integrations → Hardware → topic of the corresponding equipment:
Complete reference: Entities > Controllers
Step 4: Create Access Categories
What are Categories?
Categories define who can access where and when. They are groups to which people are associated:
- Employees
- Visitors
- Residents
- Service providers
- Management
- Security
Categories are the most important configuration in the system. They determine all physical access permissions.
Accelero already comes with some default categories created. Review them and create the additional ones needed for your operation.
Create Categories
Path: Settings > Categories
Just like with areas, when you click "New Category", the system does not open a new page. It displays an inline form with the basic fields for quick creation.
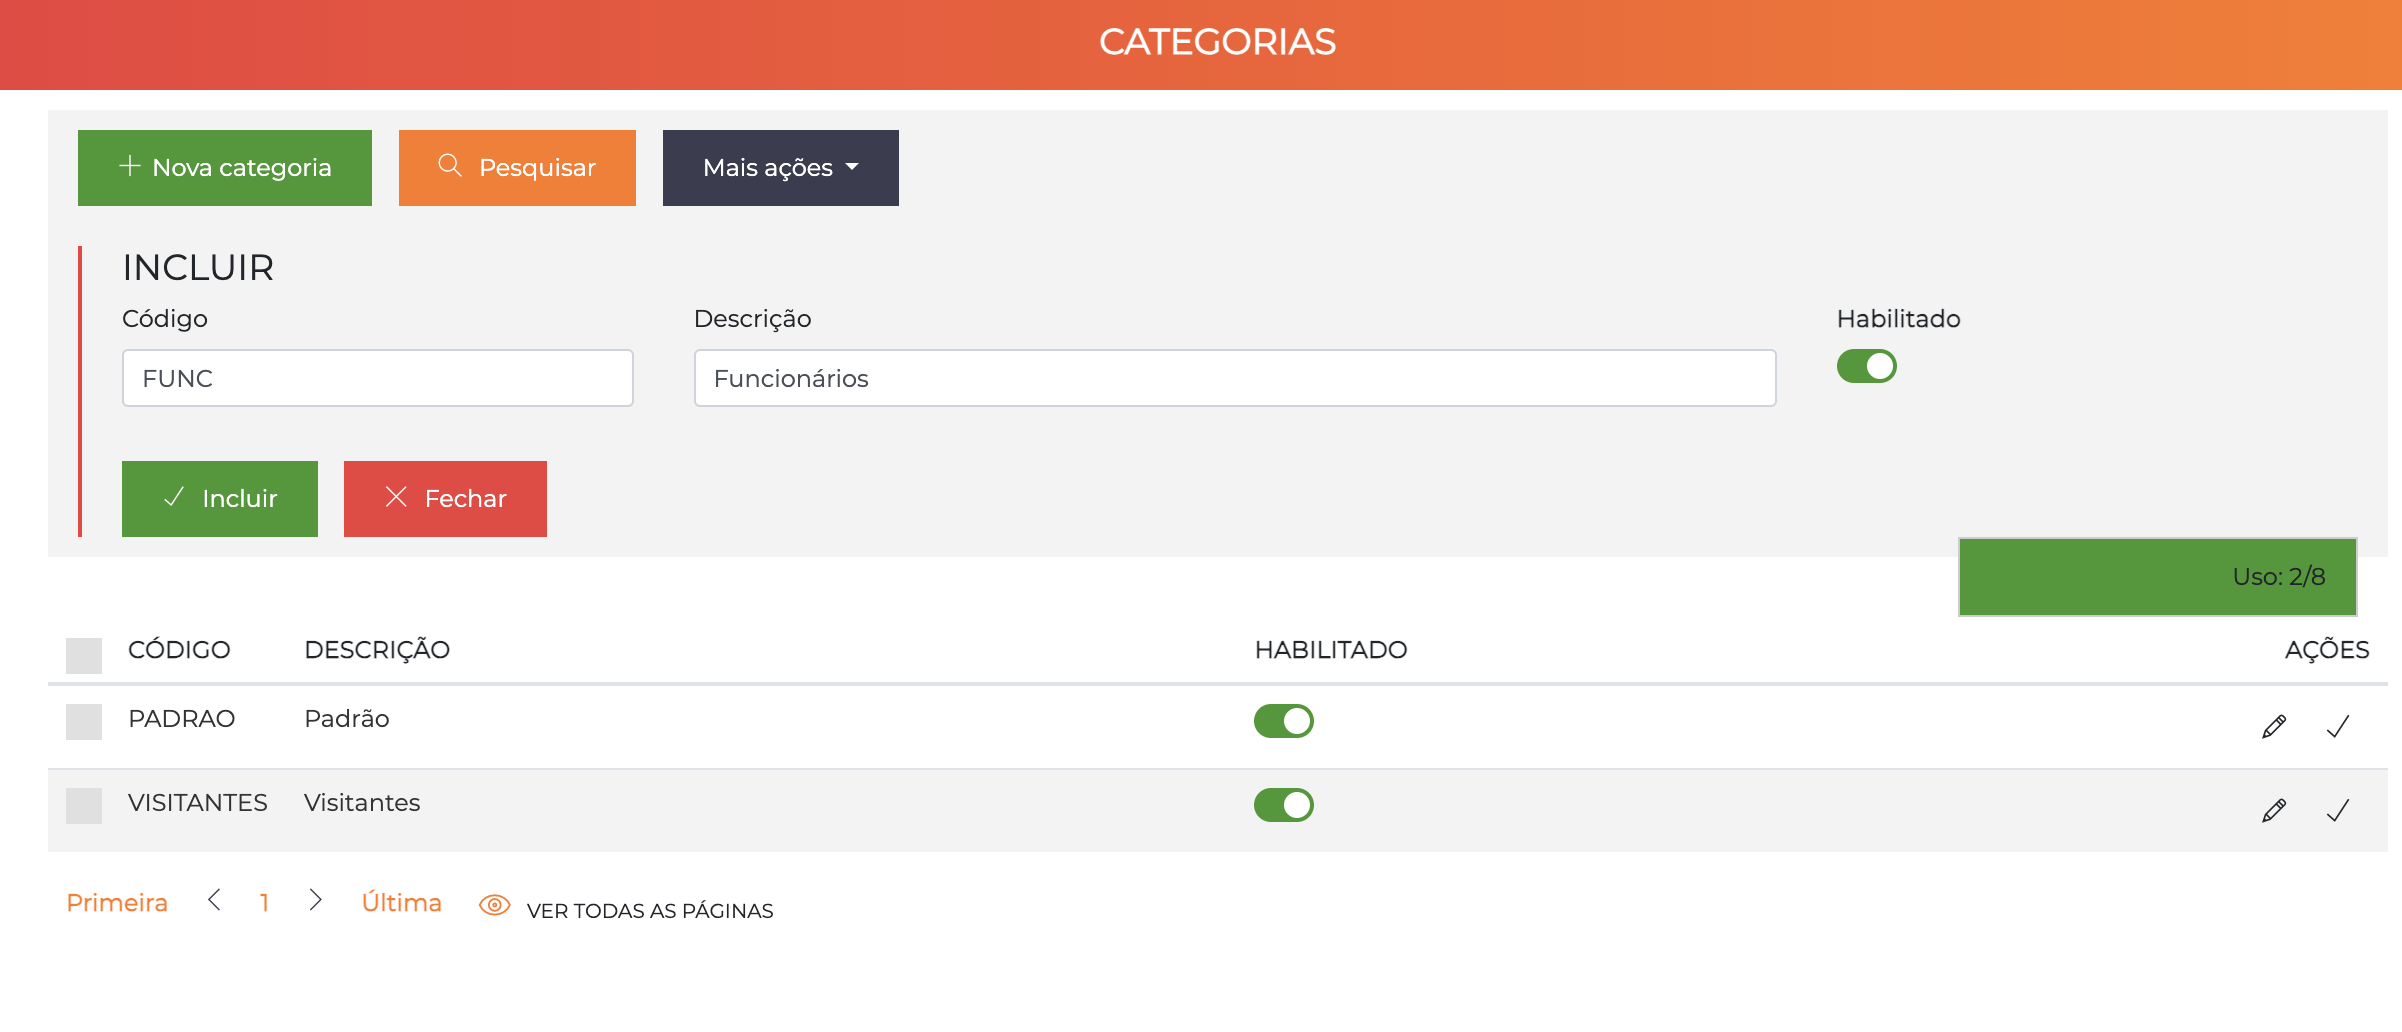
Fields available in quick creation:
- Code: Unique identifier (e.g.,
EMP,VISIT,MANAGER) - Description: Name of the category (e.g., "Employees", "Visitors")
- Enabled: Switch to enable/disable ✅
After creating the category, click the pencil (✏️) icon to access advanced settings such as: anti-passback control, escort, contingency, working times, impeding category, among others. See all available fields in the complete Categories documentation.
First: Create all necessary categories with their codes and descriptions. Then: Edit each one to configure the access areas.
Examples of Categories to Create:
| Code | Description | Use |
|---|---|---|
EMP | Employees | Permanent staff |
MANAGER | Management | Managers and directors |
VISIT | Visitors | Temporary visitors |
PROV | Service Providers | Outsourced, maintenance |
SECURITY | Security | Guards and doorpersons |
Create each one by clicking "New Category", filling in the fields, and saving.
Configure Access Areas for Each Category
After creating all the categories, configure where and when each one can access:
- In the category listing, click the pencil (✏️) icon next to the desired category
- You will be directed to the complete category edit page
- Go to the "Access areas" tab
- There you define which areas this category can access and at what times
After configuring all the category's access areas, always click "Save" before leaving the edit screen, otherwise all the configured permissions will be lost!
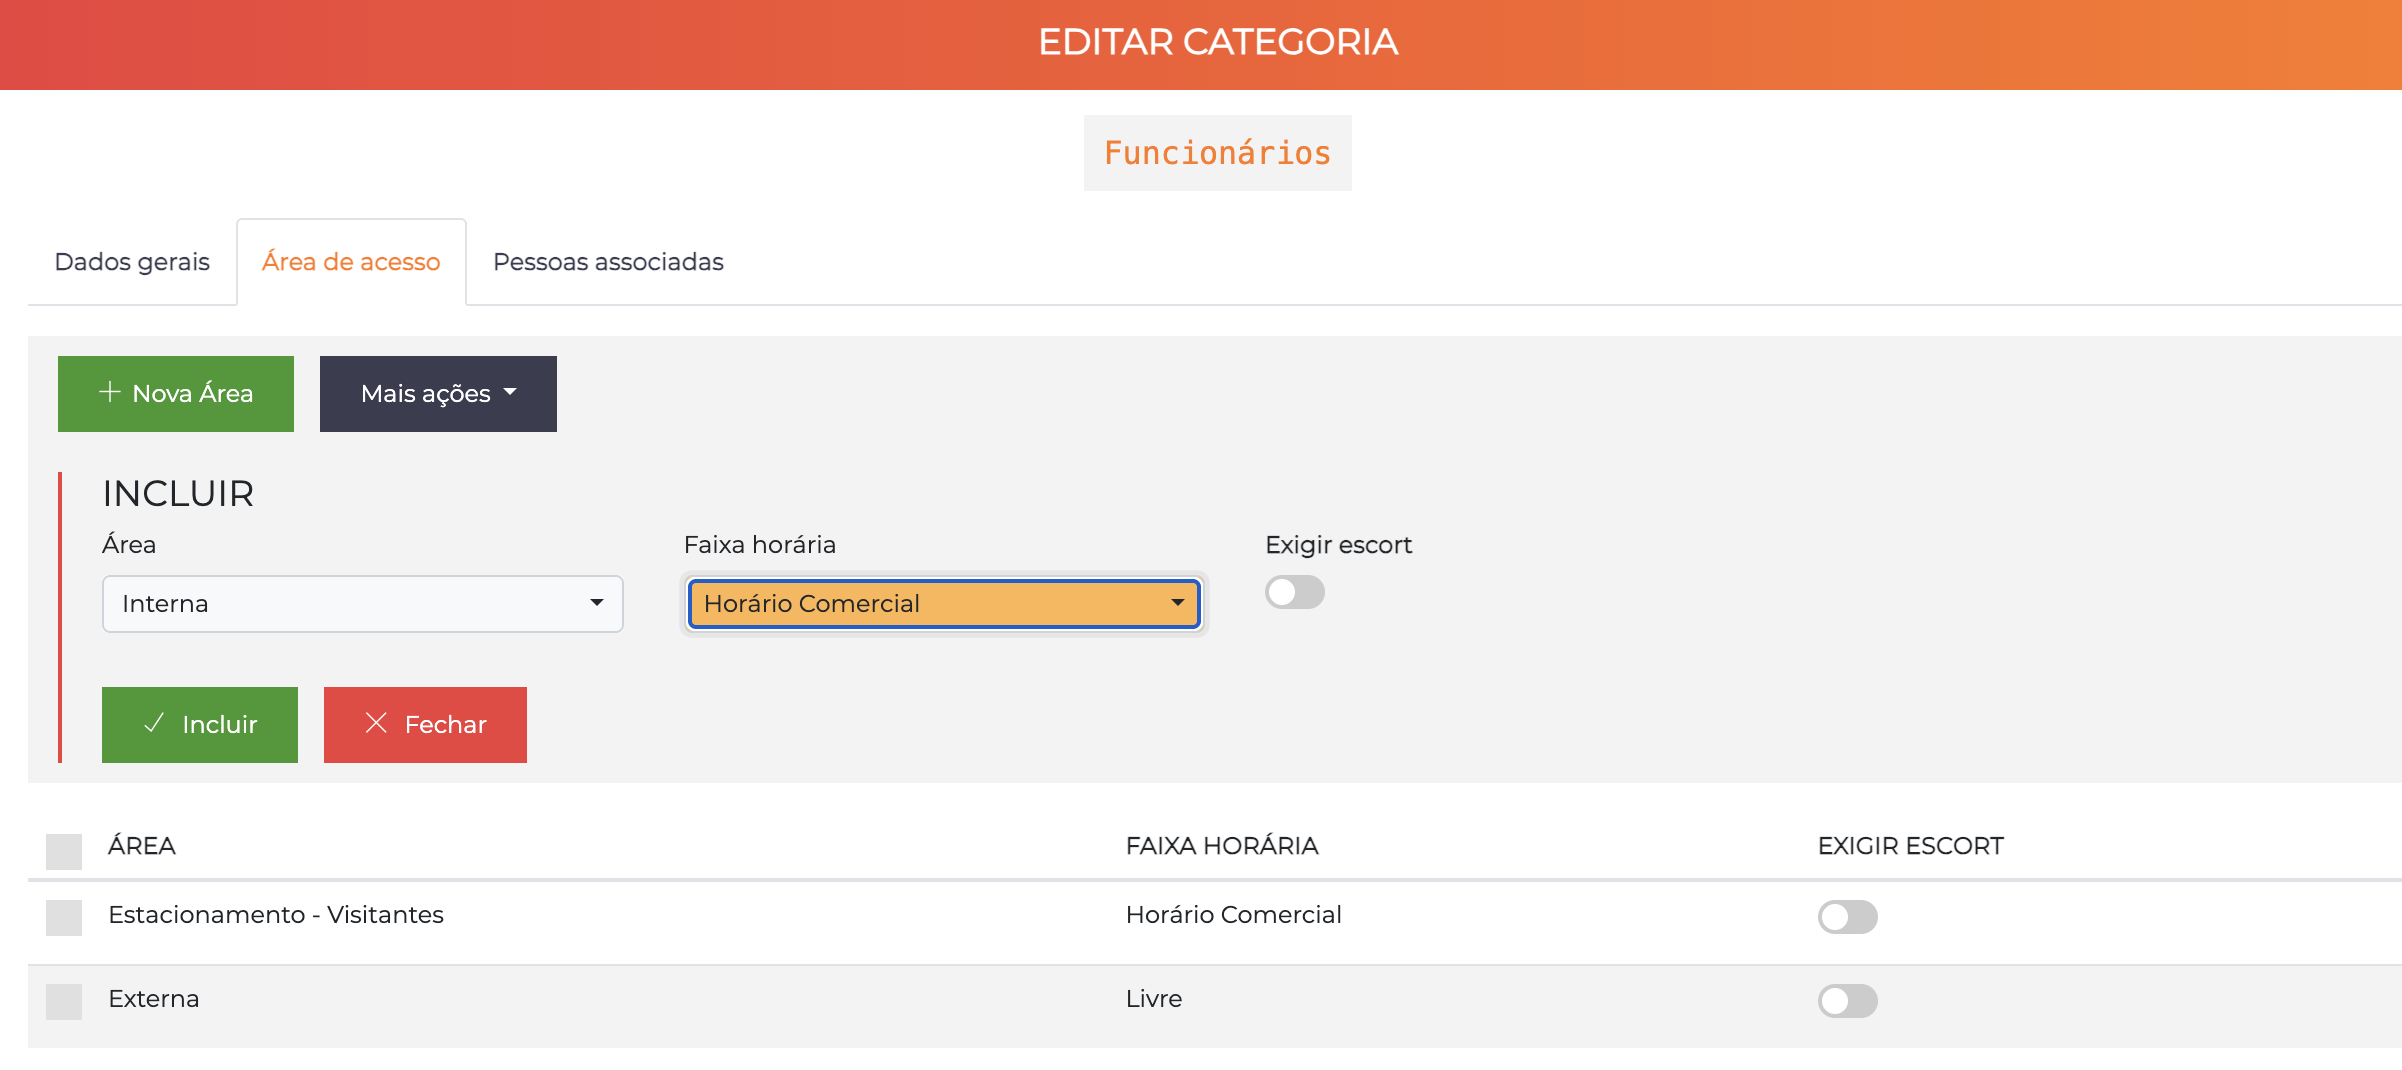
Example: Employees
- Click the pencil (✏️) next to the "Employees" category
- Go to the Access areas tab
- Click "Add" for each permission:
- Area: Internal Area | Time Range: Business Hours
- Area: Reception | Time Range: 24 Hours
- Click Save
"Employees can access the Internal Area during Business Hours (Monday to Friday, 08:00-18:00) AND Reception 24 hours a day"
Example: Management
- Click the pencil (✏️) of the "Management" category
- Access areas tab → click Add:
- Area: Internal Area | Time Range: 24 Hours
- Area: Reception | Time Range: 24 Hours
- Save
Example: Visitors
- Click the pencil (✏️) of the "Visitors" category
- Access areas tab → click Add:
- Area: Reception | Time Range: Business Hours
- Save
"Employees can access the Internal Area during Business Hours (Monday to Friday, 08:00-18:00) AND Reception 24 hours"
"Management can access the Internal Area and Reception 24 hours a day"
A person can have several categories simultaneously. The permissions are summed: if John is "Employee" + "Manager", he has access to all areas of both categories. See detailed examples of summed permissions.
Some categories can be configured as impeding, completely blocking physical access, event registration, and editing of the person's record. See Impeding Categories for more details.
Complete reference: Entities > Categories
Step 5: Create Identifiers (Proximity Cards)
What are Identifiers?
Identifiers are the physical means of identification that people use to access the system:
- RFID/proximity cards
- Vehicle tags
- QR Codes
- Biometrics
- Numeric passwords
In this step, we will create a batch of permanent proximity cards that will be associated with people.
Without identifiers, people cannot physically access the controlled locations. This step is essential for the functioning of the system.
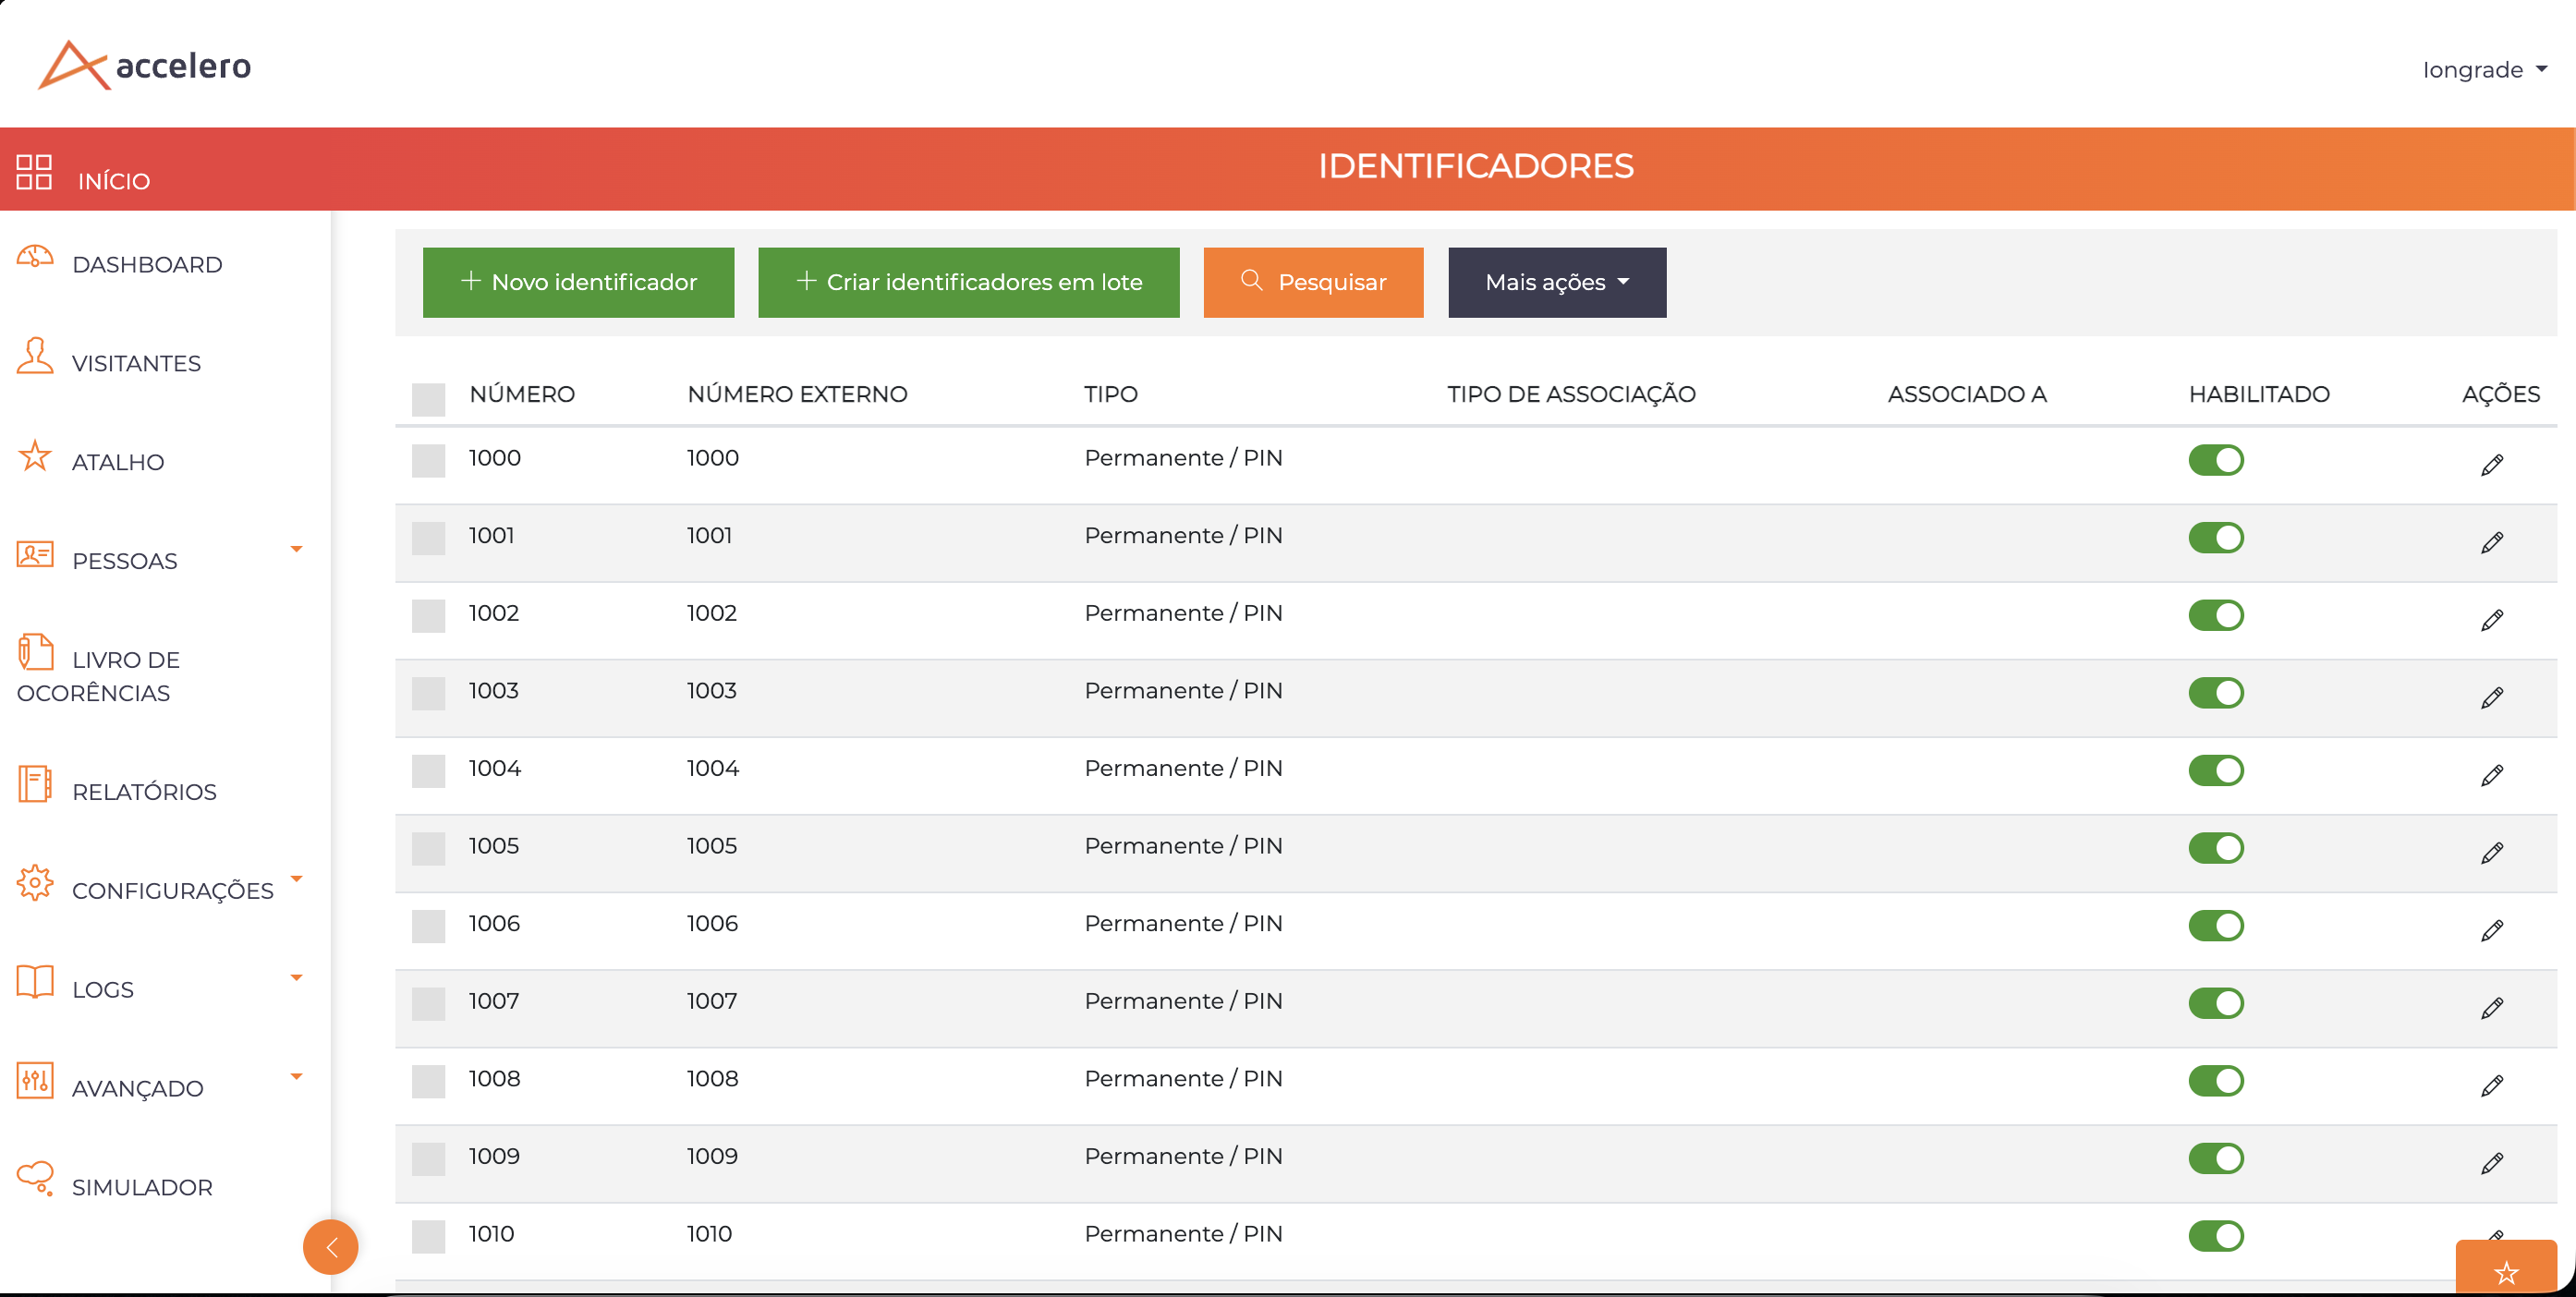
Method 1: Manual/Sequential Creation
Use this method when you know the numbers printed on the physical cards.
Path: Settings > Identifiers > New identifier
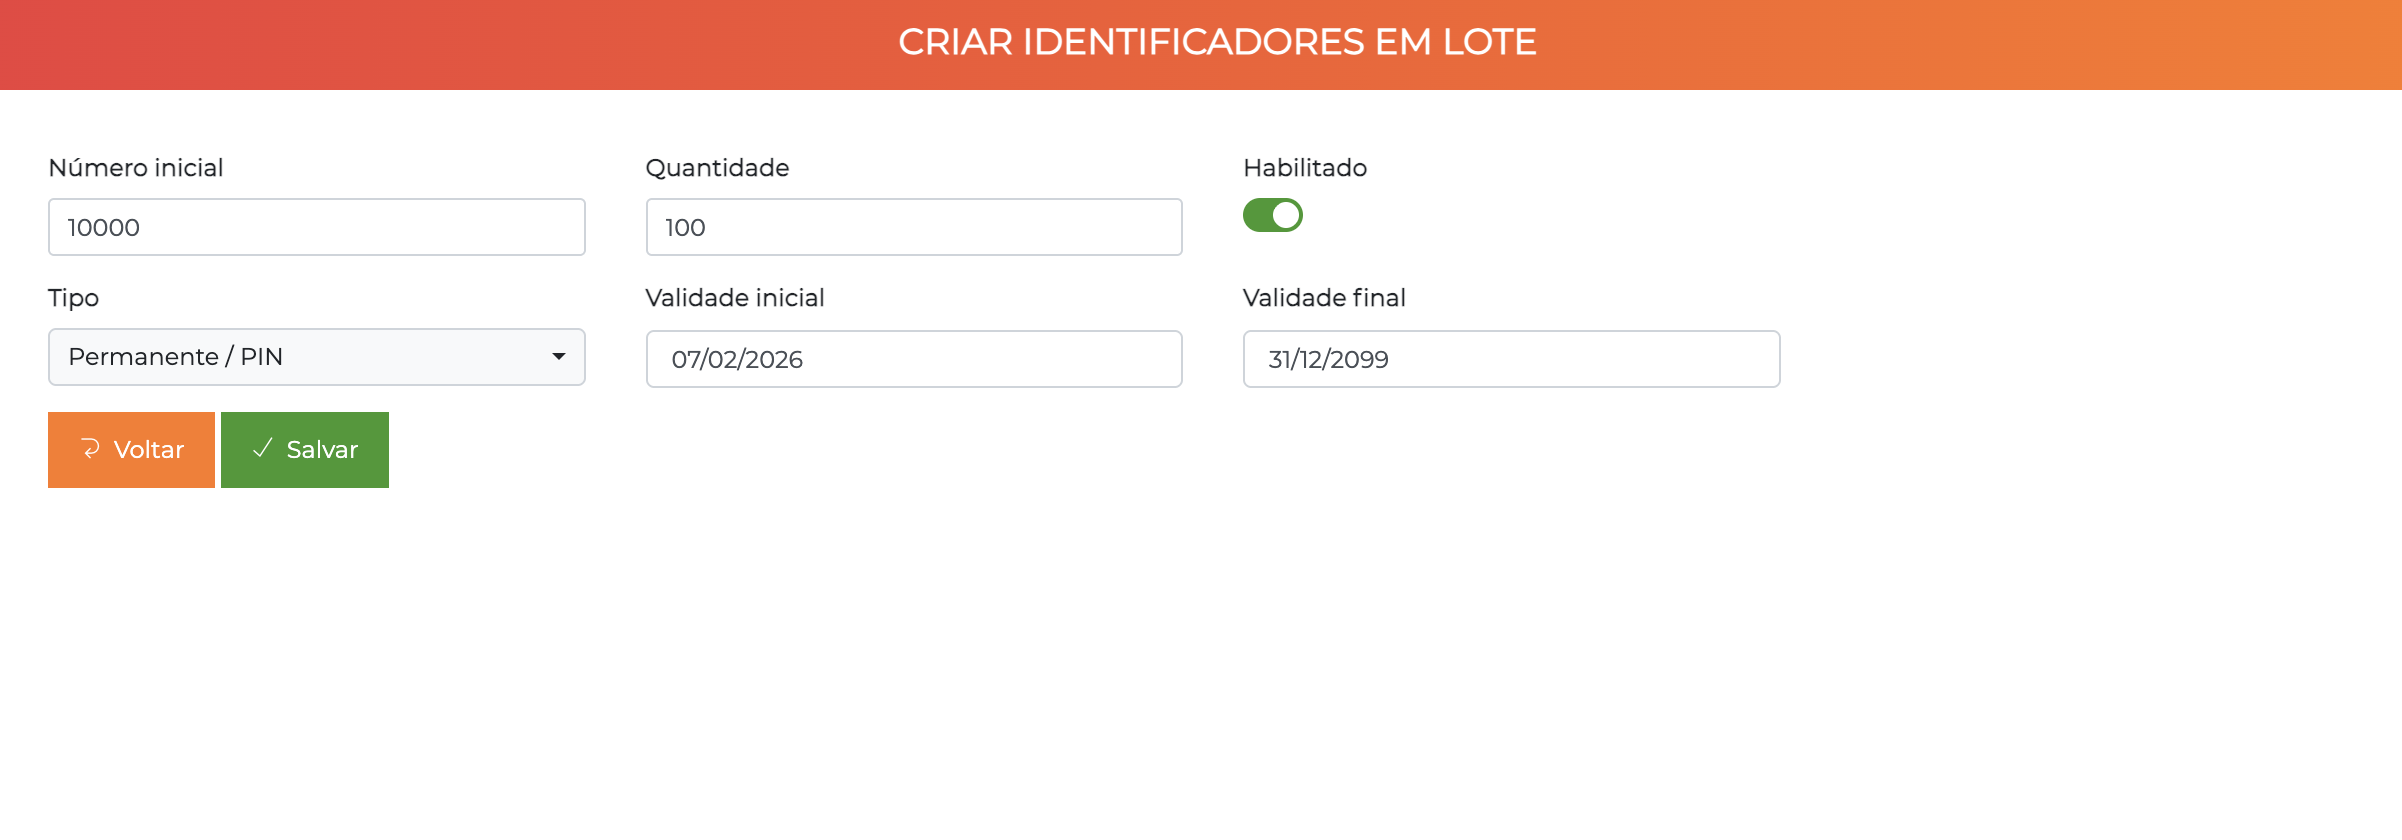
Create Cards for Employees
- Click "New identifier"
- Fill in the fields:
- Starting number: Type the real number of the first physical card (usually printed on the card)
- Quantity:
100(how many cards to create sequentially) - Type: Select
Permanent Card - Enabled: ✅
- Start validity: Leave blank (no limit)
- End validity: Leave blank (no limit)
- Click Save
The example numbers (10001, 90001, etc.) are for illustration only. You must use the real numbers that are engraved/printed on the physical cards you have. Otherwise, the cards will not work on the readers!
The system will create 100 sequentially numbered cards starting from the informed starting number, all enabled and with no expiration date.
Create Cards for Visitors (Temporary)
Repeat the process to create visitor cards:
- New identifier:
- Starting number: Real number of the first visitor card
- Quantity:
50 - Type: Select
Visitor Card(or create this type if it does not exist) - Enabled: ✅
- Click Save
These cards will be lent to visitors during the visit and returned upon exit. They are reusable.
Method 2: Creation by Capture
If you do not know the numbers of the physical cards you have (or prefer not to type them), use creation by capture.
Path: Settings > Identifiers > Create identifiers in batch
When you click "Create identifiers in batch", the system opens a new screen where you can:
Capture Configuration
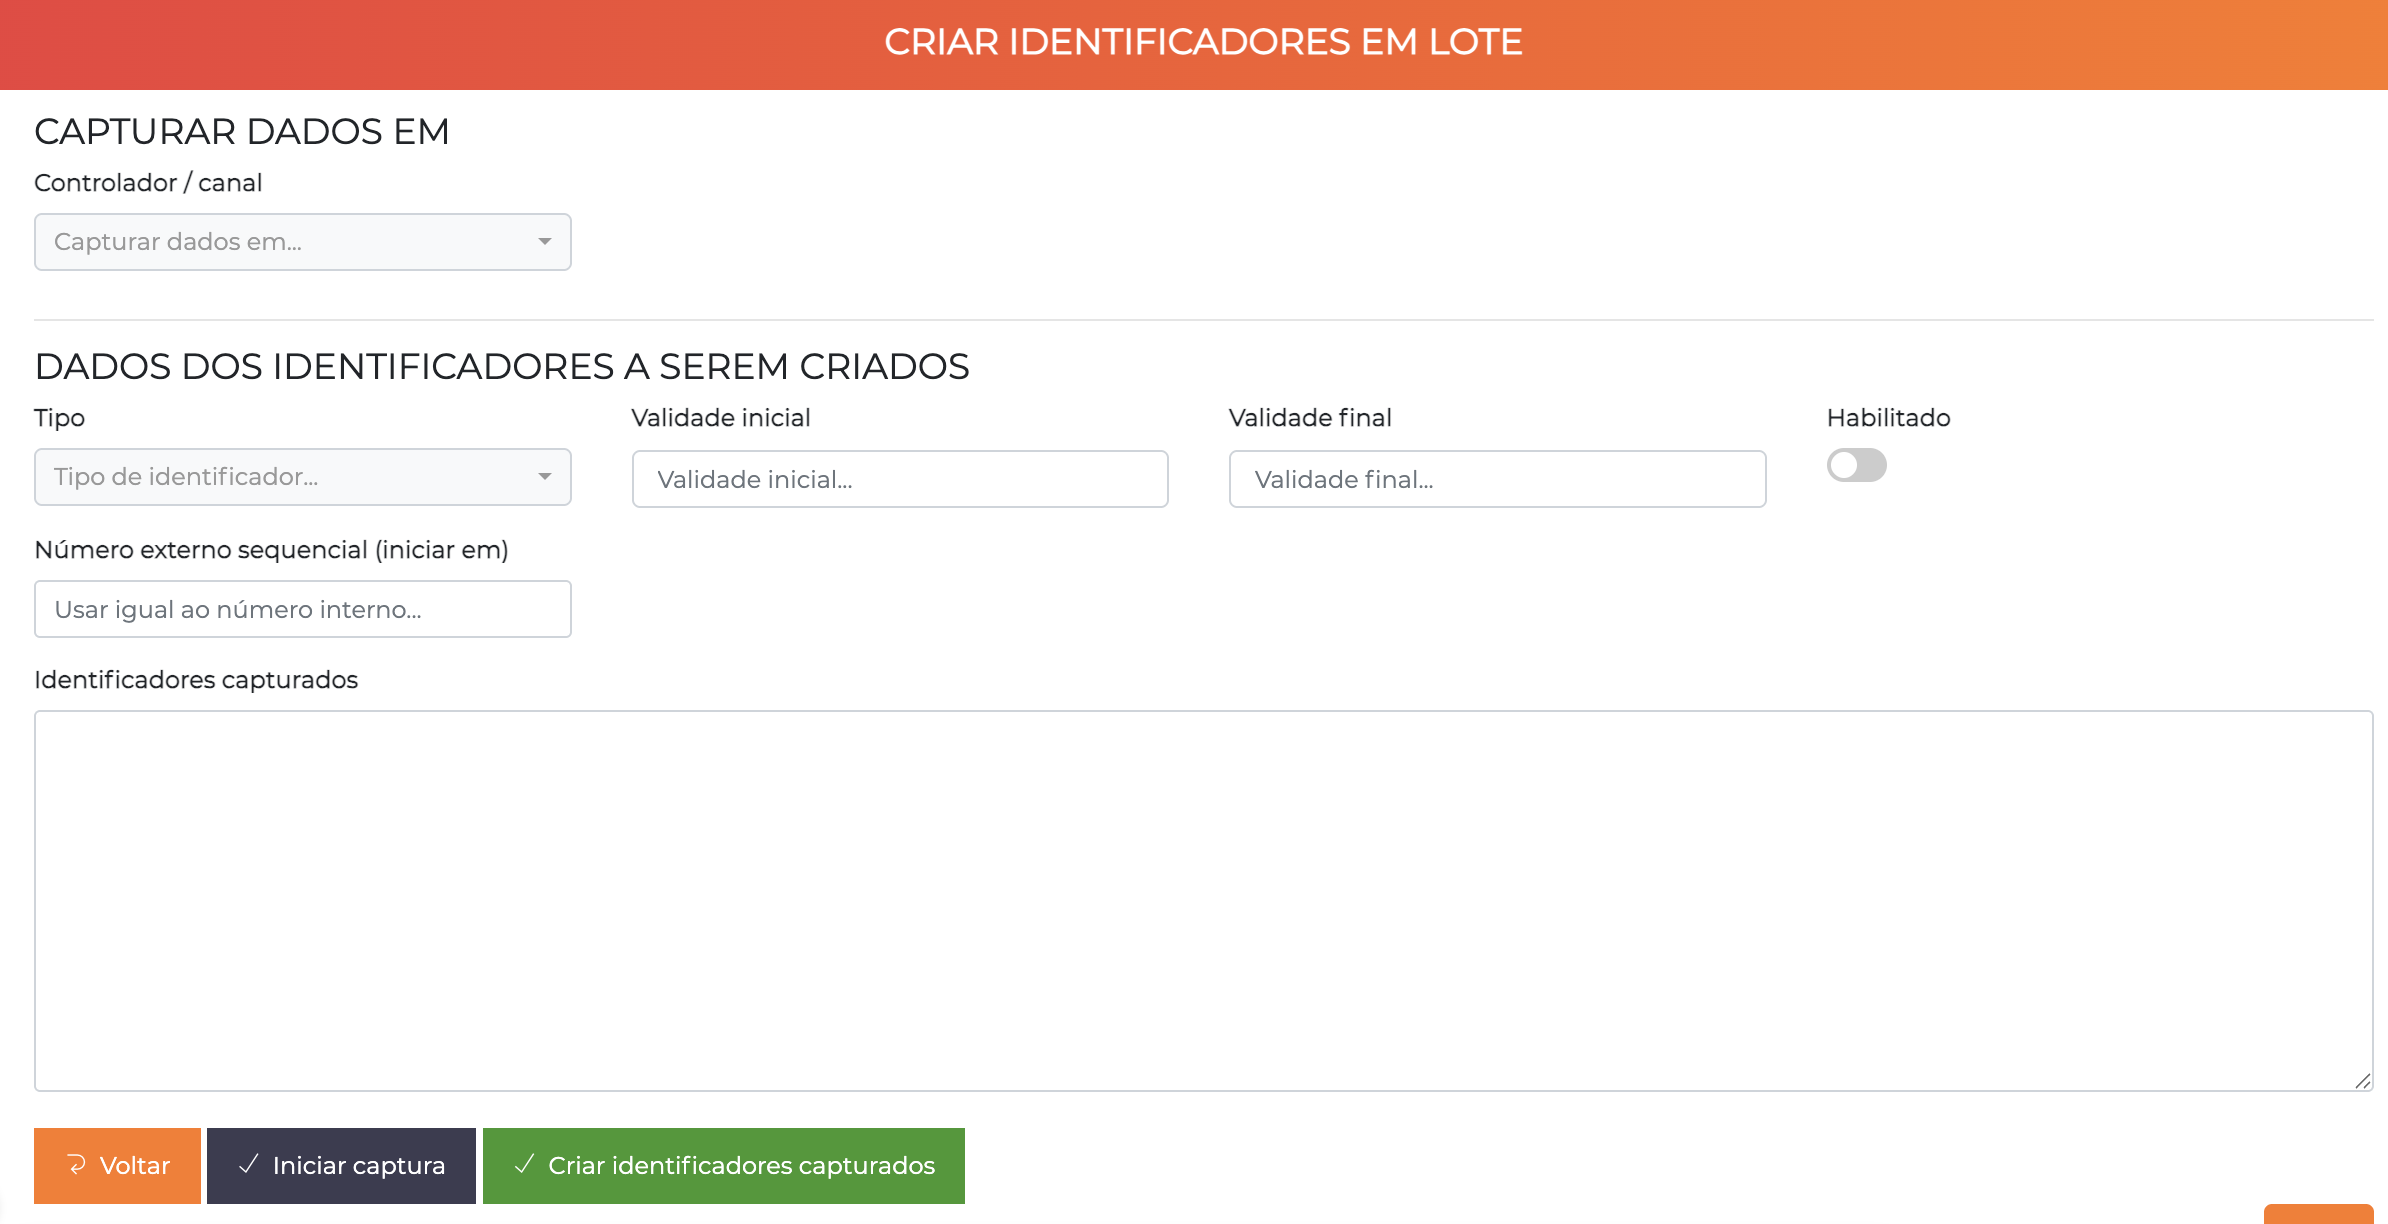
- Channel for capture: Select the channel (reader) where you will pass the physical cards
- Configure the common data that will be applied to all captured cards:
- Type: Select
Permanent Card,Visitor Card, etc. - Start validity: Validity start date (optional)
- End validity: Validity end date (optional)
- Enabled: ✅ (check for cards to already be active)
- External number: Optional field for custom identification (see explanation below)
- Type: Select
Capture Process
-
Click "Start capture"
-
Pass each card on the configured reader
-
The system automatically captures the number of each card and displays it in the list
-
When you finish passing all the cards, click "Stop capture"
-
Review the list of captured cards
-
Click "Create captured identifiers"
Use this method when:
- You have physical cards but do not know the printed numbers
- You need to register many cards quickly
- You do not want to type number by number manually
The external number is an alternative identifier used to make card management easier:
Practical example:
- The physical card may show only:
667862 - The full number captured by the system may be:
0256 667862 - Where
0256is the Facility ID (installation code engraved on the card) - And
667862is the card number itself
The "external number" field allows you to use only the visible number (667862) to make identification easier, while the system works internally with the full number (0256667862).
Organizing Identifiers
We recommend creating identifiers organized by type and purpose:
| Range (Example) | Type | Use | Suggested Quantity |
|---|---|---|---|
| 10001-19999 | Permanent Card | Employees, residents | 100-500 |
| 90001-99999 | Visitor Card | Temporary visitors | 20-50 |
| 50001-59999 | Vehicle TAG | Vehicles | 50-200 |
The number ranges above are just examples. Always use the real numbers of your physical cards! The organization by ranges depends on the cards you purchased.
Check Identifier Types
Before creating, check whether the necessary types exist:
Path: Advanced > Identifier types
Common types that should exist:
- ✅ Permanent Card
- ✅ Visitor Card
- ✅ Fingerprint Biometrics
- ✅ Temporary QR Code
- ✅ Vehicle TAG
If any type does not exist, create it before proceeding.
If your readers use the Wiegand protocol, the leading zeros are important!
00123is different from123- Keep a consistent standard
Complete reference: Entities > Identifiers
Step 6: Create Profiles and Operators
What are Profiles?
Profiles make it easier to manage permissions for operators in the web system (not to be confused with categories, which are for physical access):
- Which menus the operator can see
- Which actions they can perform
- Which reports they can generate
- Which person categories they can view/edit
- Profiles = Operator permissions in the web system
- Categories = People permissions in physical access
Access the Profiles Screen
Path: Advanced > Profiles
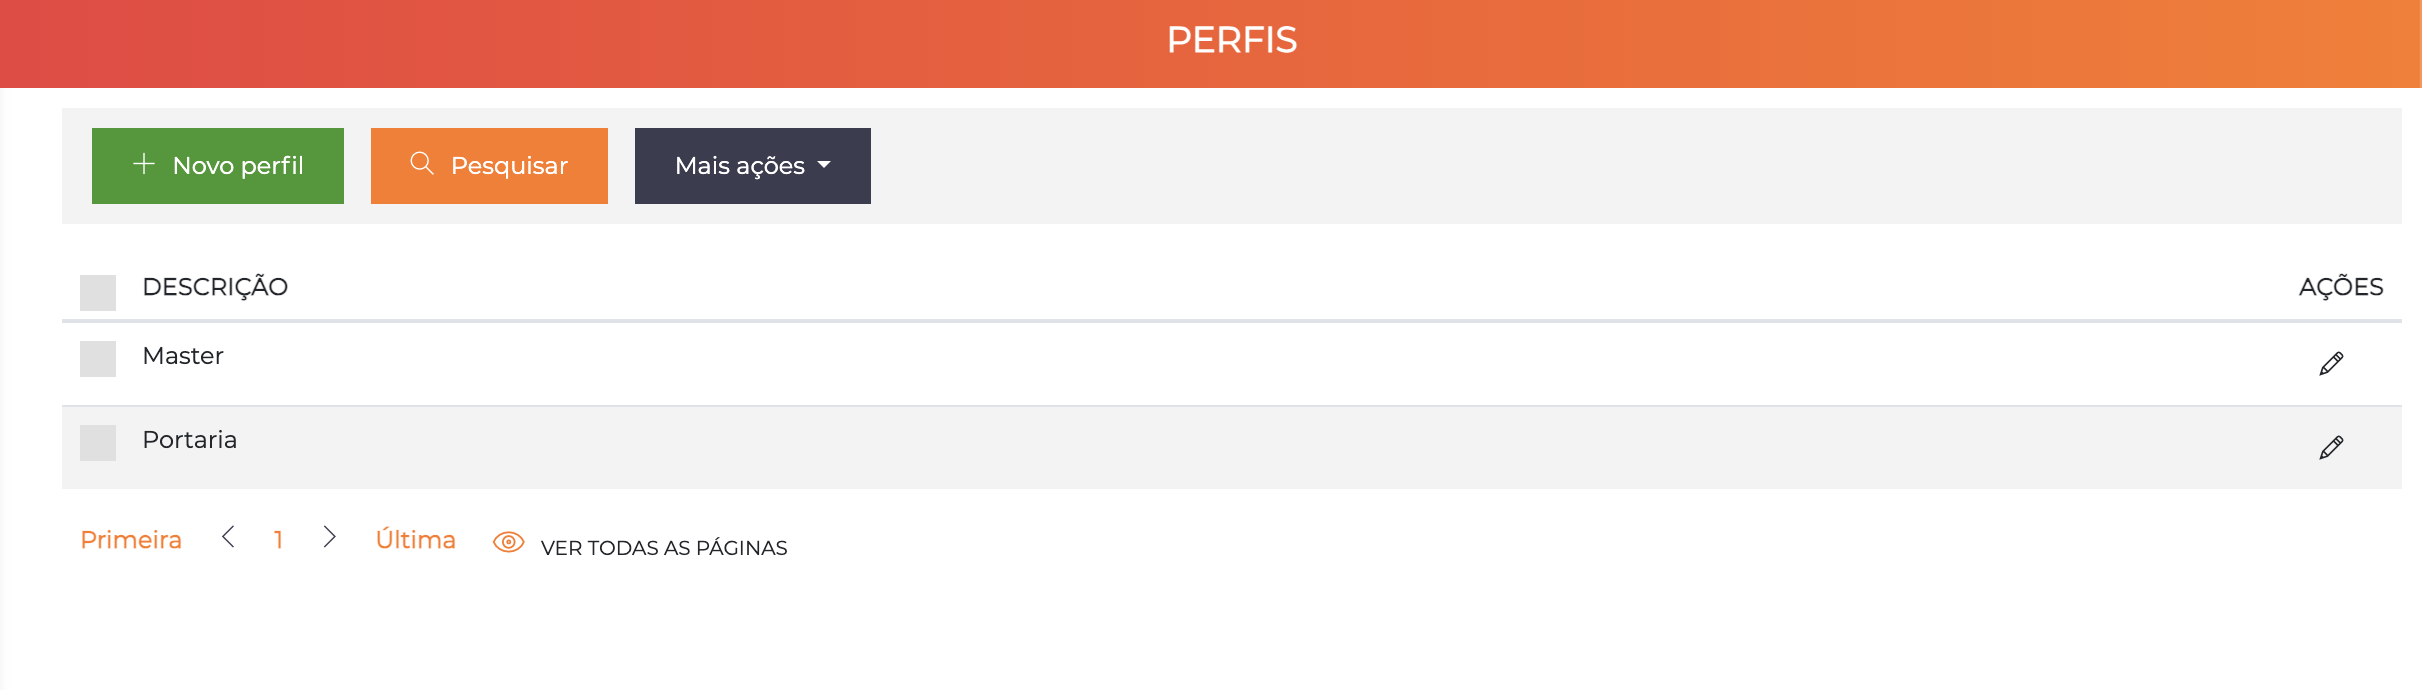
Create "Reception" Profile
Let's create a profile for reception that can only manage visitors, not employees.
Configure System Permissions
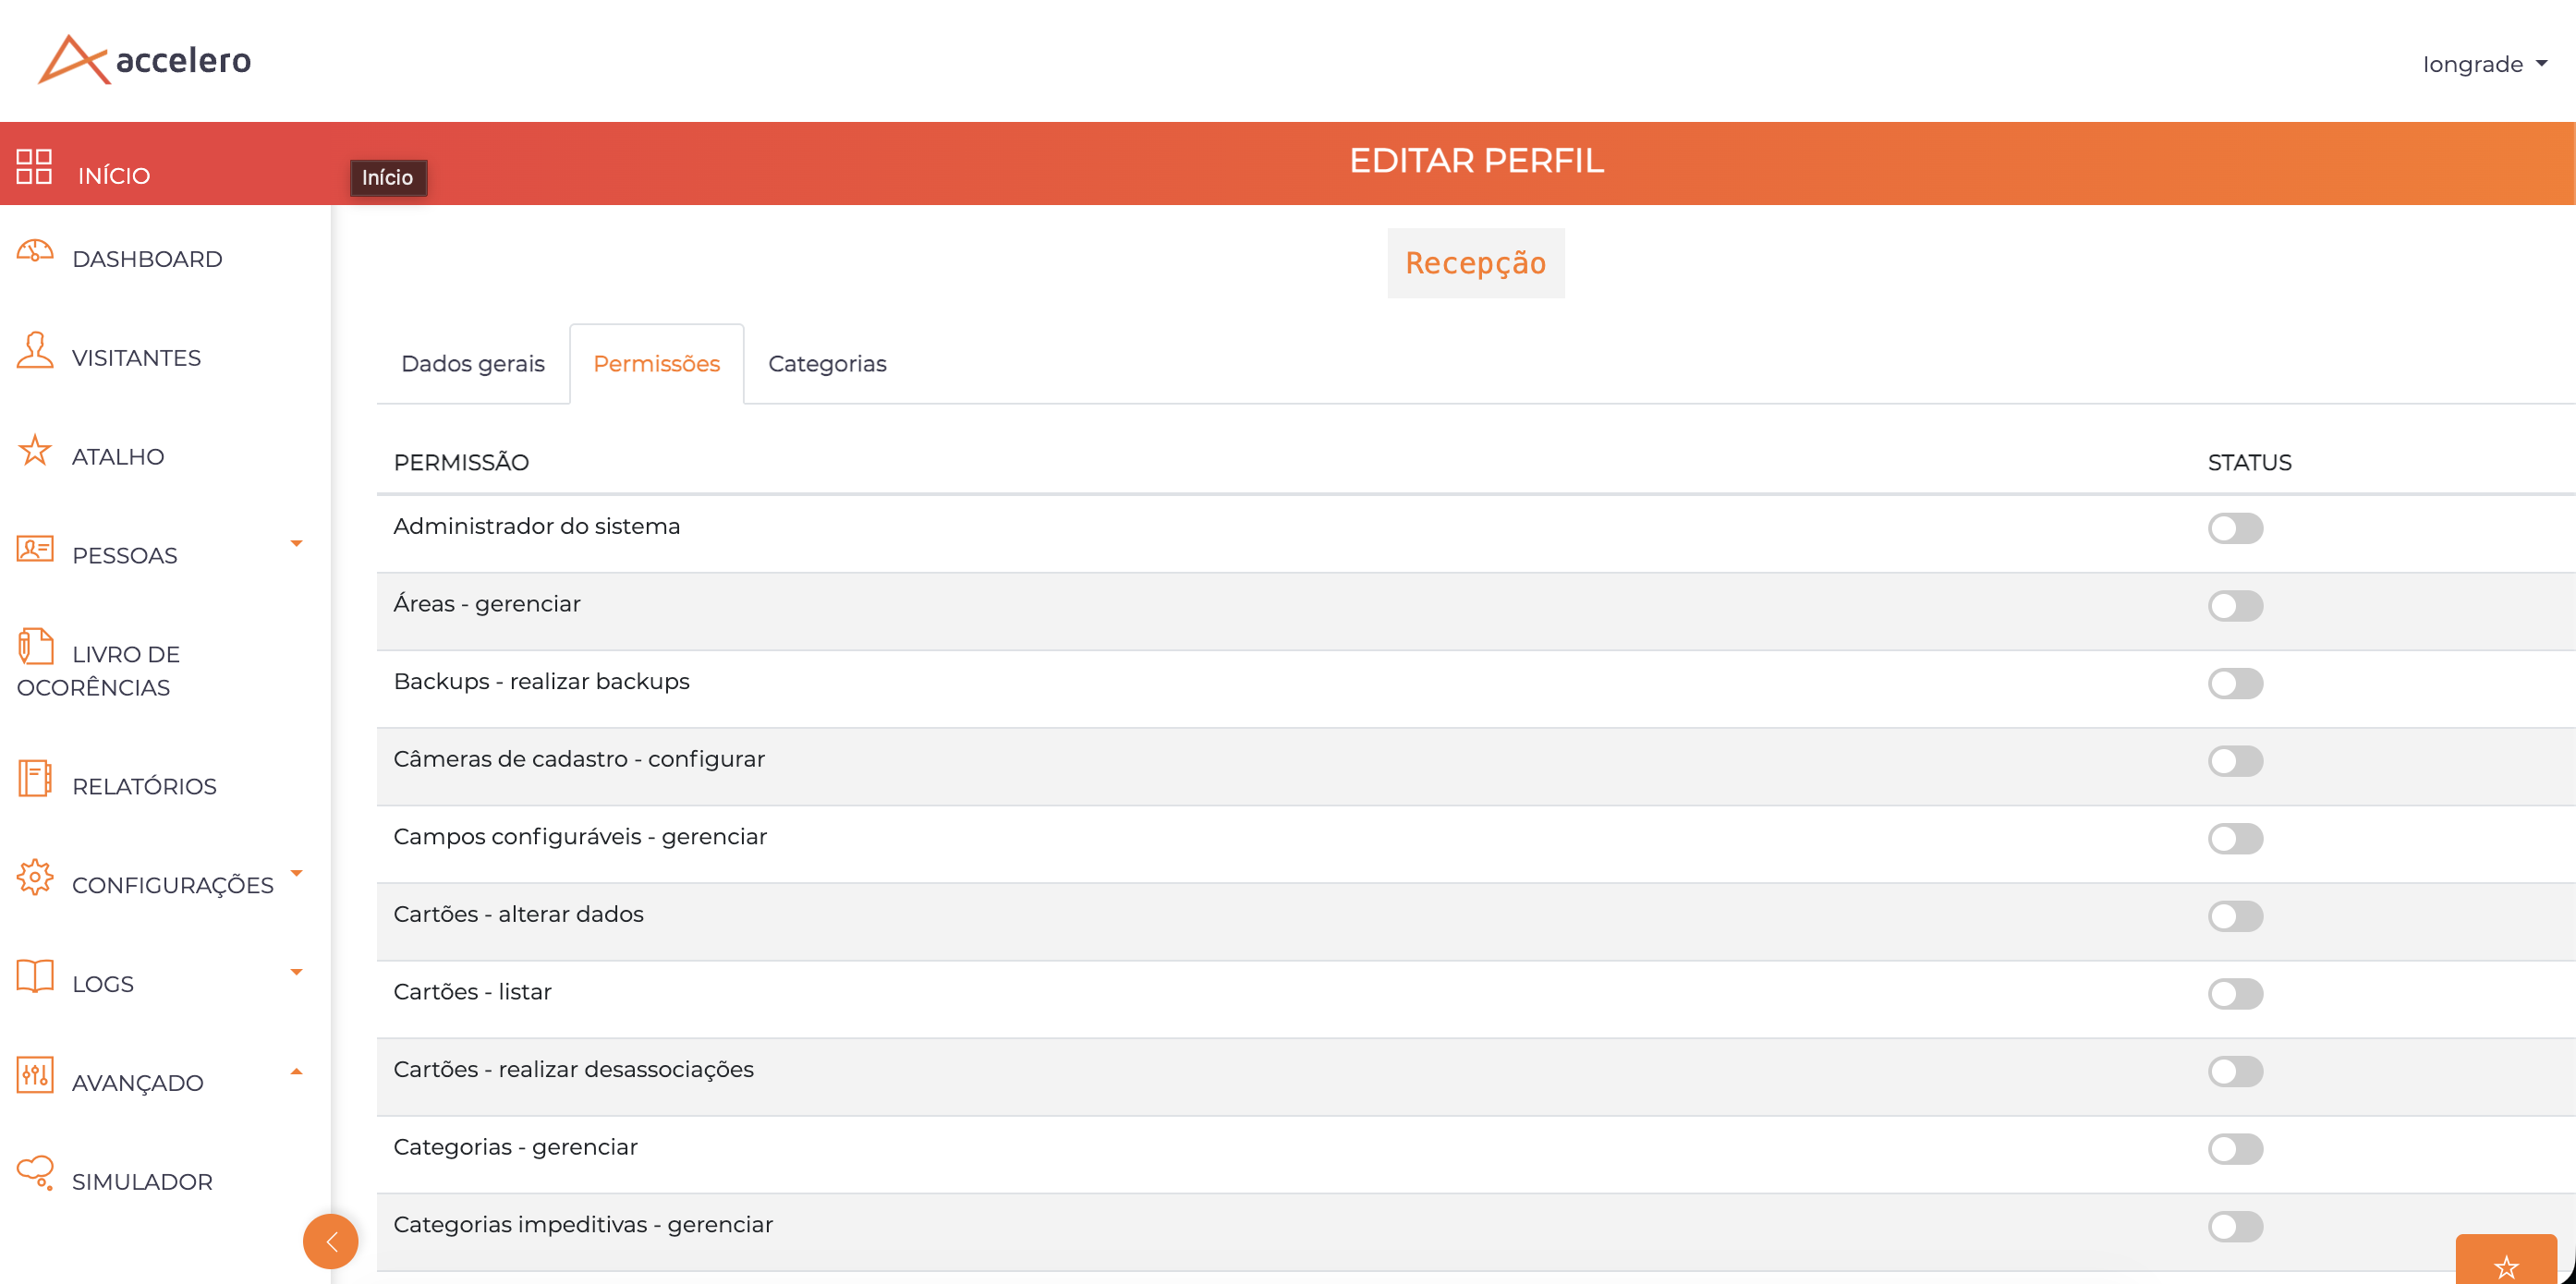
- Click "New Profile"
- Name:
Reception - In the Permissions tab, select the appropriate permissions:
- ✅ View people
- ✅ Create/edit people
- ✅ Create visitors
- ✅ Approve visits
- ✅ Events dashboard
- ❌ System settings (leave unchecked)
- ❌ Data deletion (leave unchecked)
The system offers dozens of specific permissions. Configure only the ones necessary for each role!
Restrict Allowed Categories
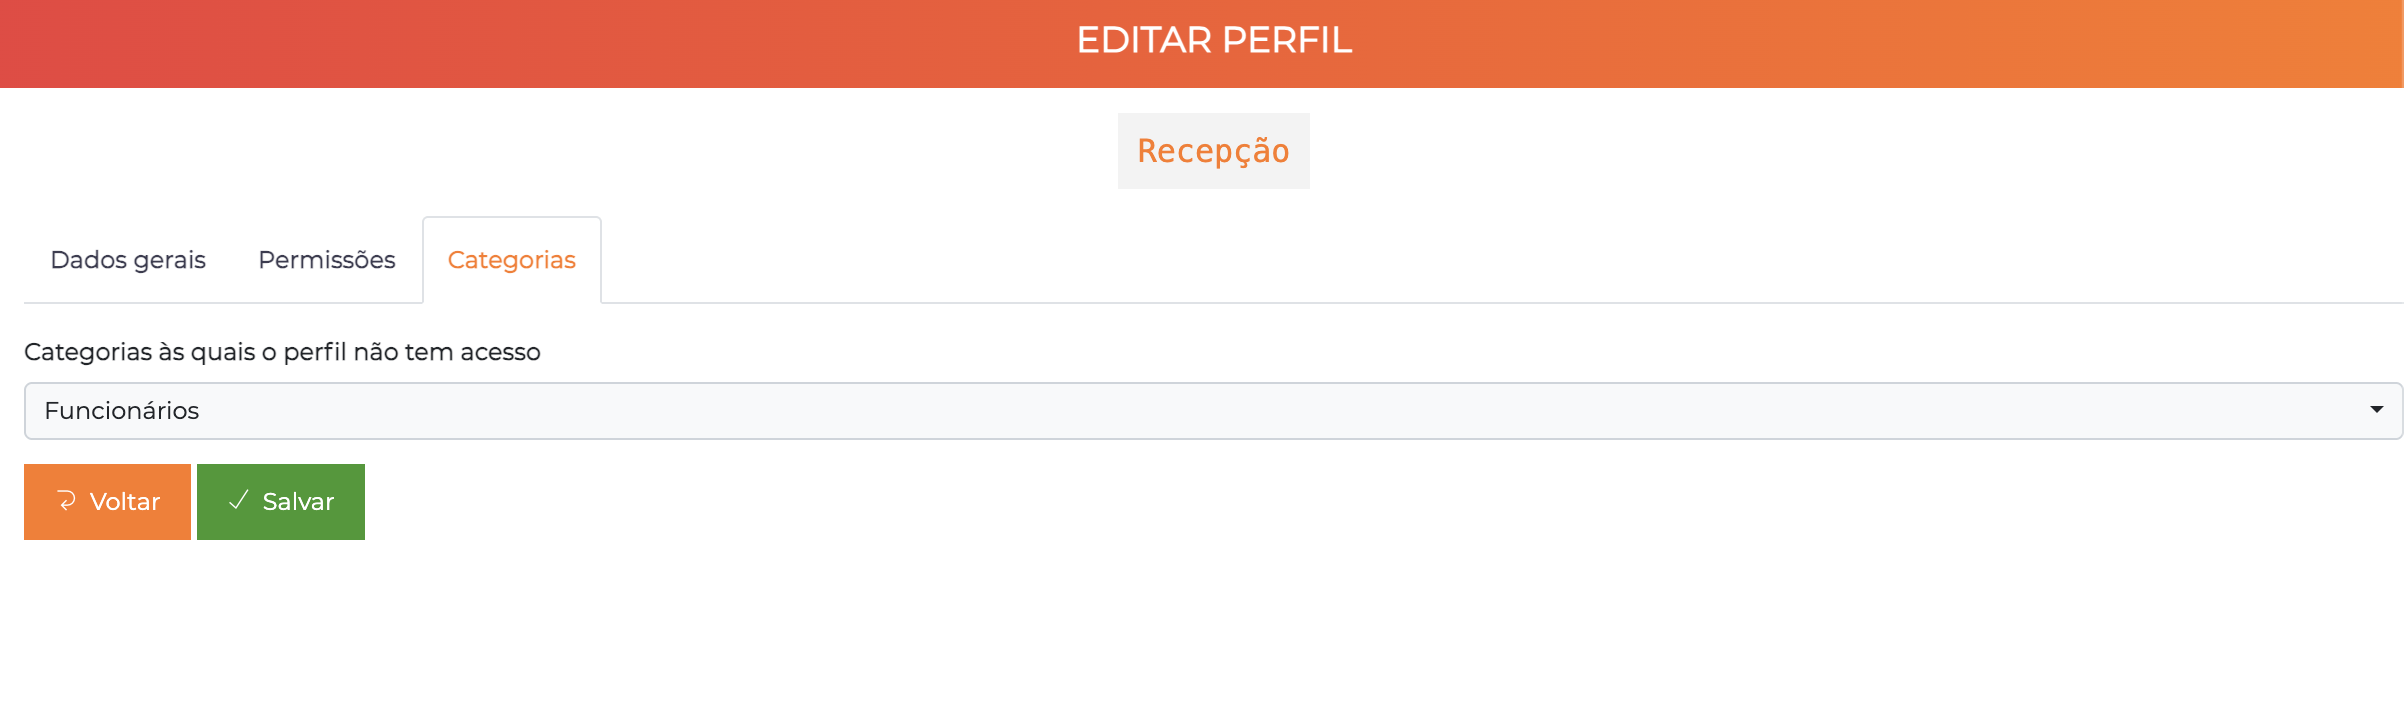
- Go to the Categories tab
- Select the categories that the operator WILL NOT be able to view or edit:
- ✅ Employees (check to BLOCK)
- ✅ Directors (check to BLOCK)
- ❌ Visitors (leave UNCHECKED to allow)
Categories checked = operator CANNOT view or edit people in these categories. Categories unchecked = operator CAN work with these categories.
Example: Reception can register and edit only Visitors, with no access to the records of Employees and Directors.
- Click Save
Do not forget to click Save after configuring the profile's permissions and categories!
Create New Operator
Now let's create an operator and associate them with the Reception profile created earlier.
Path: Advanced > Operators
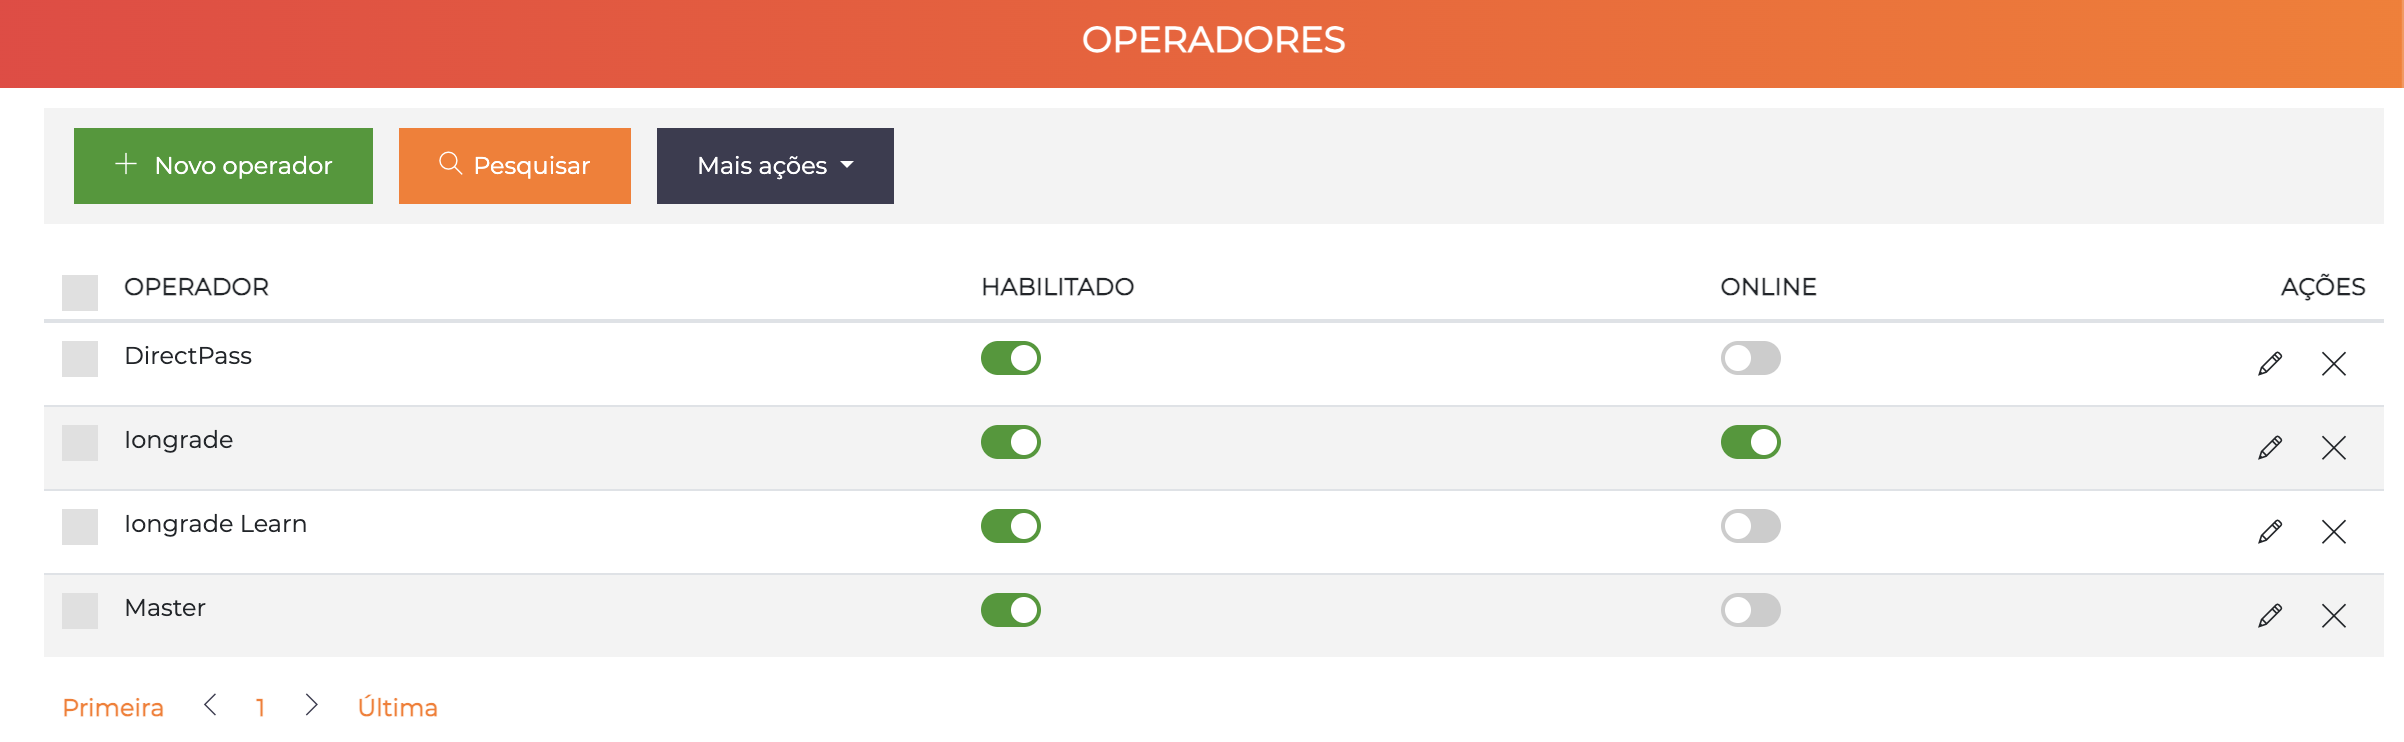
Fill in the Operator Data
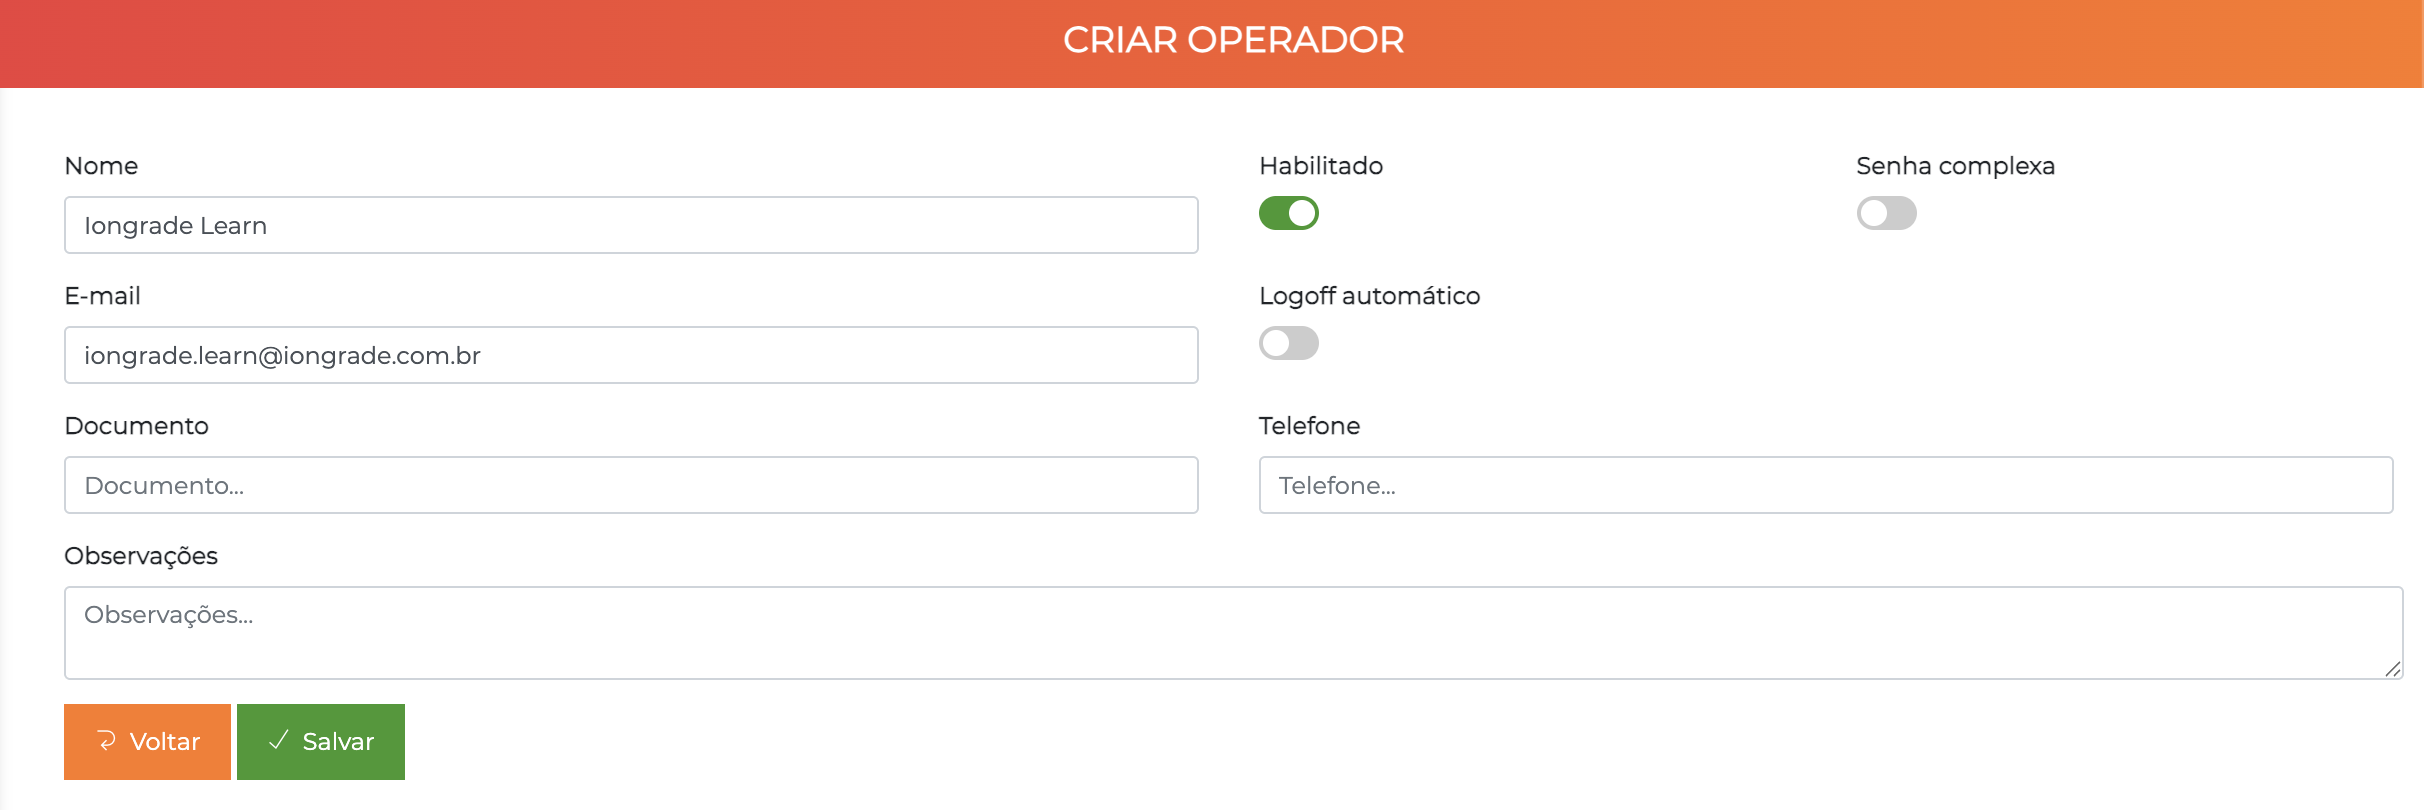
- Click "New Operator"
- Fill in the fields:
- E-mail: email@example.com (will be the operator's login)
- Name: Full name of the operator
- Document: CPF or identification document
You do not need to create a password now. The operator themselves will define their password on first access following the First Login process described in the Quick Start guide.
Associate Profile with the Operator
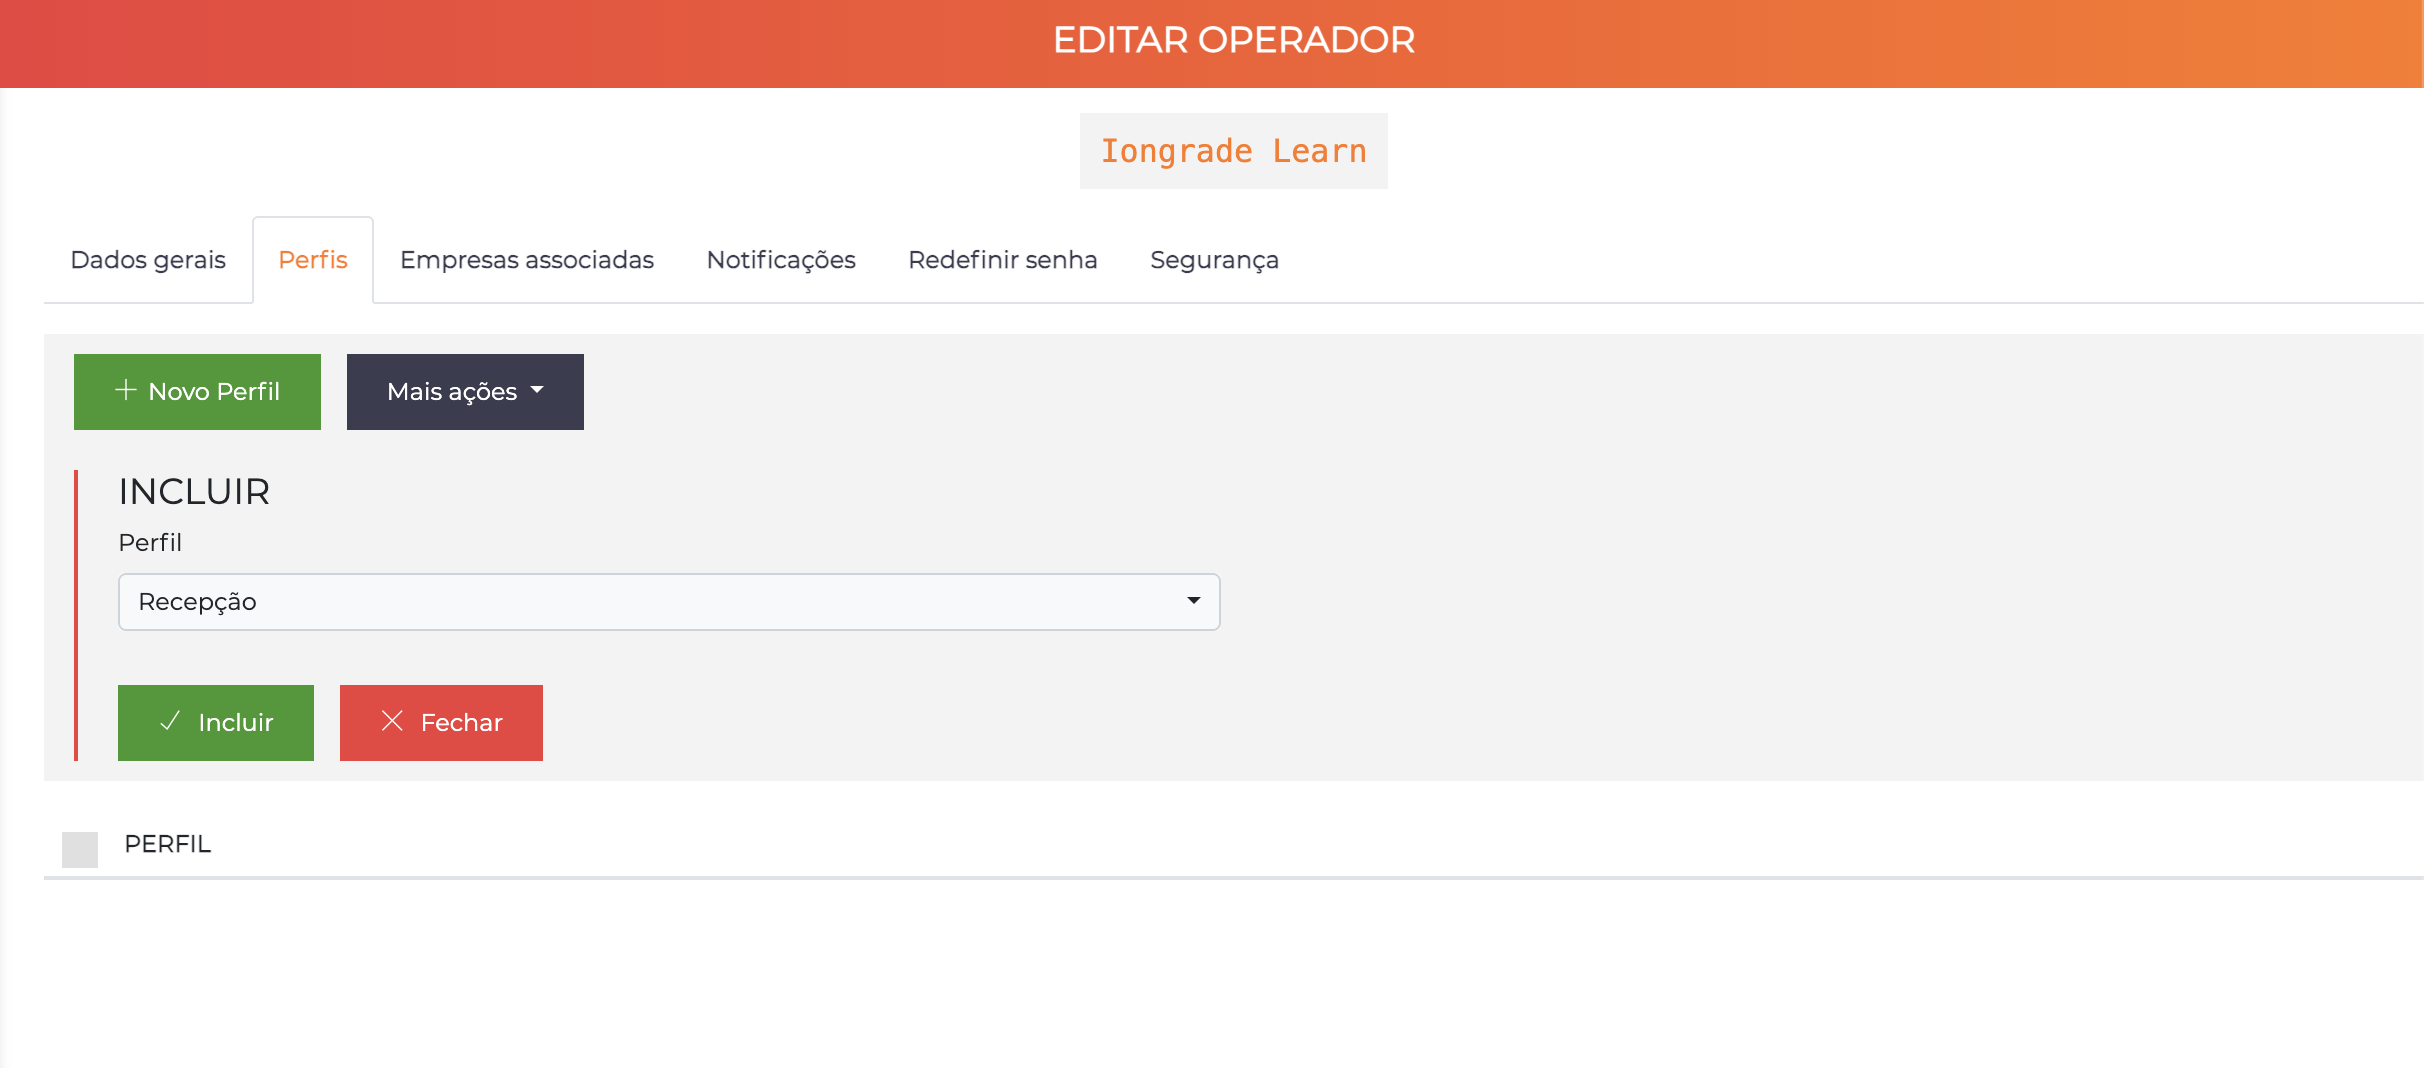
- Go to the Profiles tab
- Check the profile created earlier:
- ✅ Reception
- Click Save
After saving, inform the operator of:
- The registered access e-mail
- The system access link
- Instruct them to follow the First Login process to request a temporary password and create their definitive password
Do not forget to click Save after associating the profile!
Complete reference: Entities > Operators and Profiles
Step 7: Test First Access
Now let's validate the entire configuration by creating a test person and checking the physical access.
Register Test Person
Path: People > All
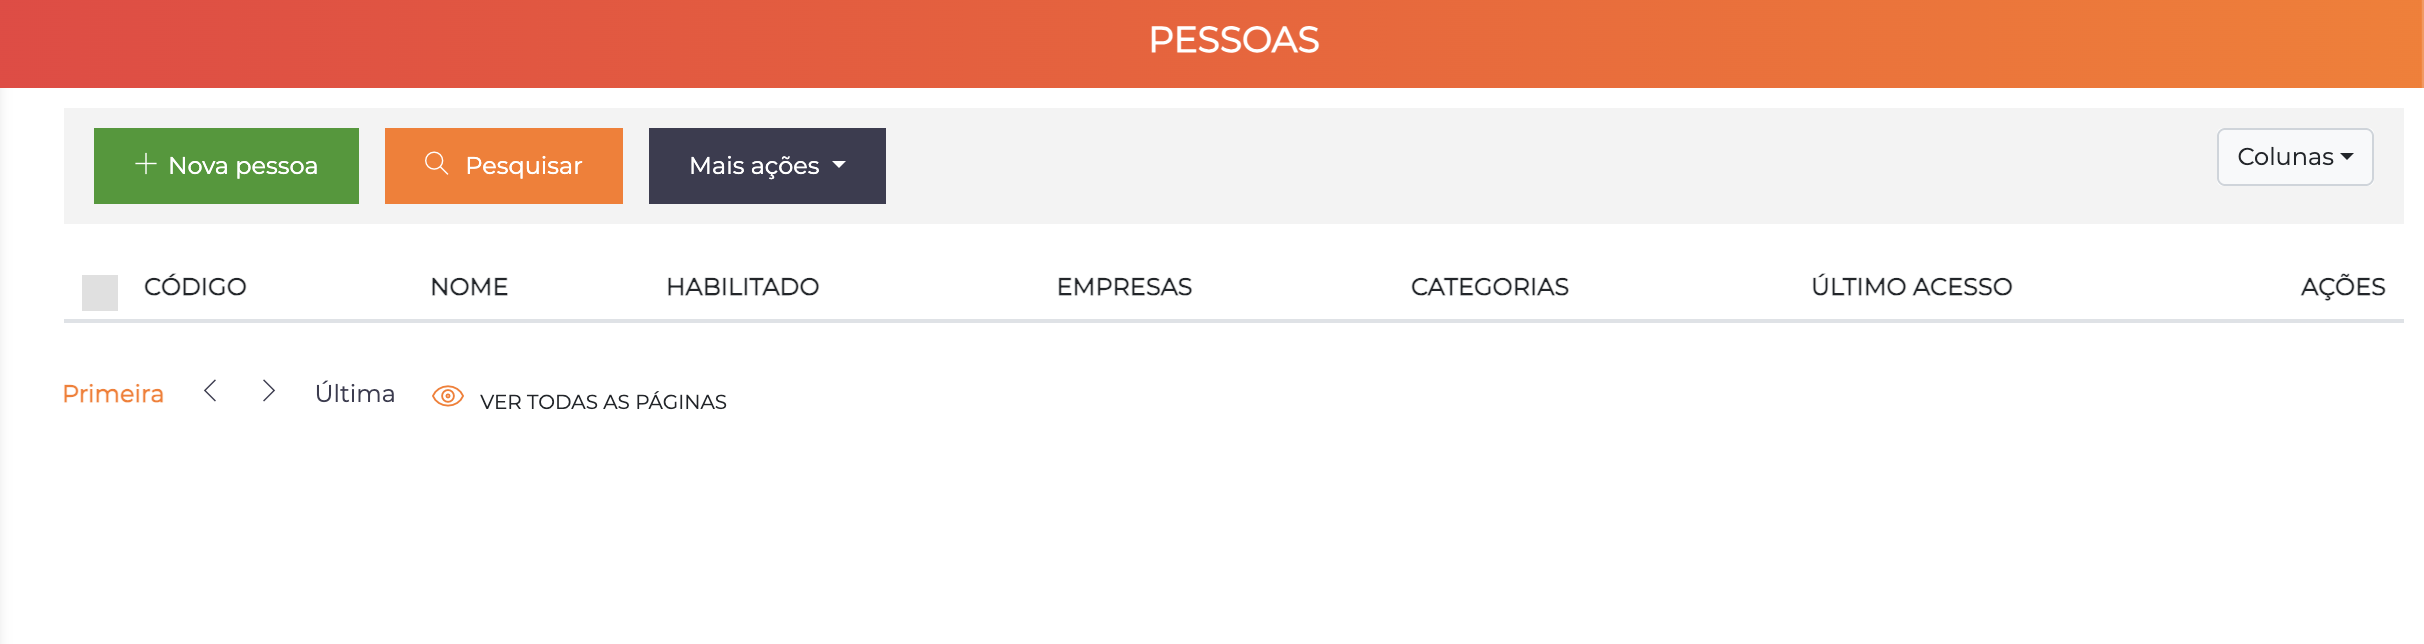
Create New Person
Click "New Person" to be directed to the registration form.
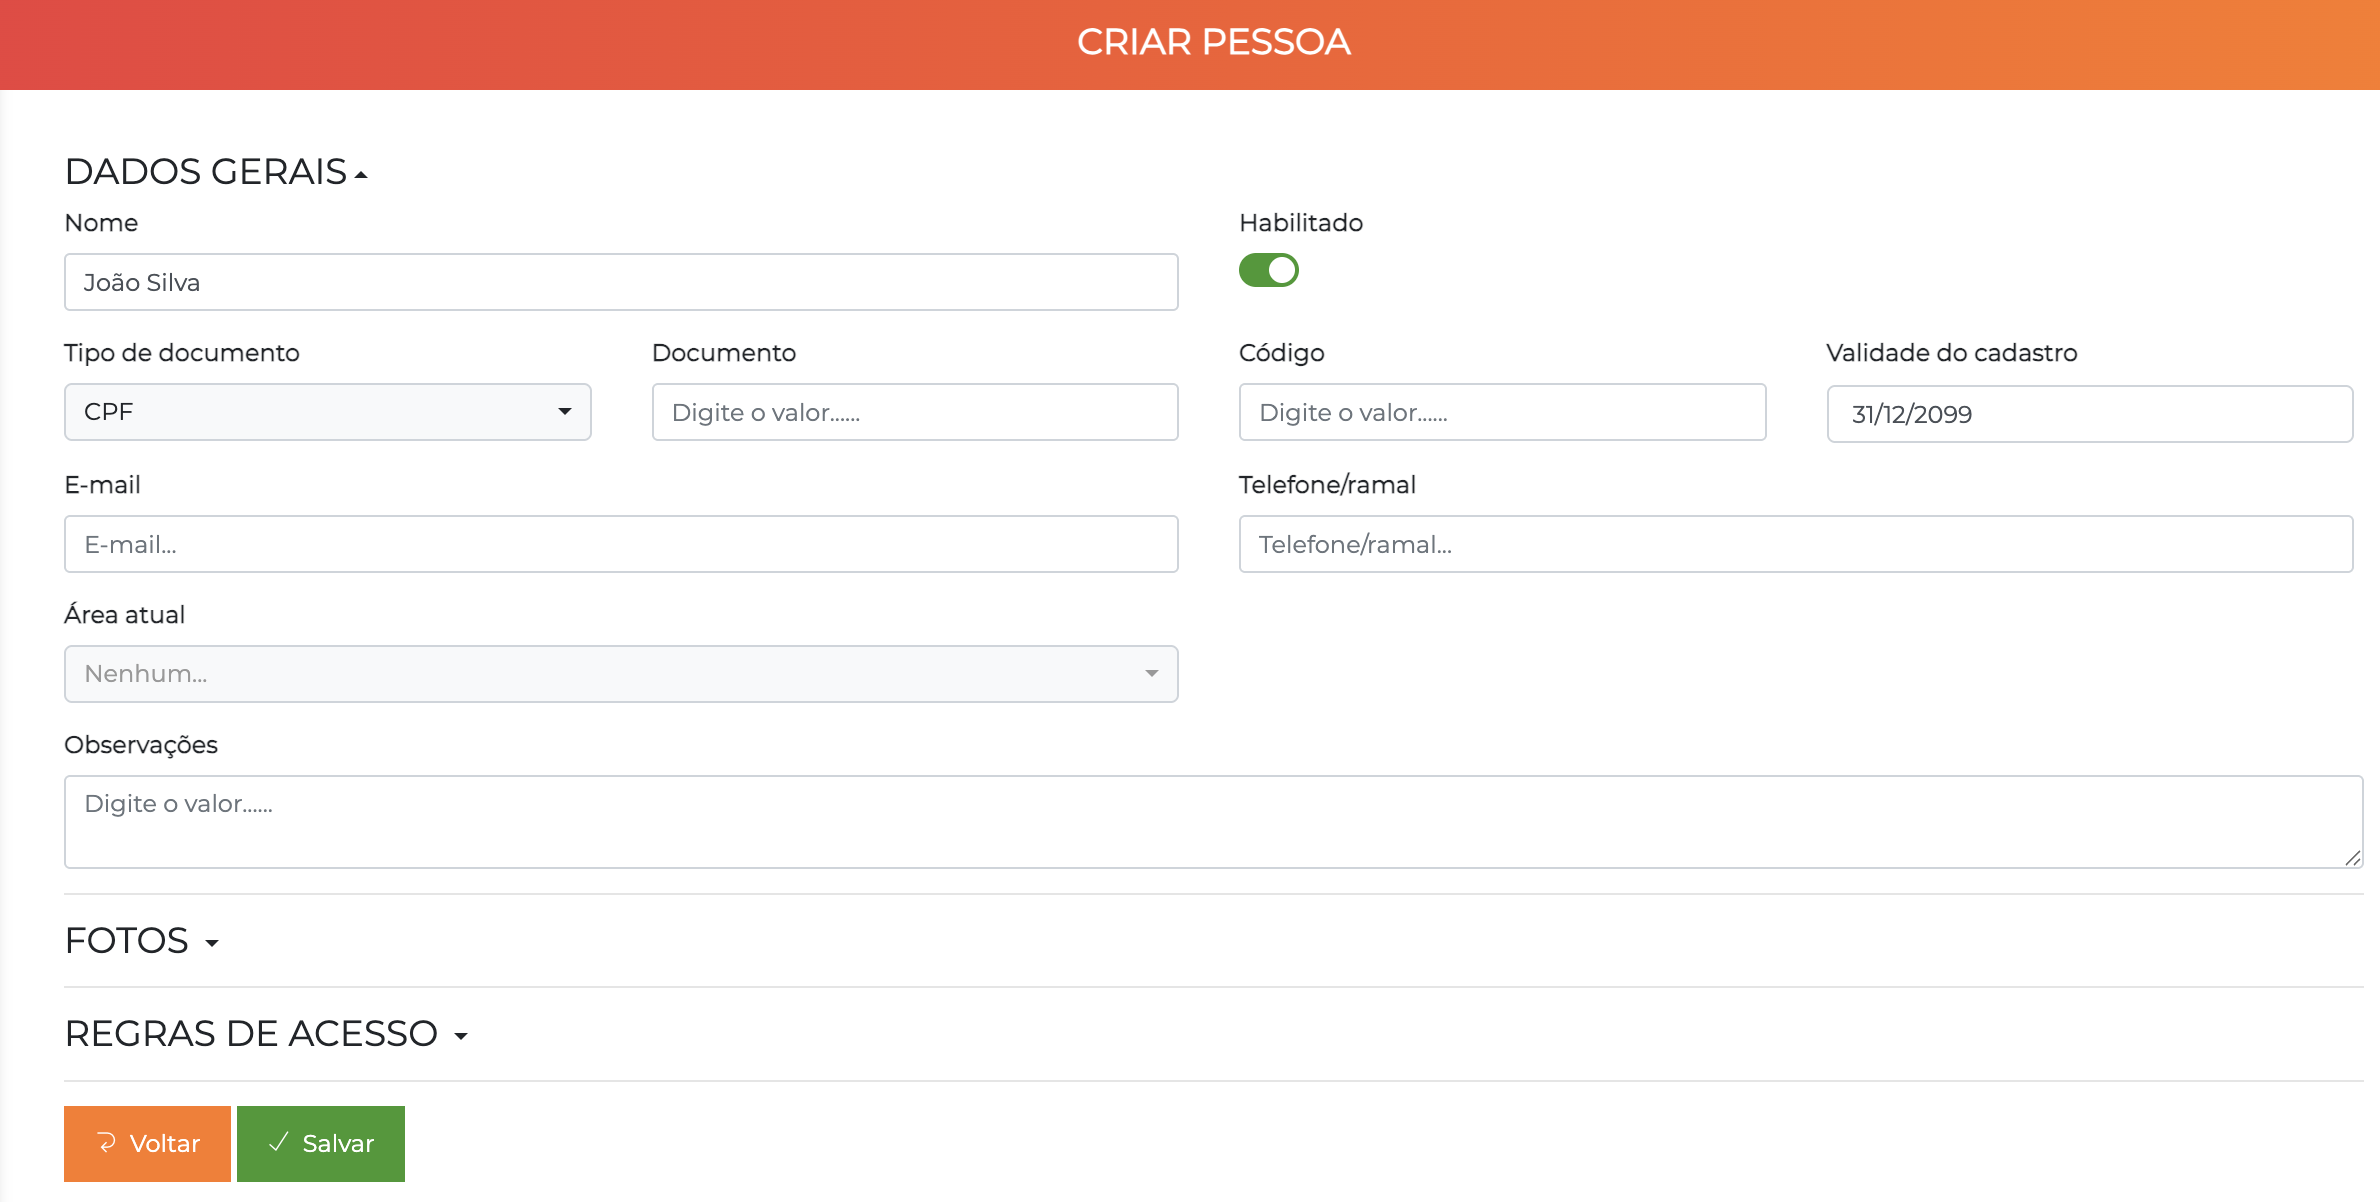
Fill in the basic data:
- Full name: John Silva (or a test name)
- Document: 12345678900
- E-mail: joao.silva@exemplo.com (optional)
- Phone: (11) 98765-4321 (optional)
- Enabled: ✅
- Registration validity: Leave blank (no expiration)
- Click Save
After saving the basic data, other tabs and options become available to complete the registration:
- Identifiers (in the same General Data tab)
- Categories
- Companies
- Photos
- Access Rules
- And other advanced settings
Associate Category
Now associate the person with one of the categories you created earlier.
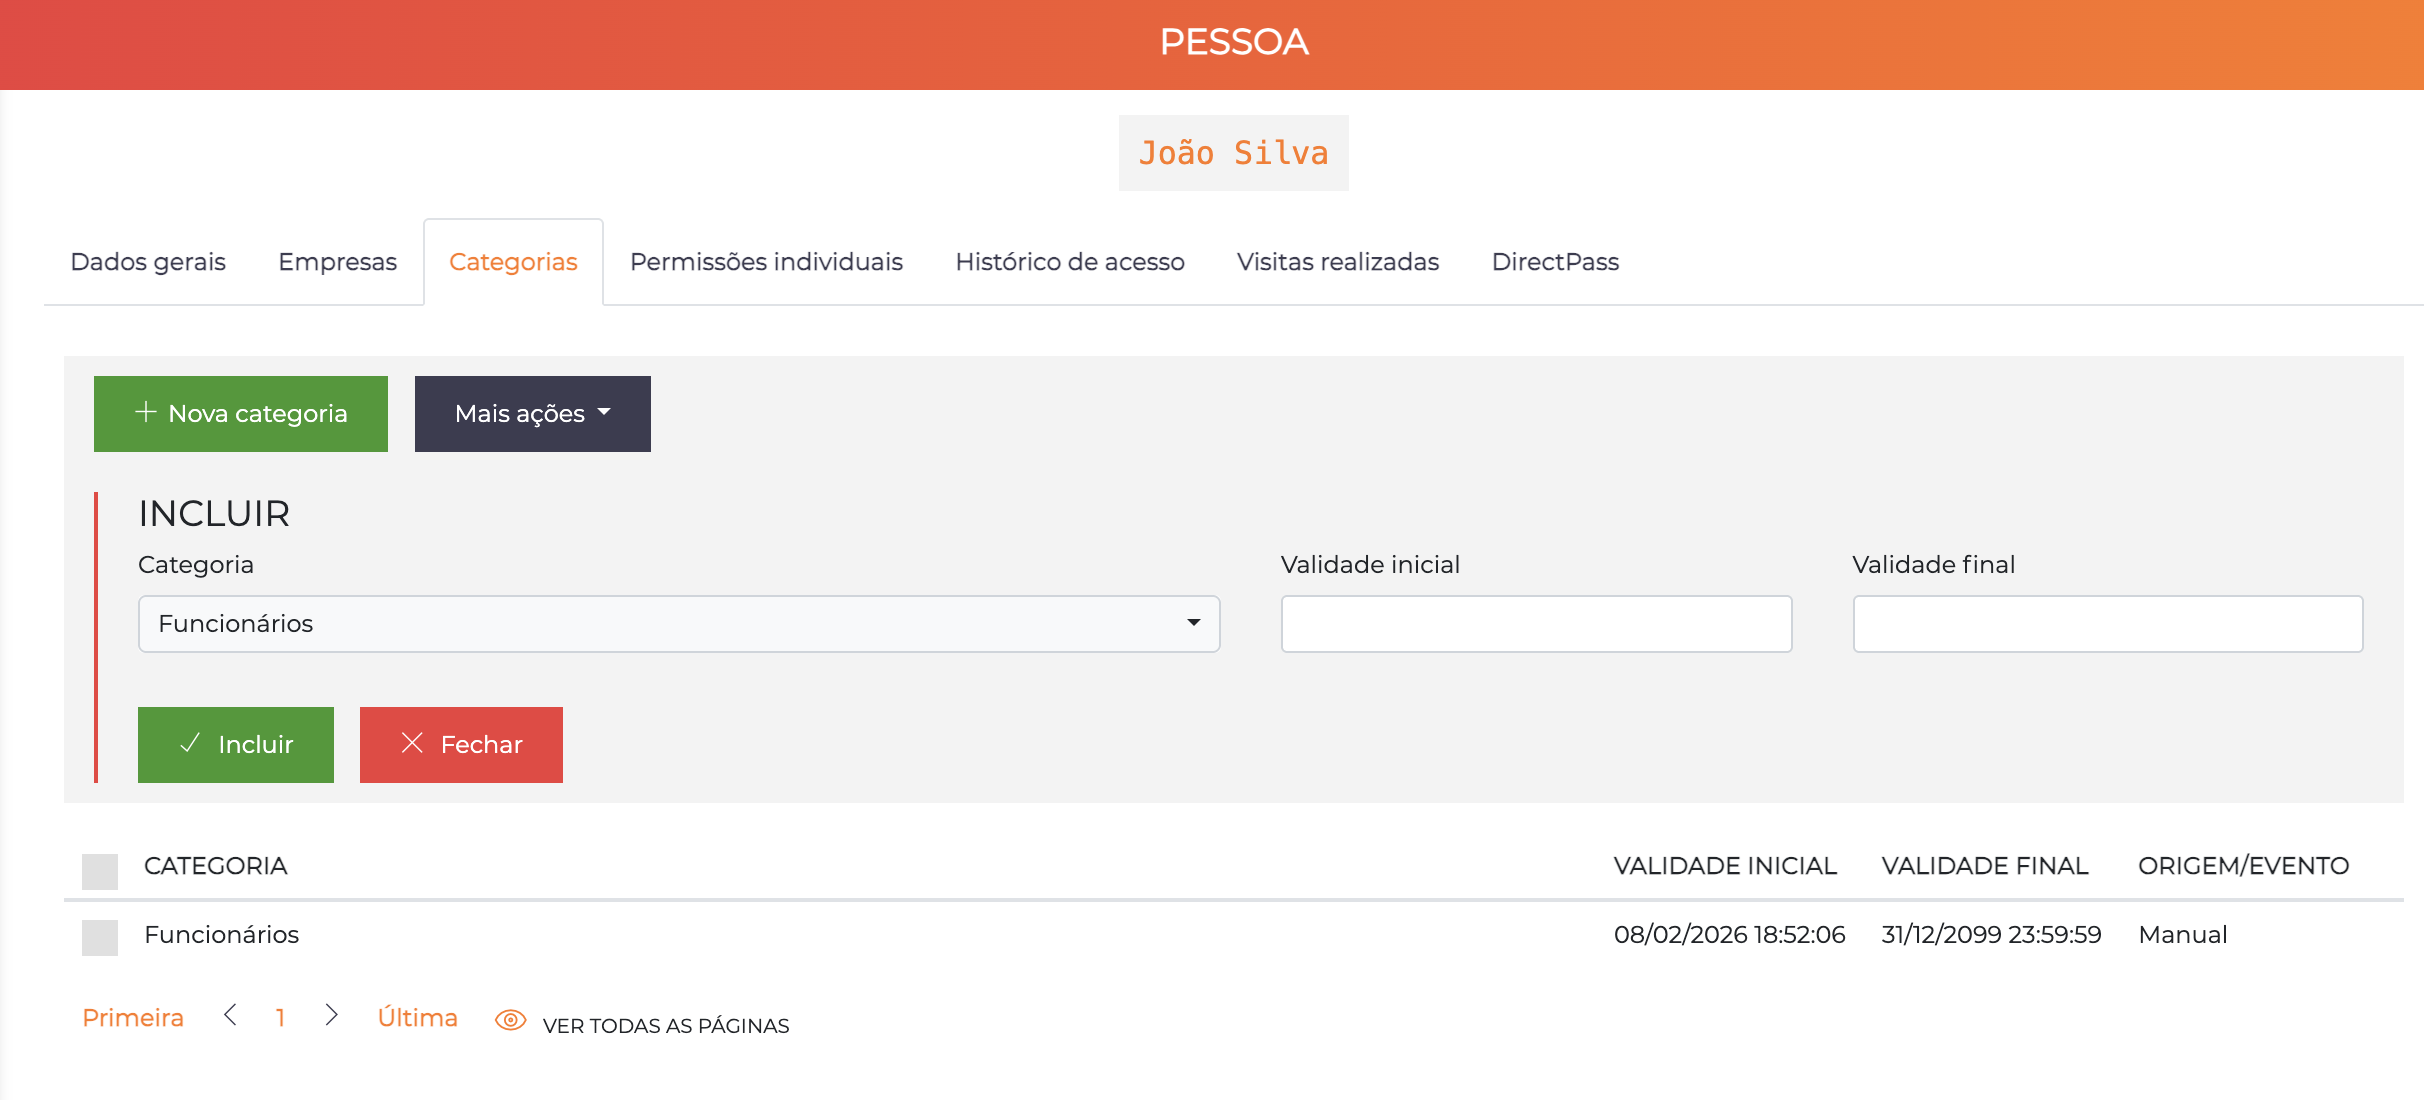
How to associate:
- On the created person, go to the Categories tab
- Click Add to include a new category
- Configure:
- Category: Select
Employees(or another category you created) - Start date: Today's date (or leave blank)
- End date: Leave blank
- Category: Select
If the validity dates (start and end) are not filled in, the category will be associated with the person with lifetime validity (permanent).
Practical example:
- ✅ Permanent employee: Do not fill in the dates → category valid forever
- 📅 Temporary provider: Fill in start and end dates → category valid only in the determined period (e.g., 01/02/2024 to 28/02/2024)
- Click Save
The person now inherits all the permissions of the selected category. If you chose "Employees", they can access the Internal Area during Business Hours (as you configured in Step 4).
Associate Identifier
Now associate one of the cards you created in Step 5 with the person.
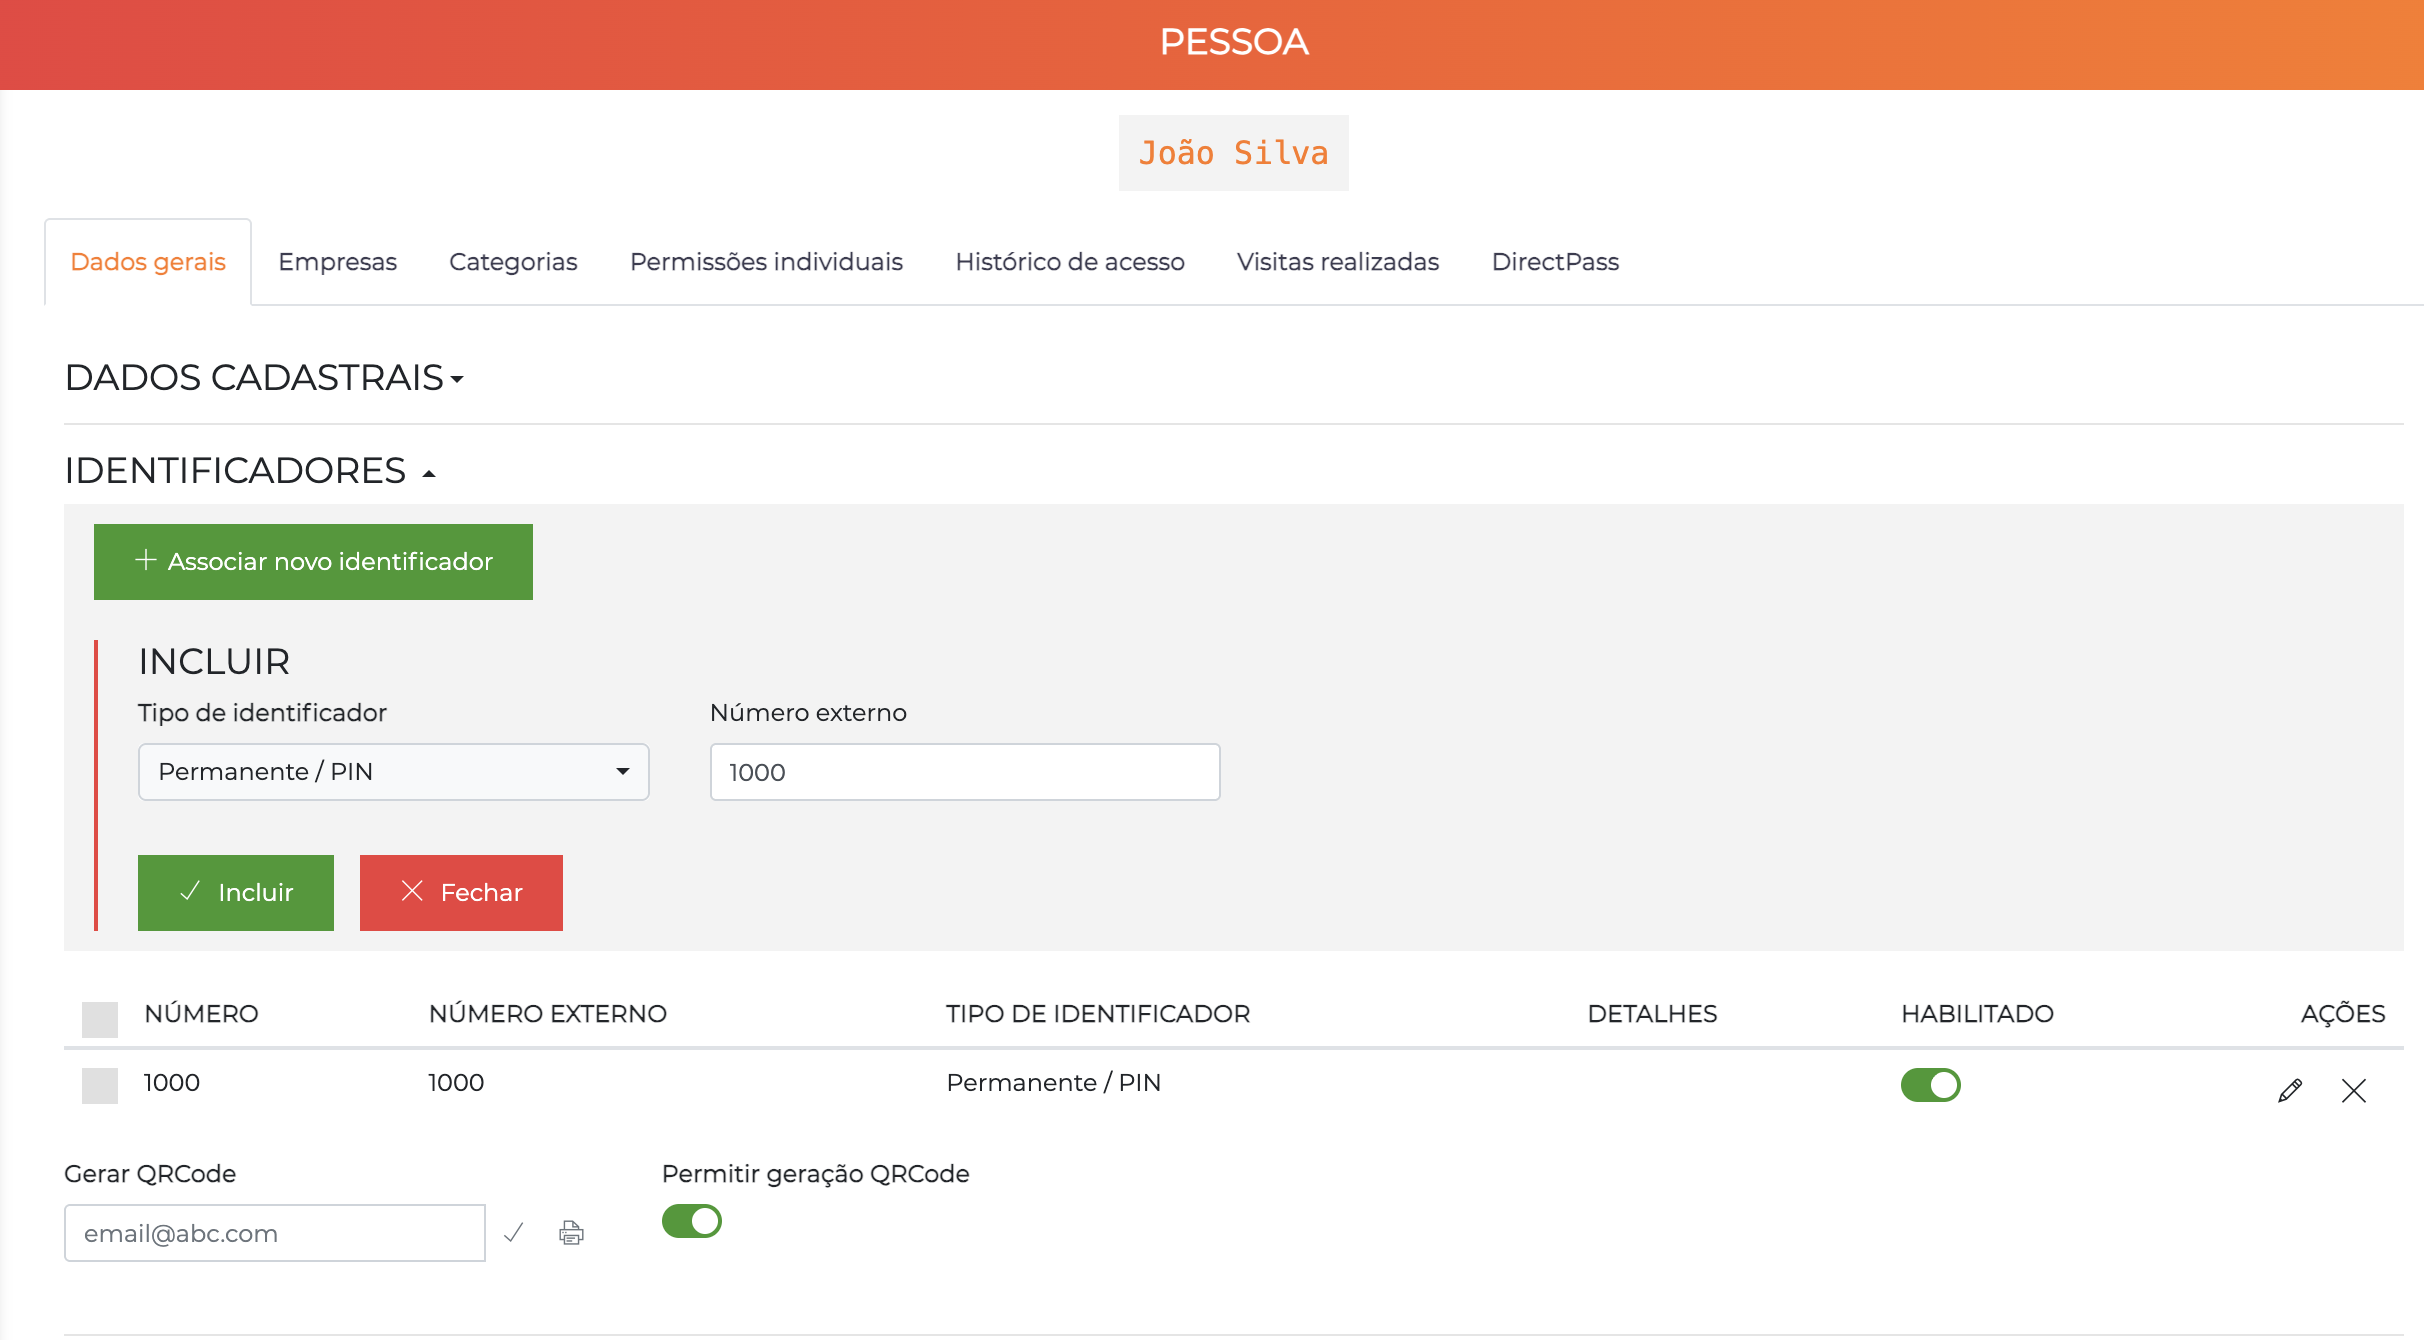
The Identifiers section is available in the General Data tab, right after saving the person's initial registration.
How to associate:
- On the same person screen, scroll to the Identifiers section
- Locate the field of the Permanent Card type (or the desired identifier type)
- Type or search for the card number:
- Type the number:
10001(or another number from the batch you created in Step 5) - Or use the search field to locate available identifiers
- Type the number:
- Click the Include button
- The card is now associated with the person and will appear in the list of associated identifiers
The system shows only identifiers that are enabled and unassociated (free for use). If you do not find the card, check whether it was created correctly in Step 5.
If you prefer to test with a QR Code instead of a physical card:
- In the same Identifiers section, click "Generate QR Code"
- Choose an option:
- Send by e-mail: Sends the QR Code to the person's registered e-mail
- Print: Generates a PDF for printing
The QR Code serves as a means of identification in the system and can be presented on mobile devices or printed.
Do not forget to click "Save" on the person's registration after associating the category and identifier. Without saving, the settings will not be applied and access will be denied!
Test Physical Access
- Go to the physical controller
- Present the identifier (card, QR Code, biometrics)
- Observe the result:
- ✅ Access Granted: The configuration is correct!
- ❌ Access Denied: Check the steps below
If access was denied, check:
- Is the person enabled? ✅
- Is the category enabled? ✅
- Does the category have permission for the destination area? ✅
- Are we within the configured time range? ⏰
- Is the controller online? 🟢
- Is the identifier correctly associated? 🎫
Check the Access Log
Path: Logs > Access Log
Now let's validate whether the entire configuration is working correctly through the real-time access log.
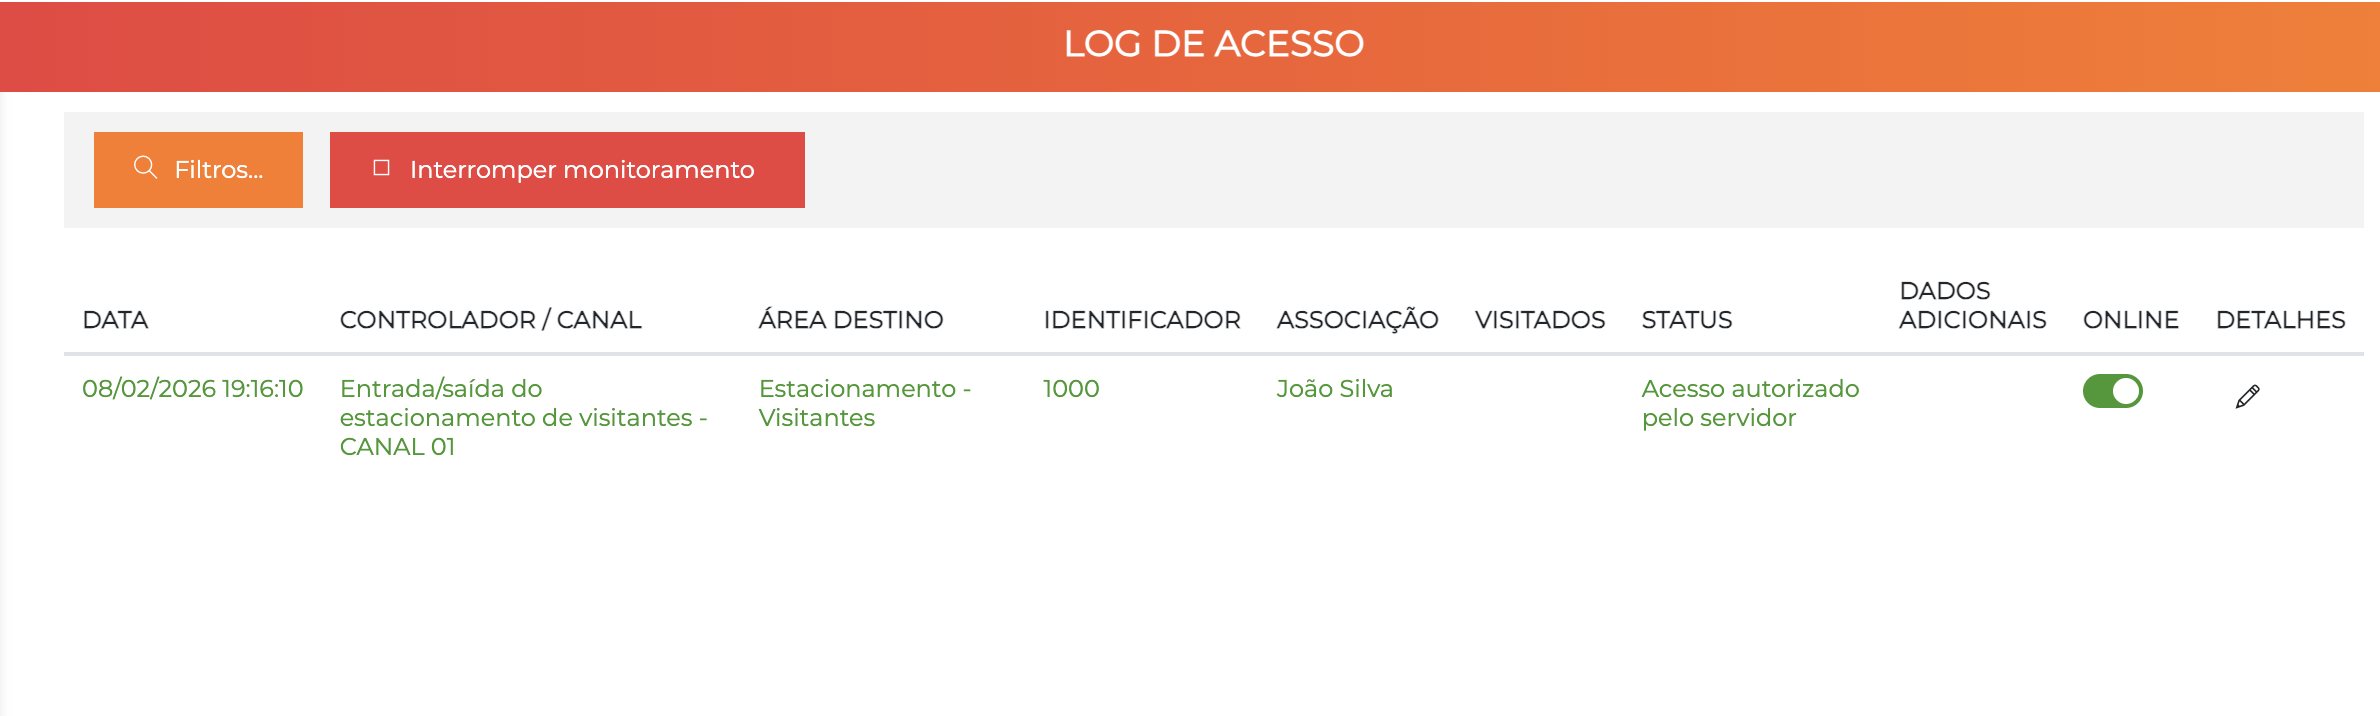
How to Test
- Open the Access Log screen: Navigate to
Logs > Access Log - Keep the screen open in the browser
- Go to the physical reader (controller configured in Step 3)
- Pass the card on the proximity reader
- Observe the screen: The access log will be updated automatically in real time
What You Should See
If everything is configured correctly, the log will show:
- ✅ Status: Access Authorized (green background)
- 👤 Person: John Silva (name of the test person)
- 🎫 Identifier: Number of the card used
- 📍 Origin area → Destination area: E.g., "Reception → Internal Area"
- 🕐 Date/Time: Exact moment of the access
- 🖥️ Controller: Name of the controller/reader used
- 📋 Category: Employees (or the associated category)
The access log is updated automatically as new events occur. There is no need to reload the page!
Troubleshooting
If access was denied (red background), check:
| Check | How to Verify |
|---|---|
| ✅ Person enabled? | Person's record → "Enabled" field checked |
| ✅ Category enabled? | Settings > Categories → category marked as enabled |
| ✅ Category associated? | Person > Categories tab → category associated with current validity |
| ✅ Permission configured? | Category > Access areas → destination area configured |
| ⏰ Correct time? | Check whether it is within the allowed time range |
| 🟢 Controller online? | Settings > Controllers → "Online" status |
| 🎫 Identifier associated? | Person > Identifiers → card correctly associated |
| 💾 Saved changes? | Were all edit screens saved? |
The log will show the specific reason for the access denial. Read the message carefully to quickly identify the problem.
Message examples:
- "Person does not have a valid category"
- "Category does not have permission for the destination area"
- "Outside the allowed time range"
- "Identifier not associated with any person"
In addition to the real-time log, you can consult the complete event history in:
- Dashboard > Last Accesses: Last access events performed by the system
- Person > Access History tab: Specific events of that person
The system records all access events (authorized and denied) for complete auditing.
✅ Configuration Complete!
Congratulations! Your Accelero system is configured and ready for basic use.
Recommended Next Steps
- First Login - Complete reference on login and interface
- Licensing - Check the modules and limits of your license
- Entities and Records - Explore all the system entities
- Features - Get to know the operational features
💡 Important Tip
Golden rule: Always click "Save" before leaving any edit screen!
🔴 What happens if you do not save:
- All changes will be lost
- Settings will not be applied
- Permissions will not work
- Accesses will be denied
✅ Remember to save in:
- Editing areas (advanced settings)
- Editing controllers and channels
- Editing categories (access areas)
- Registering people (category + identifier)
- Any other configuration screen
Tip: Always look for and click the "Save" button before closing or navigating to another page!
Need Help?
- 📖 Complete Reference Documentation
- ❓ FAQ
- 🔧 Support: suporte@iongrade.com