Antennas
Antennas are the BLE signal receivers installed in the site's zones. Each antenna captures the BLE advertisements emitted by the beacons and sends them to the server via MQTT for location calculation — the antenna itself acts as a gateway (BLE → MQTT), with no need for an intermediary device.
Iongrade's field antenna is the Radium Gateway — proprietary hardware. ION Guard is also compatible with third-party BLE gateways — currently the Minew MG4C —, which act as antennas in the same way.
On this page, antenna is the generic term for the Synapsys module's field device. Iongrade's antenna is the Radium Gateway; the Minew MG4C is a compatible third-party gateway. The instructions apply to both, except where indicated (e.g., the scan parameters specific to Minew gateways).
| Antenna | Origin | MQTT configuration | Documentation |
|---|---|---|---|
| Radium Gateway | Iongrade proprietary hardware | Through the gateway's own portal (Communication ▸ MQTT) — see Manual configuration | Radium documentation |
| Minew MG4C | Third-party gateway | Automatic provisioning via the gateway's local HTTP API | — |
Antenna status
| Status | Indicator | Meaning |
|---|---|---|
| Pending | Gray | Registered but has not connected yet |
| Online | Green (pulsing) | Receiving and transmitting signals |
| Offline | Red | Stopped transmitting signals |
| Maintenance | Blue | Temporarily offline for scheduled maintenance |
Antenna list
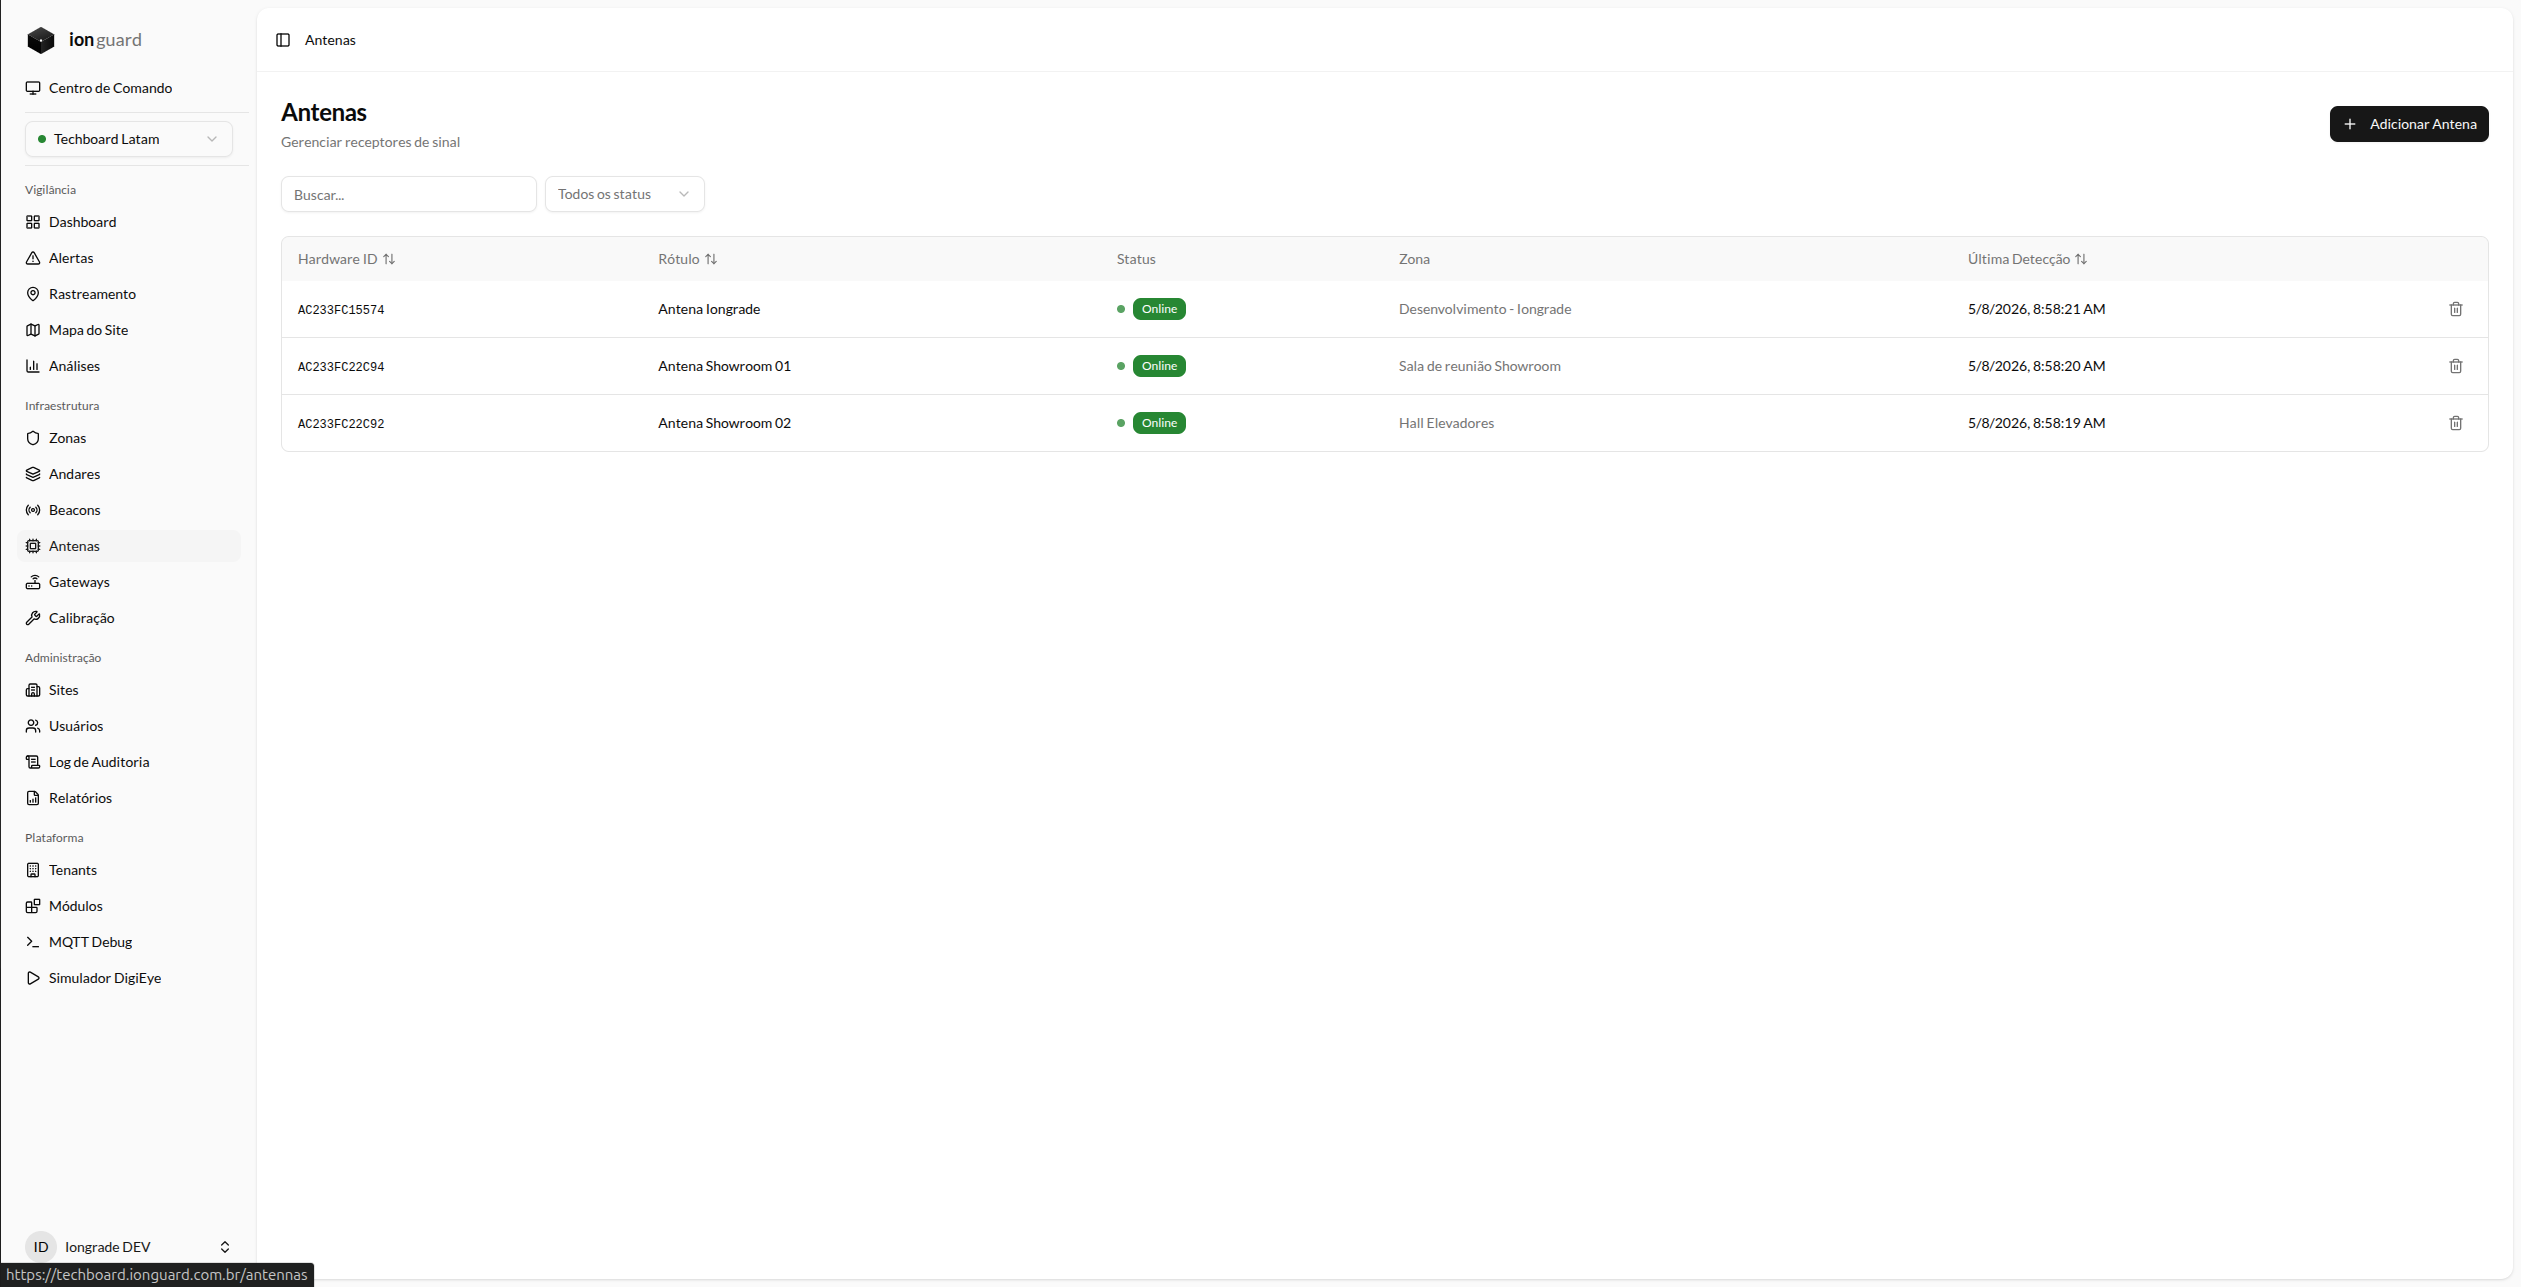
The Antennas page (/antennas) displays all antennas of the selected site:
- Hardware ID — Unique device identifier (MAC address)
- Label — Friendly name
- Status — With a visual indicator (pulsing dot when online)
- Zone — Assigned zone (or "Not assigned")
- Last signal — When the antenna was last seen
Available filters
- Search by hardware ID or label
- Status: Pending, Online, Offline, Maintenance
- Sorting by hardware ID, label, or last signal
Register an antenna
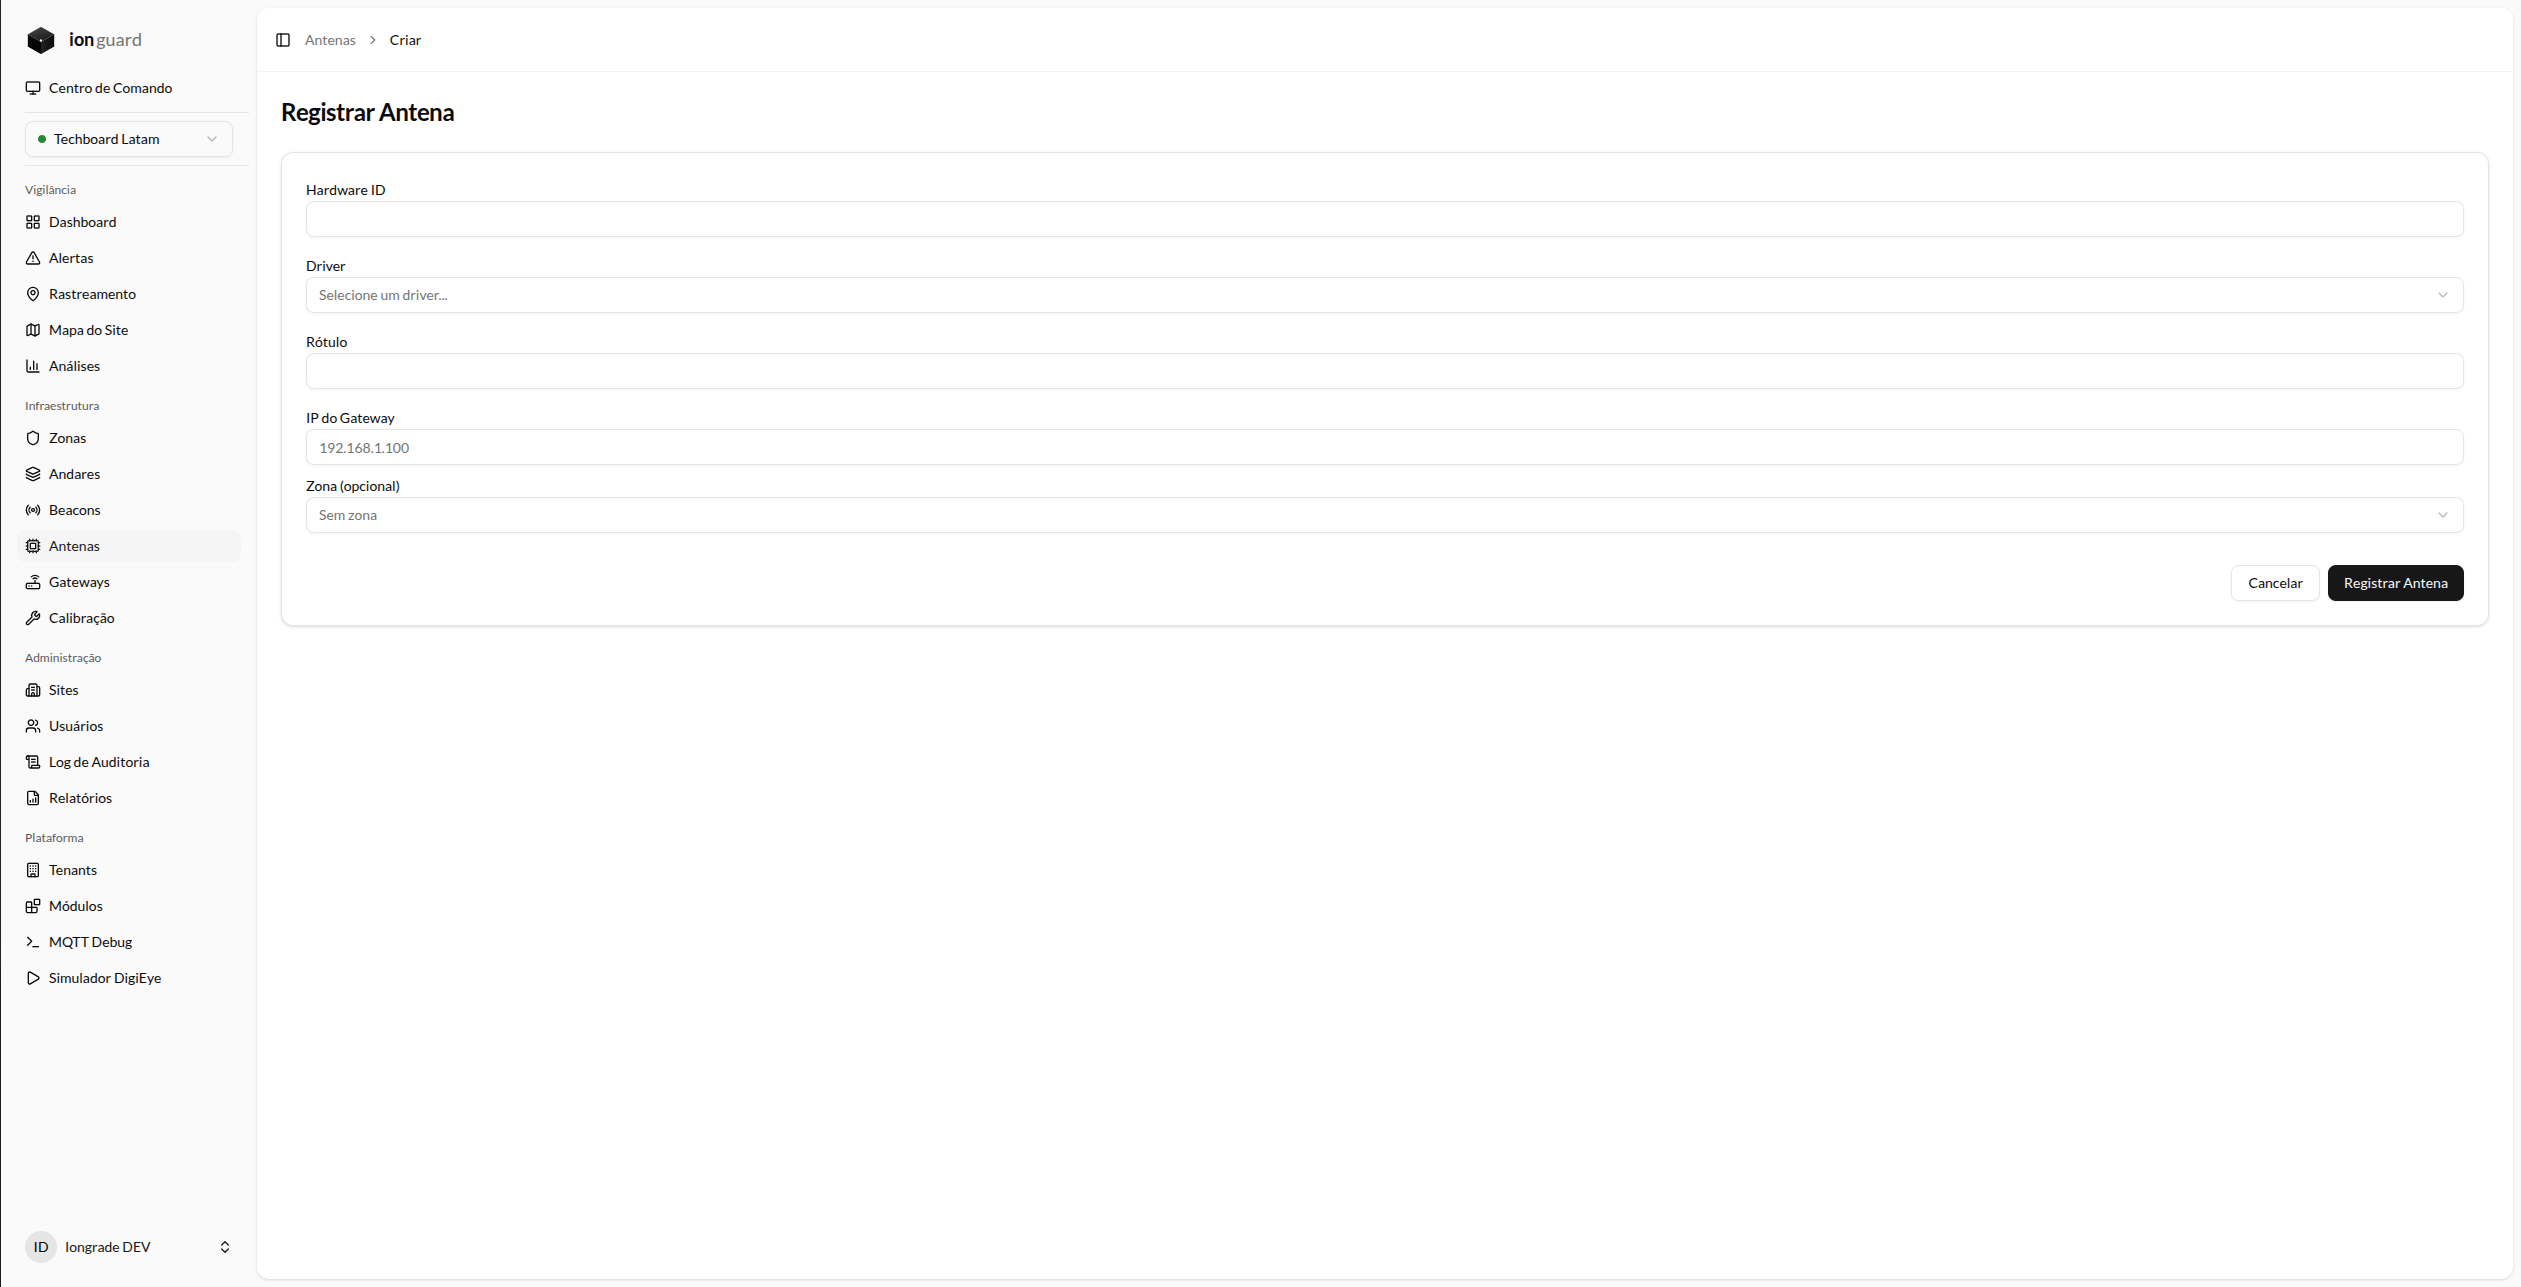
- In the antenna list, click "Add Antenna"
- Fill out the form:
| Field | Required | Description |
|---|---|---|
| Hardware ID | Yes | Gateway MAC address (e.g., AC233FC22C94). Unique per site |
| Driver | Yes | Compatible hardware driver (e.g., Minew MG4C Gateway) |
| Label | Yes | Friendly name (e.g., "Antenna - North Reception"). Max. 255 characters |
| Gateway IP | No | Gateway IP address on the local network (e.g., 192.168.1.100). Required for automatic provisioning |
| Zone | No | Zone the antenna is associated with. Can be assigned later |
- Click "Save"
Check the server's ARP table (arp -a) or the router panel to find the gateway IP by its MAC address. Minew gateways appear with a hostname in the format MG4C-xxxxxx.
Gateway configuration
After registering the antenna, it needs to be configured to send data to the ION Guard server via MQTT. There are two ways to do this:
Automatic provisioning (recommended)
ION Guard can configure the gateway automatically via its local HTTP API. This method is available when the server and the gateway are on the same network (on-premises installations).
Automatic provisioning relies on the gateway's local HTTP API and is currently available for Minew MG4C gateways. On the Radium, by design, the network and broker configuration is done only through the board's own portal — never remotely —, precisely so that a remote command cannot lock the gateway out of the network. Use manual configuration.
- On the antenna details page, verify that the Gateway IP field is filled in
- Click the "Provision Gateway" button
- The system checks whether the gateway is reachable and displays its information (model, version, battery)
- Confirm by clicking "Provision"
Provisioning automatically performs:
- Generation of unique MQTT credentials (username + password)
- Sending the full configuration to the gateway (MQTT broker, topics, scan parameters)
- Rebooting the gateway to apply the settings
After ~10 seconds, the gateway reconnects to the MQTT broker and starts sending data. The status changes from Pending to Online.
When you re-provision an antenna that has already been configured, the previous credentials are invalidated. The gateway will automatically receive new credentials.
Manual configuration
For gateways that are not reachable over the network (e.g., SaaS installations where the server is in the cloud), configuration must be done manually:
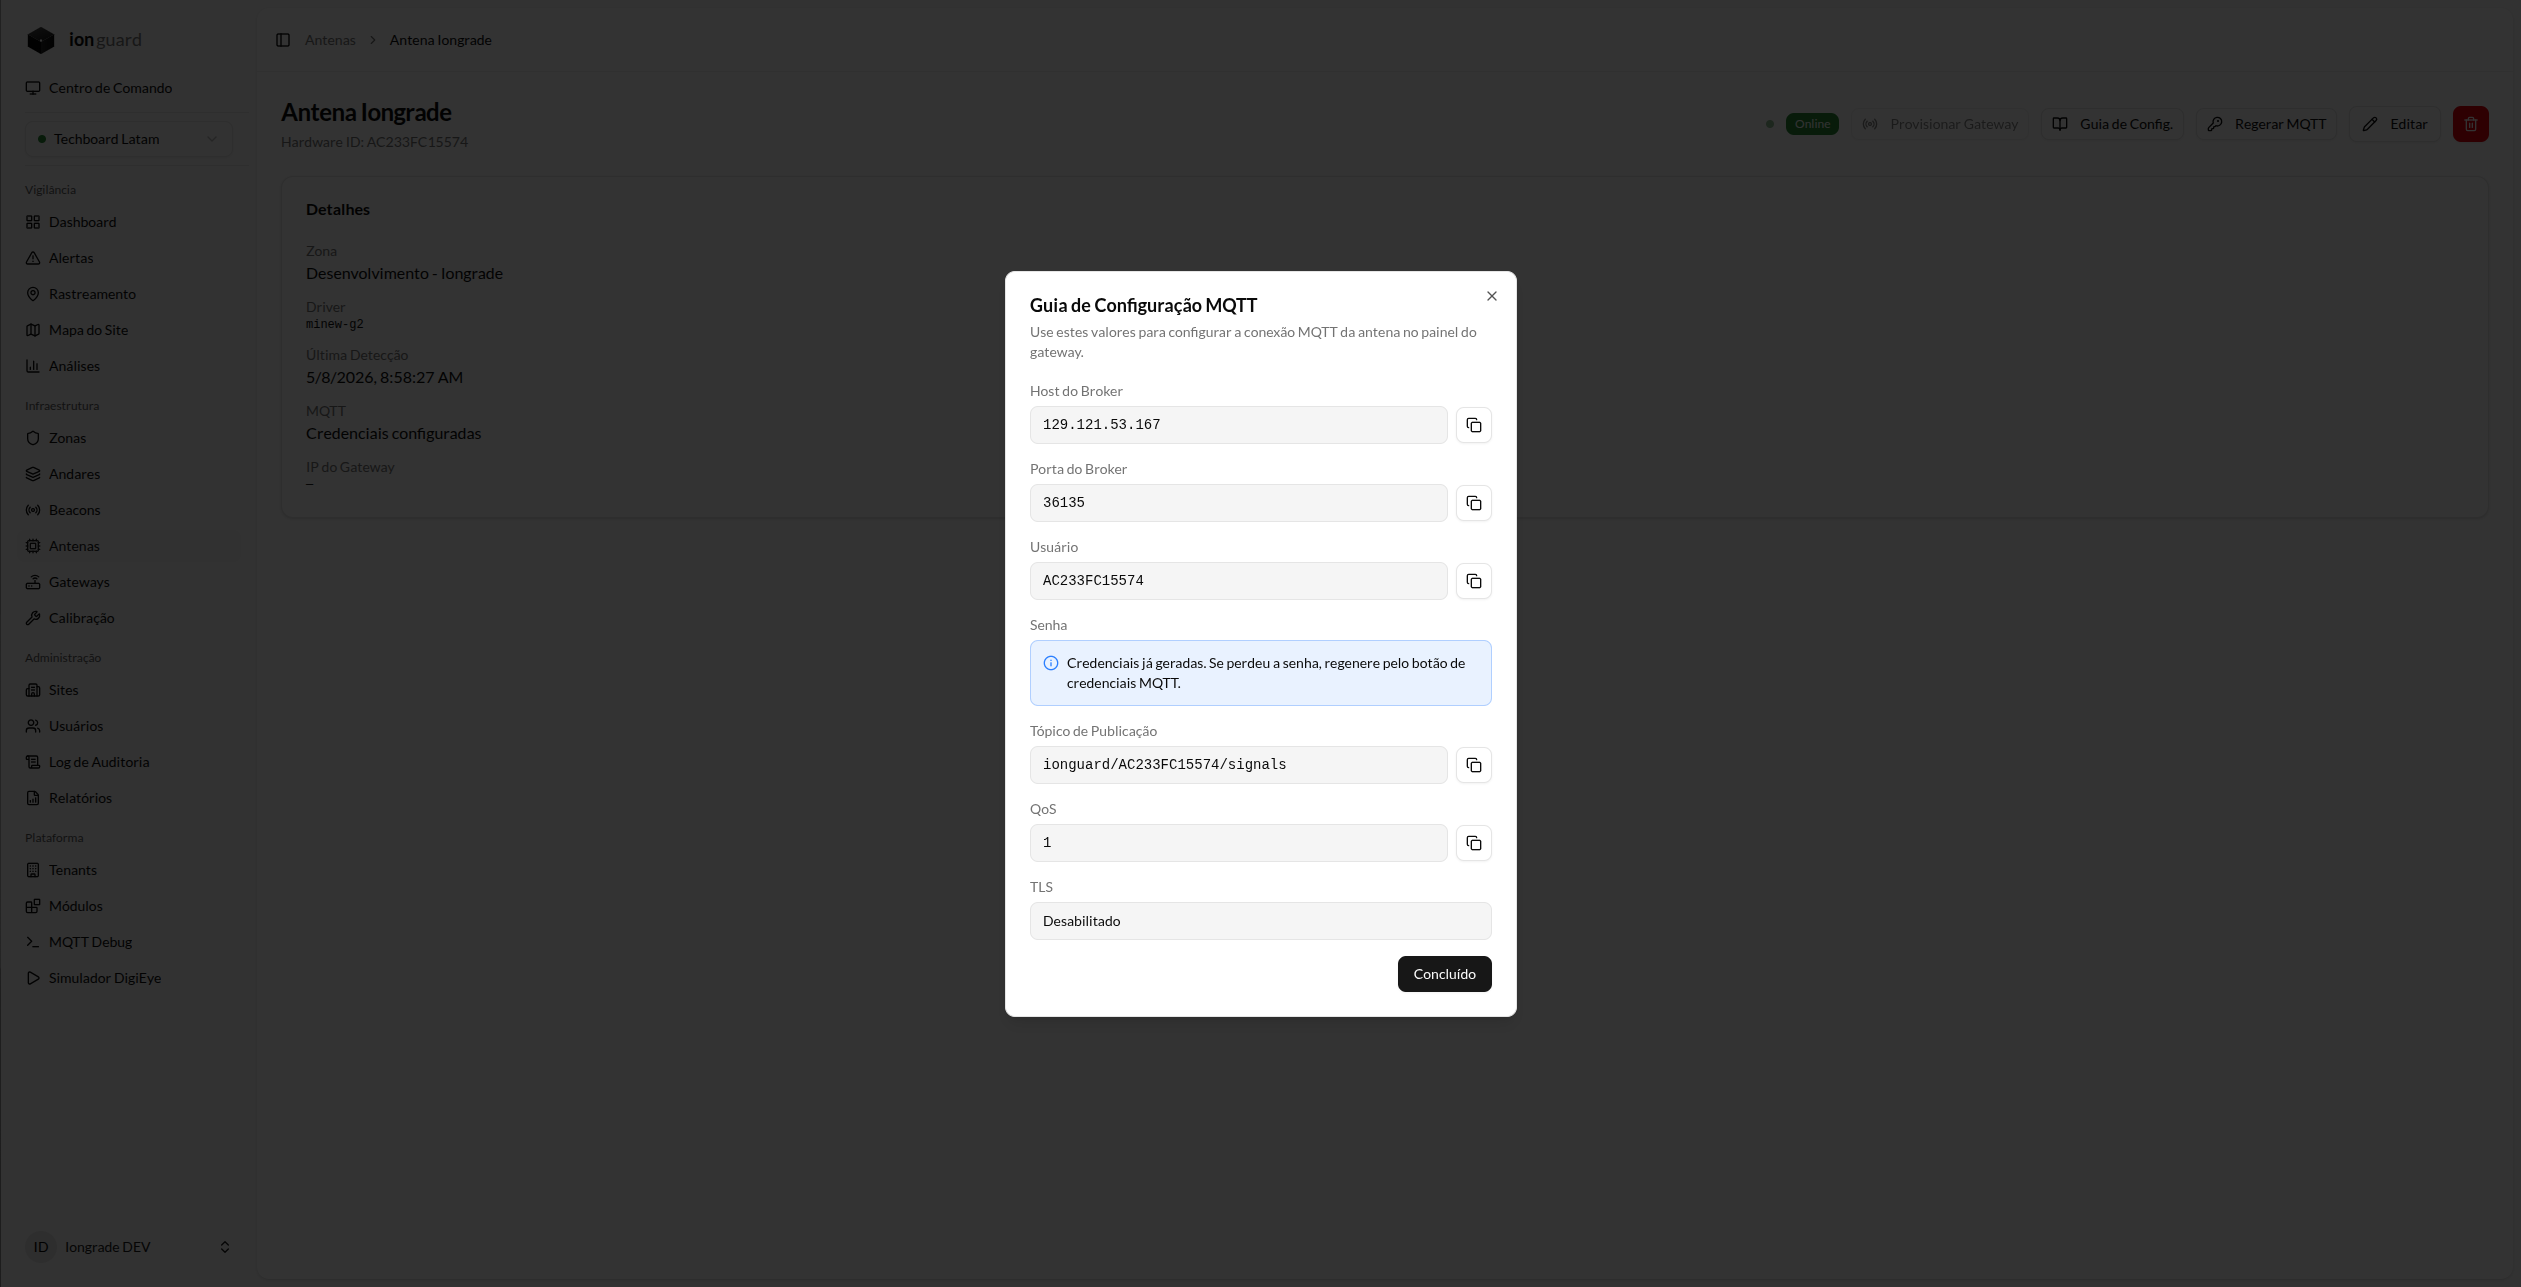
- Click "Generate MQTT Credentials" to obtain a username and password
- Click the MQTT info button to view the connection parameters
- Access the gateway's web interface (e.g.,
http://192.168.1.100) and configure:
| Parameter | Value |
|---|---|
| MQTT URL | mqtt://{ip-do-servidor}:{porta} |
| Client ID | Antenna hardware ID (e.g., AC233FC22C94) |
| Username | Value generated by the system |
| Password | Value generated by the system |
| Publish Topic | ionguard/{hardware_id}/signals |
| Subscribe Topic | ionguard/{hardware_id}/to |
| Response Topic | ionguard/{hardware_id}/from |
| QoS | 1 |
| Keep Alive | 30 seconds |
The MQTT password is displayed only once at the moment it is generated. If you lose it, generate new credentials.
On the Radium Gateway
On the Radium, the portal is served by the board itself: enter configuration mode by holding the magnet near the magnetic sensor, connect to the gateway's WiFi network and open http://192.168.4.1 — the full procedure is in the Radium Installation Manual.
The parameters generated above are entered under Communication ▸ MQTT (field reference):
| ION Guard parameter | Where to enter it on the Radium |
|---|---|
| MQTT URL (host and port) | Connection type = Manual, fields Broker and Port |
| Username / Password | User and Password |
| MQTT over TLS (port 8883) | Security = TLS (or mTLS), with the TLS version and CN/SAN verification |
| Keep Alive | Communication ▸ MQTT — Telemetry, field Keep-alive |
The Radium's MQTT page does not expose topic fields (publish/subscribe/response) — they are defined by the firmware. Use the Test button on the MQTT page to confirm the connection before leaving the portal.
Scan parameters (Minew gateways)
Automatic provisioning configures the following default BLE scan parameters:
| Parameter | Value | Description |
|---|---|---|
| Upload Interval | 5s | Interval for sending data to the server |
| Scan Interval | 100ms | Interval between BLE scans |
| Scan Window | 100ms | Scan window (100% = continuous scan) |
| Active Scan | Yes | Captures advertising + scan response packets |
| RSSI Filter | -90 dBm | Ignores signals weaker than -90 dBm (noise) |
| MAC Filter | ^AC233F.*|^C30000.* | Filters only Minew beacons |
| NTP Server | br.pool.ntp.org | Brazilian time server |
| Timezone | UTC+3 | Brasília time |
Equivalents on the Radium Gateway
The Radium has the same parameters, but they are set in the board's portal — and none of them are pushed by ION Guard:
| Parameter | Where it lives on the Radium | Factory default |
|---|---|---|
| Upload Interval | Communication ▸ MQTT — Telemetry, Send interval | 1 s |
| Scan Interval / Scan Window | Hardware ▸ Bluetooth | 100 ms / 80 ms |
| Active Scan | Hardware ▸ Bluetooth, Active mode | — |
| RSSI Filter | Hardware ▸ Filters, Minimum RSSI | -90 dBm |
| MAC Filter | Hardware ▸ Filters, MAC filter (prefixes) | Empty (passes everything) |
| NTP Server / Timezone | Hardware ▸ Time | ntp.iongrade.com.br · UTC-3 |
On the Radium, enter only the beginning of the MAC, separating multiple families with | — e.g., AC233F|C30000. The ^AC233F.*|^C30000.* form used on Minew gateways is also accepted for compatibility: the ^ and the .* are simply ignored.
Zone assignment
The zone assigned to an antenna determines which zone the Location Engine considers when that antenna receives a beacon signal. Therefore:
- Each antenna must be assigned to exactly one zone
- A zone can have multiple antennas (improves accuracy)
- Antennas without an assigned zone do not contribute to location calculation
To assign or change the zone, edit the antenna and select the zone from the dropdown.
Antenna details
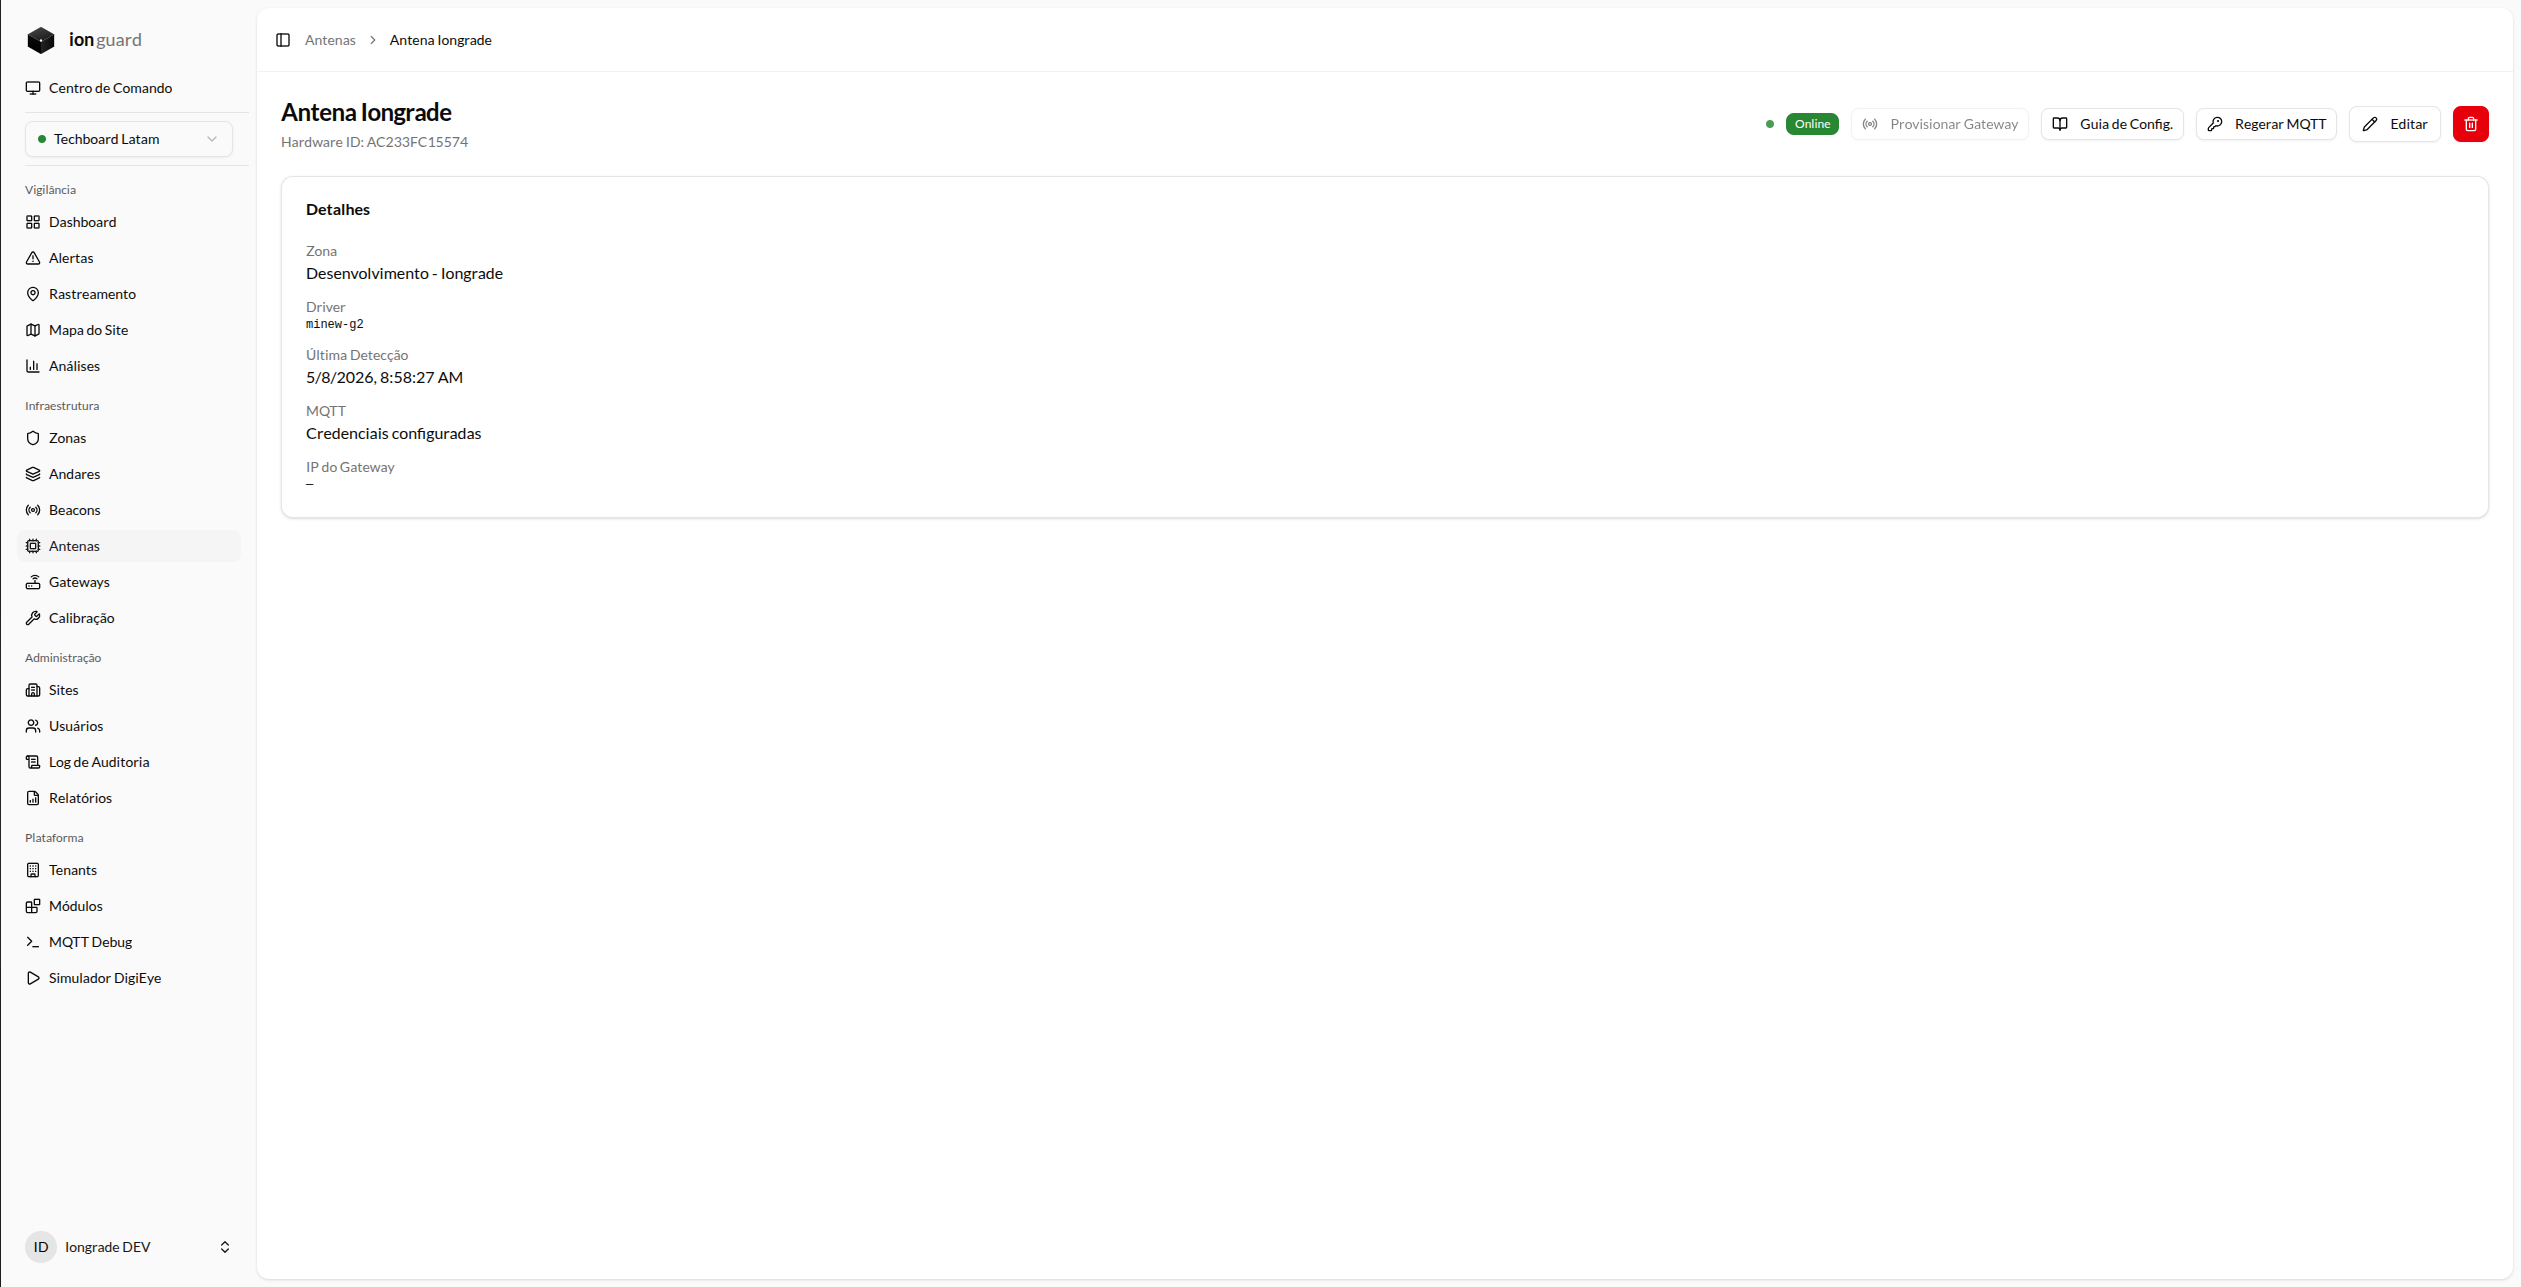
When you click an antenna, the details page displays:
- General information — Label, hardware ID, driver, status, assigned zone
- Gateway IP — IP address on the local network
- Gateway Status —
Configured on {data}when provisioned - MQTT Configuration — Connection data for reference
Available actions
| Button | Function |
|---|---|
| Provision Gateway | Automatically configures the gateway (generates credentials + sends config + reboot) |
| MQTT Guide | Displays the MQTT connection parameters for manual configuration |
| Generate Credentials | Generates or regenerates MQTT credentials (without configuring the gateway) |
| Edit | Changes label, zone, and gateway IP |
| Delete | Removes the antenna and its MQTT credentials |
Edit an antenna
On the details page, click "Edit". You can change:
- Label — Friendly name
- Gateway IP — IP address on the local network
- Zone — Assign, change, or remove the zone
Delete an antenna
In the list or on the details page, click "Delete". A confirmation dialog appears. Deleting disassociates the antenna from the zone and removes the record.
Troubleshooting
Gateway does not connect after provisioning
- Check whether the gateway restarted (the LED blinks during boot)
- Wait ~15 seconds for the MQTT connection to be established
- Check the MQTT logs:
docker logs ionguard_mosquitto_{deploy} | tail -20 - Confirm that the firewall allows the MQTT port (1883)
"Provision" button disabled
The button is disabled when the Gateway IP field is not filled in. Edit the antenna and add the IP.
Diagnosing from the Radium itself
The Radium signals the problem on its status LED before you even look at the server: red with 1 blink = no network interface up; 2 blinks = MQTT down (broker unreachable); 5 blinks = clock not synchronized. The full table is in the Installation Manual.
In the board's portal, the Info ▸ Diagnostics page lists connection errors (MQTT, NTP and internet drops) and the Network tools page runs ping, DNS and traceroute from the gateway itself.
The Radium keeps scanning and storing signals while the broker is down, and republishes them with the original timestamp when the connection returns — panic events first. See offline buffer.
Gateway responds but does not send data
- Check whether the MQTT credentials are correct:
docker logs ionguard_mosquitto_{deploy} | grep {hardware_id} - If "not authorised" appears, generate new credentials via provisioning
- Check the MAC filter (
regex_mac) — only Minew beacons (AC233F*) are captured by default